Table of Contents
This document is for app providers who want to place their product clearly visible for a broad, professional and growing user group. It covers the steps on how to make the product available as an app for Univention App Center.
Univention App Center is an ecosystem similar to the app stores known from mobile platforms like Apple or Google. It provides an infrastructure to build, deploy and run enterprise applications on Univention Corporate Server (UCS). The App Center uses well-known technologies like Docker.
The ecosystem consists of the following components:
For building an app the app developer works with UCS, the app, the App Provider Portal and the Test App Center.
This chapter describes the requirements and the steps to create an app for Univention App Center. After reading this chapter an app provider will be able to create their own app and start with a development and test cycle using the Test App Center.
The software needs to be provided as a Docker image. This
is the easiest way to deploy software in Univention App Center.
It is also recommended to publish the Docker container to
Docker hub. This
makes referencing the image later much easier and simplifies
the development and test cycle during development. If public
access to the image is not wanted, it can be made private and
granted access to the Docker Hub user
univention. In this case, the image has
to be copied manually by the App Center team to the Univention
Docker registry.
The image must have a version tag to distinguish different software versions. It later allows updates for the apps.
The App Provider Portal is the app developer's place for self service for all the settings around the app.
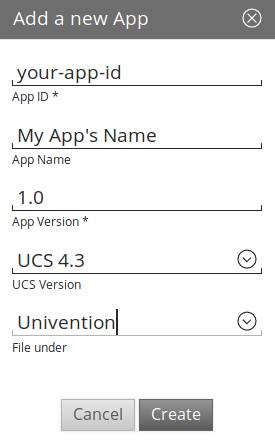
This section describes how to create the app in the App Provider Portal and use a Docker image. It focuses on a single container setup. For a setup with multiple containers with Docker Compose please see Section 2.3.
Click on and provide the following settings.
univention/ucs-master-amd64:4.2-2.
Please add the version tag explicitly. The App Center distinguishes different app versions and handles updates accordingly.
The App Center does currently not support multi container setups. The container needs to include all services needed for the software, except the database. The App Center takes care of providing a database management system directly on the Docker host that can be used by the Docker container. Supported are MySQL and PostgreSQL. See Section 2.2.8.
Upon app creation the UCS Version has been
specified. Please define the supported UCS version explicitly
on the tab in the section.
Example: The app has been created for UCS
Version 4.2. The two
entries for
can be made: 4.2-3 and
4.3-0. This means that for the
installation of the app UCS 4.2-3 or UCS 4.3-0 are required.
On the app's tab please provide a description in English and logos for the software. Start with a short and a long description. It gives an impression on how it will look like during later testing.
On the same tab two logos can be uploaded: A default icon that is shown on the app tile in the overview. For optimal presentation it should be more of a square ratio. The second can be more detailed and can for example include the software name. Please provide the logos in SVG format.
Those settings can be changed later. For a more detailed description of the app presentation and notes on the translation, please take a look at Chapter 4.
In order to get the usual Docker images working, some settings in
the App Provider Portal have to be changed. In the
section on the
tab all Docker script drop-downs need
to be changed to Disabled, unless a
Custom script shall be provided.
By default files created inside a container are stored in it, but they don't persist when the container is no longer running, removed or is exchanged with a newer version. As solution Docker offers volumes, a mechanism for persisting data generated and used by Docker containers. A volume is a directory on the Docker host that is mounted inside the Docker container.
To define volumes for the app, please go to the section on the tab. Add an entry for each volume and define the directory or file path on the host in the first field and the destination in the container in the second field. Leave the second field empty for the same path.
For example:
Host: /var/lib/app_etc
Docker container: /etc/app
Many Docker apps expose a web interface to the outside world, e.g. via the port 8080. The App Center on UCS takes care to map this web interface from some relative link to this port and adds a reverse proxy configuration to the host's webserver configuration.
In the section on the
tab in the app, enter the relative
path and which ports should be proxied. For example, to map
the container's ports 80 and 443 to
/myapp, the following settings have to
be made:
Relative URL to web application:
/myapp
HTTP port of web application:
80
HTTPS port of web application:
443
Supported protocols by the container's web
                                interface
: On the tab
in the section
, select
HTTP and HTTPS, if both
protocol schemes should be covered.
If the app needs to occupy ports on the host that need to be passed along to the container in order to work properly, they can be defined in the section on the tab. A list of ports can be defined that the Docker host shall exclusively acquire for the Docker container. Ports defined here cannot be used by other services or other Docker containers on the UCS host.
For example, the solution exposes API under the dedicated port
5555. This port would be predestined to
be defined here.
With the port definition the App Center also takes care to open them in the UCS firewall. If additional ports are needed, the can be defined in the app join script. Please the Network Packet Filter section in the UCS Development Reference.
Many applications need a relational database management system (RDMS) somewhere in the environment to function properly. If the app needs such a database the App Center takes care of providing one directly to the Docker host. In two sections on the tab the appropriate settings can be made.
In the section the settings for the database are defined. MySQL and PostgreSQL are supported. Database user, database name and the path to the password file can be specified. Upon installation of the app, the App Center installs the defined database on the Docker host, creates a database with the defined settings and saves the password in a file for later use.
In the for the
mapping of the database settings to the environment variables
in the container are defined. For example, if the container
expects the database hostname in DATABASE_HOST,
it has to be entered into the field . There are also
fields for the database port, user, password, database name and
the password file.
Docker images usually receive environment variables when the container is started. The App Center supports to pass static configuration options to the container. Variables parameterized by Univention Configuration Registry variables are also supported. An environment file can look like the following example:
LDAP_SERVER=@%@ldap/server@%@
FQDN=@%@hostname@%@.@%@domainname@%@
HOME=/var/lib/univention-appcenter/apps/myapp/data/myapp_home
The content of the environment file can be entered in the App Provider portal on the tab, in the section in the field for .
Starting with UCS 4.3-2 errata 345 Univention App Center supports apps that consist of multiple docker images. It uses Docker Compose, a tool for defining and running multi-container Docker applications. The heart of such applications is a YAML file that configures all services for the application. The supported compose file format version is 2.0.
In order to create a Multi Container App, go to the
tab in the App Provider Portal, scroll
down to the section and enter the
content of your docker-compose.yml file. A
"flat" YAML file must be used, because the implementation does
currently not support references to other files like for
example files that should be mounted inside a container.
You also need to define the below the .
In order to provide access to the application's web interface, please see Section 2.2.6.
If the app setup requires exclusive ports and a list of ports needs to get forwarded from the host to the container, please see Section 2.2.7.
The App Center allows several scripts to be executed on the host and inside the container during installation (Section 6.1), uninstallation (Section 6.2) and upgrade (Section 6.3). Scripts run inside the container are run inside the container of the "main service".
Before a Multi Container App is started by the App Center, the
docker-compose.yml is altered by the App
Center with the following changes:
docker-compose.yml is adjusted on
the server side and the Docker Image information is
changed to point to the Docker Images in the
Univention Docker Registry. All Docker Images from
published apps are copied to the Univention Docker
Registry to be independent of Docker's own
infrastructure. This is the only server-side change
to the Docker Compose file.
/var/lib/univention-appcenter/apps/$appid/data
and
/var/lib/univention-appcenter/apps/$appid/conf
directories on the UCS host. If volumes are defined
in the App Provider Portal in the App
Configuration, these are also supplemented in
docker-compose.yml by the App
Center for the main service.
docker-compose.yml. Ports that
have already been defined continue to exist. If the
same port is defined in the portal and in
docker-compose.yml, the
configuration in the App Provider Portal takes
precedence. For example, if
docker-compose.yml states that
port 4500 is provided externally as port 4500, but
the portal defines that this port is to be used as
6500, docker-compose.yml will be
modified to map port 4500 to 6500 on the host.
docker-compose.yml specifies
that port 80 or 443 should be opened to the outside
and the App Configuration specifies that these
ports should be used by the App Center for the web
interface, the App Center will define a port on the
fly define it in
docker-compose.yml. This is
because UCS hosts usually occupy ports 80 and 443
with a web server. The App Center creates an Apache
Reverse Proxy configuration. See section Section 2.2.6 for details.
docker-compose.yml in
the environments section.
/etc/univention/base.conf, as
well as the password for the so-called machine
account under
/etc/machine.secret.
As a result, Docker Compose starts a configuration on the
UCS system that no longer matches 100% of the App
Provider's input. The modified
docker-compose.yml can be found at
/var/lib/univention-appcenter/apps/$appid/compose/docker-compose.yml.
This chapter relates the life cycle of an app from the first app development, its life in the public to termination. The life cycle applies to the app overall and to every single version.
Every app starts with its development. It involves the definition of the app in the App Provider Portal, providing the software solution as a Docker image (see Chapter 2) and the integration of the solution with UCS, for example in the identity management area (see Chapter 5). This part of the life cycle can be divided into two steps: setup and integration.
Testing the app is the final part of its development. It typically involves a combination of manual and automatic tests. In order to test the app with UCS, please follow these instructions.
Download UCS to get a copy of UCS free of charge from the Univention website. Choose an ISO image or a pre-installed virtual machine image for various virtualization hypervisors, like for example VMware (ESXi and Workstations), VirtualBox and KVM.
Please refer to the UCS Quickstart Guide for the first steps about installation and initial setup.
Switch to the Test App Center Repository and test the app directly on the UCS system set up before.
univention-install univention-appcenter-dev
univention-app dev-use-test-appcenter
Up until here, the app is available in the Test App Center and a UCS system is up and running that is configured against the Test App Center. The app can be installed via the Univention Management Console. UMC consists of several modules and one of them is called . Open this module and install the app from there.
The following points are mandatory for the App to be published:
When installing the App, also mind README information that may have been defined on the in the app in the App Provider Portal. An Administrator expects an app to be fully configured after the installation. If something is needed in order to use the app (e.g., activating users for the service), it should be described in the appropriate README section (see Section 4.7).
Once several versions of the app exist, the upgrade should be tested, as well. The App Center UMC module only allows the installation of the latest app version. To test an upgrade of the app, please go to the console and install a version explicitly:
univention-app install myapp=1.0
Afterwards, go back to the App Center UMC module. There, the app should show up with the update symbol indicating the availability of an update. Continue and perform the app upgrade.
To switch back to the productive App Center, please run:
univention-app dev-use-test-appcenter --revert
Univention always runs automated tests on an app before it is released. This testing infrastructure can be used by the app provider to increase the test coverage for the app. This can save manual testing efforts.
A test script for the app can be provided in the tab. The script needs to be entered in the text area . It is run together with the automatic app tests in the Univention test infrastructure and will be executed after the app has been installed during those tests.
The App Provider Portal offers an example for how the test script should look like and an example for how the test script can be tested on a UCS system. On successful tests, the script has to end with exit code 0.
For certain tests user credentials for access to the directory
service are needed. They are passed with the parameters
binddn and bindpwd. In many
cases the user Administrator is used.
During app development or for problem analysis it is necessary to debug an app. If an app installation fails, the App Center removes the docker container and thus prevents the developer to have a deeper look into what happened. With the following command the App Center will not throw away a failed app installation. The container is kept on the system.
univention-app install myapp --do-not-revert
For debugging or support cases it can be helpful to enter the app container. The following command opens a shell in the container.
univention-app shell myapp
If the container does not support a shell, the container can be entered with the plain Docker commands.
CONTAINER="$(ucr get appcenter/apps/myapp/container)"
docker exec "$CONTAINER" ...
Important logfiles on the UCS host for debugging are:
/var/log/univention/appcenter.log/var/log/univention/management-console-module-appcenter.log/var/log/univention/join.log/var/log/docker.log
Testing the app also involves giving an approval for the release of the app. Each app in the App Center requires a two-way approval, one from the app provider and one from Univention. The app provider starts with the process and performs the tests to give the approval for its app.
The app provider's approval is given by clicking on in the App Provider Portal. The Univention App Center team is notified and they will start the automated tests. As soon as the automated tests are successful, the second approval is available and the app is ready to be released.
The automated tests conducted by Univention test for installation, un-installation and re-installation of the app for different UCS system roles. They check for proper operation of the UCS services. No app functionality will be tested. The tests are for ensuring that the app does not break UCS functionality.
Besides the technical testing, the first release also undergoes a manual review process on the app presentation. The app description is checked for plausibility, understandability and for the App Center context.
As soon as the app is ready for release, it is copied to the productive App Center by the Univention App Center team. This involves the app's presentation material as well as the Docker image. Univention maintains an own Docker registry. The Docker image is copied to that registry and the reference to the Docker image is updated accordingly in the app definition. The app will be visible in the App Center UMC module immediately for all UCS users. The app catalog is updated automatically and shows the new app.
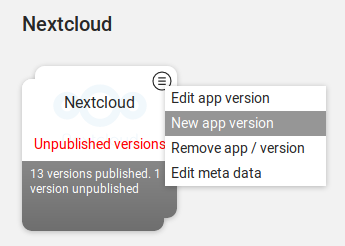
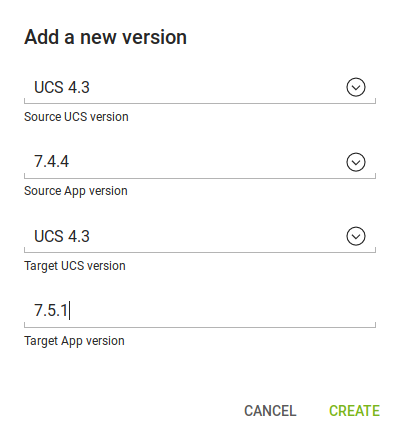
After the release of the first version the app enters "maintenance mode" and receives updates from the app provider. The evolution of an app is represented by its version. In order to provide an update for the app, follow these steps:
If the app provider decides to discontinue an app and stop
maintenance, the app can be terminated by setting it end
of life. As soon as an app is published in status
end of life, UCS system administrators won't be able to install it
anymore. UCS systems that already have the app installed, will show
a notification in the App Center that informs the UCS system
administrator that they should look for alternative solutions.
App versions are not explicitly terminated. They are superseded by the next version. The termination applies to the whole app.
The app can be terminated by going to the app's configuration in
the App Provider Portal. Please go to the
tab to the section . Create a new custom entry with the
Custom key EndOfLife and
the Custom value True.
Afterwards press and
. Please provide a custom message in
the publish dialog and let the App Center team know about the
reasons for the termination.
An app is configured via the App Provider Portal, which offers a web interface. There is also an upload interface available. If the developer prefers to keep the app configuration in a version control system, the upload interface offers a good way to push changes for the app to the Test App Center. The script can also be used in non-interactive mode within other scripts. In such cases username and password should be stored in separate files (no new line at the end) that are passed as parameters.
The scripts needs to be downloaded from https://provider-portal.software-univention.de/appcenter-selfservice/univention-appcenter-control. It requires Python 2.7 and cURL to run. For a list of available actions and their parameters, use the script's help:
./univention-appcenter-control --help
./univention-appcenter-control upload --help
The following examples show how the script can be used.
# creates a new version based on the latest version of myapp
./univention-appcenter-control new-version 4.3/myapp

# finds out on which UCS versions this Docker App may be installed
# Note: jq is an external tool: apt-get install jq
# you may parse JSON without it, of course
./univention-appcenter-control get --json 4.3/myapp | jq '._ini_vars.SupportedUCSVersions'

# creates version 2.0 of myapp based on the (formerly) latest version
./univention-appcenter-control new-version 4.3/myapp 4.3/myapp=2.0

# sets the DockerImage of the new app
./univention-appcenter-control set 4.3/myapp=2.0 --json '{"DockerImage": "mycompany/myimage:2.0"}'

# copies myapp Version 1.0 from UCS 4.2 to UCS 4.3.
./univention-appcenter-control new-version 4.2/myapp=1.0 4.3/myapp=1.0

# uploads all README files in the current folder to the latest version
# myapp in UCS 4.2
./univention-appcenter-control upload 4.3/myapp README*

# uploads an image. Will be rejected if this image is not specified somewhere
# in the ini file. Note: This may overwrite the logo for other
# version using the same logo name, too.
./univention-appcenter-control upload 4.3/myapp=1.0 myapp.svg
This chapter is about how the app is presented to the user with texts, logos, screenshots and videos. The contents are part of the app configuration. They are shown to the UCS system administrator in the App Center UMC module in UCS and to users on the Univention website in the App Catalog.
All logos uploaded to the App Provider Portal have to be SVG format, which is most flexible for the presentation purposes.
When SVG files are created or exported, please make sure that fonts are converted to paths before export. Otherwise the text in the logos is not rendered properly and the logo may look odd.
Please also do not simply import a bitmap graphic into SVG and export it. Results after scaling may not look good, because the logo is basically a bitmap in SVG apparel.
The logos can be uploaded on the tab in the section. Two icons are needed: One for the app tile on the overview page and a more detailed logo for the app page. The tile has only limited space in square format. Please make sure, the logo can still be recognized. The detailed logo is not limited. Most logos for this slot have a landscape orientation. The App Center and the App Catalog take care of the appropriate scaling. SVG allows a very good result due to its nature as a vector graphics format.
Screenshots and videos are a good way to introduce the solution to the user. To add screenshots please go to the tab for upload. Screenshots can be in PNG or JPG format. Videos have to be published on YouTube and the full YouTube link has to be provided in the App Provider Portal. Please keep in mind that the screenshots and videos in this tab must be for an English speaking audience.
If the same screenshots exist in German, it is recommended that they are added, as well, in the tab in the section.
Comprehensive visualizations can be added optionally which make it easier to understand the app's description. Give the image files sensible names including the keywords. An example of a bad file name for an image would be “app_76bz3.jpg”, whereas “app_name.jpg” would be much better.
The description is the text introducing the solution to the user and thus is very important for getting their attention. Here are some tips intended to help to present the app in a user-friendly, customer-oriented, and search-engine-optimized manner.
The description is provided in HTML format. If more control on the HTML is needed, switch to HTML source mode and edit the HTML directly.
Custom styles in CSS should not be used, because they may distract from the overall impression. The App Center UMC module and the App Catalog already have respective CSS style definitions.
The length of the description depends on how much there is to say and how much explanation the app requires. Ideally the description should be at least 300 words long. The text should be structured and paragraphs should be used to make it easier to read. The target group are potential customers. Subheadings (HTML: h2, h3) should be used to divide the text into logical sections. It is very helpful for the reader to be able to see the advantages of the app and its combination with UCS at a glance. For this reason, presentation of the advantages in lists (HTML: ol, ul, li) is particularly practical.
If links are used in the app description (e.g., to pages on
the solution's own website), please always use the
target="_blank" (open in new tab) and assign
the link a title attribute. Please keep the use of links to a
minimum and ideally use the fields provided especially for this
purpose in the app metadata.
On the tab the app can be given one or more categories from a given set. Users can filter the app overview in the App Center and in the App Catalog accordingly. App categories help to group apps together by topic and give a better overview for the various apps available.
For the users it is important to know who is the producer of the
app. For this purpose there is the tab
in the App Provider Portal. Please provide Gerneal product
contact information like an email address and a
website to the solution. Please also link to a website, where the
app provider's support options and pricing is explained to
potential customers and place the link in the field Website
with information regarding support options.
On the tab license information can be defined; for example, a license agreement. This should be read by a UCS system administrator and has to be accepted before the app is installed. If the text is not accepted, the installation process is aborted and no app is installed. The license agreement is mostly used by app providers for legal information that needs confirmation by the administrator before anything is installed. If such a text is not needed, leave it empty.
UCS system administrators have to register with a valid email
address in order to use the App Center. If the app provider
configures an email address in the field E-mail address for
App install notifications it receives information on a
daily basis about who installed the app. The App Center UMC
module informs the user that the app provider may contact them. App
providers can use the address, for example, for lead management.
The last setting is intended to provide the users a rough imagination about the license type of the software. One option best fitting to the solution should be chosen:
Empty: If no value is given, the
App Center UMC module and the App Catalog will show the
text "Please contact the App provider for further
license details".
Free commercial use
Free commercial use. Some functions or
                            services are liable to costs.
Liable to Costs with Free Trial
Liable to Costs
In the tab additional information for an app can be provided that show up at certain stages of the app life cycle. README files are also in HTML like the description and content can be provided the same way (see Section 4.3). The App Provider Portal describes when each README file shows up.
It is highly recommended to use the README files to show information that should not go in the app description, like for example configuration details, hints before and after an update, etc. Please also keep in mind to provide a proper German translation.
All texts, screenshots and videos should be entered in English. Translations to German should be only made on the tab. It should be made sure that translations for the texts that have an English version are provided. Otherwise, English text will show up for a user with German language settings. Each translation consists of a set of two texts, the English version first and second a text field for the German translation.
Apps can be awarded with different badges and are therefore especially highlighted in the App Center. One of those badges is the "Recommended Apps" award for the use in professional environments. Apps with the "Recommended Apps" award meet the below listed quality criteria. The functional scope of the software solution is not evaluated. The award is assigned by the Univention App Center Team and the criteria serve as decision guidelines.
One of the UCS's key features is the integrated identity management (IDM). With this central identity management, users benefit, among other things, from a single login independent of which services or systems they use. It is highly recommended to integrate the app into the identity management system.
If the app should benefit from the identity management, the flag should be activated in the App Provider Portal on the . This extends the IDM by a checkbox and an administrator of the UCS system can activate or deactivate each user individually for the app. The setting can then be found in the Users UMC module and is called . It is also possible to make significantly more complex settings. See Section 5.1.4 for more details.
There are different ways in which applications can access provisioning information. The following describes a pull and push-based procedure.
UCS stores the user and group information in an OpenLDAP based directory. Thus, the default information can be accessed via the LDAP protocol. Objects are identified by an LDAP filter. The following filter can be used to search for users "(univentionObjectType=users/user)" and for groups the filter "(univentionObjectType=groups/group)" can be used.
If the user activation is used (), the following LDAP filter can be used: (&(univentionObjectType=users/user)(myappActivated=TRUE)). The string myapp has to be replaced with the appid.
The parameters for the LDAP server can be read from the environment variables:
LDAP_SERVER_NAME:
The fully-qualified host name of the OpenLDAP
server the app may connect to.
LDAP_SERVER_PORT:
The port of the OpenLDAP server the app may
connect to.
LDAP_SERVER_ADDITION:
A list of alternative OpenLDAP servers. These
values should be used for failover.
LDAP_BASE:
The base for the whole LDAP database, e.g.,
dc=mydomain,dc=intranet or
o=mydomain.
As a rule, the LDAP base should not be further
restricted. Many environments store users below
cn=users but this is not the case in all
environments.
By default, the OpenLDAP server in UCS does not allow
anonymous connections. For every app a user account is
created. The account has read access to the LDAP directory.
The username is passed as the environment variable
LDAP_HOSTDN. The password is written in the
file /etc/machine.secret. The
credentials are not changed when an app is upgraded. But they
change if an app is reinstalled.
An app can be notified by the IDM system when users or groups are created, modified or deleted. For each change, a file is created in a specific directory. The app can either poll the directory or register a command that is executed when a file is created.
UCS 4.3-1 errata 211 is required on the user's system for this feature.
The configuration for these IDM notifications can be done on the tab in the App Provider Portal. It can be configured which object types are watched. Currently, users and groups are supported.
A script should be specified in the App Provider Portal. The script is copied from the App Center into the container and called there. If a script is already part of the container, this script can be called accordingly, e.g.
#/bin/sh
/usr/sbin/app-connector
The JSON files are created in the directory
/var/lib/univention-appcenter/apps/$appid/data/listener/.
As soon as any attribute of the watched object types is
changed a JSON file is created in the directory. The script is
called in a defined and configurable interval by the App
Center, if at least one JSON file has been written.
Once the script has finished a JSON file, the script must
delete the JSON file.
All files are JSON with one dictionary and the following content:
entry_uuid:
A unique identifier for the object. It does not
change even if the object is moved. The script
certainly wants to identify objects by this
attribute.
dn:
The distinguished name of the LDAP object.
type:
The type of the object, i.e., "users/user", or "groups/group".
attributes:
A dictionary of the attributes of this object. The
content is defined by the UDM (Univention
Directory Manager) representation of the object.
If it is null instead, the object has been
deleted.
entry_uuid of the
JSON file and the primary user key in the
solutions database is not possible, consider
maintaining a mapping table by the script, if
necessary. The entry_uuid is the only
attribute that remains the same for an
object.
entry_uuid appears
twice in the set of JSON files. This means
that multiple modifications on the object have
been made since the last time your script
processed the object.
This is an example of a JSON file for a user change. It is not complete, but should clarify the idea.
{
    "dn": "uid=Administrator,cn=users,dc=sparka-43,dc=intranet",
    "id": "b2f13544-e3cb-1037-810e-23ad4765aade",
    "object": {
        "description": "Built-in account for administering the computer/domain",
        "disabled": "0",
        "displayName": "Administrator",
        "gecos": "Administrator",
        "gidNumber": "5000",
        "groups": [
            "cn=Domain Admins,cn=groups,dc=sparka-43,dc=intranet",
            "cn=Domain Users,cn=groups,dc=sparka-43,dc=intranet",
            "cn=DC Backup Hosts,cn=groups,dc=sparka-43,dc=intranet",
            "cn=Schema Admins,cn=groups,dc=sparka-43,dc=intranet",
            "cn=Enterprise Admins,cn=groups,dc=sparka-43,dc=intranet",
            "cn=Group Policy Creator Owners,cn=groups,dc=sparka-43,dc=intranet",
            "cn=Administrators,cn=Builtin,dc=sparka-43,dc=intranet"
        ],
        "lastname": "Administrator",
        "locked": "0",
        "lockedTime": "0",
        "mailForwardCopyToSelf": "0",
        "mailPrimaryAddress": "admin@sparka-43.intranet",
        "mailUserQuota": "0",
        "password": "{crypt}$6$0kS4GowCZEAJRqWG$8LkK6iBeKFCInoxy9bCG1SFfGpajOy//Zg[...]",
        "passwordexpiry": null,
        "primaryGroup": "cn=Domain Admins,cn=groups,dc=sparka-43,dc=intranet",
        "sambaRID": "500",
        "shell": "/bin/bash",
        "uidNumber": "2002",
        "umcProperty": [
            [
                "appcenterDockerSeen",
                "true"
            ],
            [
                "appcenterSeen",
                "2"
            ],
            [
                "udmUserGridView",
                "default"
            ]
        ],
        "unixhome": "/home/Administrator",
        "unlockTime": "",
        "userexpiry": null,
        "username": "Administrator",
        "webweaverActivated": "TRUE"
    },
    "udm_object_type": "users/user"
}
There are different ways in which applications can authenticate against the UCS identity management system.
UCS stores the user and group information in an OpenLDAP based directory. Thus, the default information can be accessed via the LDAP protocol. Objects are identified by an LDAP filter. The following filter can be used to search for users "(univentionObjectType=users/user)" and for groups the filter "(univentionObjectType=groups/group)" can be used.
If the user activation is used (), the following LDAP filter can be used: "(&(univentionObjectType=users/user)(myappActivated=TRUE))". The string myapp has to be replaced with the appid.
The parameters for the LDAP server can be read from the environment variables:
LDAP_SERVER_NAME:
The fully-qualified host name of the OpenLDAP
server the app may connect to.
LDAP_SERVER_PORT:
The port of the OpenLDAP server the app may connect to.
LDAP_SERVER_ADDITION:
A list of alternative OpenLDAP servers. These
values should be used for failover.
LDAP_BASE:
The base for the whole LDAP database, e.g.,
dc=mydomain,dc=intranet or
o=mydomain.
As a rule, the LDAP basis should not be further
restricted. Many environments store users below
cn=users but this is not the case in all
environments.
By default, the OpenLDAP server in UCS does not allow
anonymous authentications. For every app a user account is
created. The account has read access to the LDAP directory.
The username is passed as the environment variable
LDAP_HOSTDN. The password is written in the
file /etc/machine.secret. The credentials
are not changed when an app is upgraded. But they change if an
app is reinstalled.
UCS integrates a Kerberos server by default. As usual with
Kerberos, the data for the Kerberos configuration can be
obtained from DNS. By default, the DNS domain name is
passed through the DOMAINNAME environment
variable. The following settings can then be queried via DNS:
_kerberos.DOMAINNAME.
_kerberos._tcp.DOMAINNAME and
_kerberos._udp.DOMAINNAME.
The flag can be activated in the App Provider Portal on the . This adds a checkbox to the user administration and a schema extension for the IDM is created, so that the status of the checkbox is stored in an attribute in the IDM. This allows each user to be activated or deactivated separately.
If the app requires more settings in the IDM, an own LDAP schema can be uploaded into the App Provider Portal .
In this case, it is also possible to create individual extended attributes during the setup process. This should be done in the join script. Further information on extended attributes can be found in the Univention Developer Reference.
The App Center offers the possibility to add scripts at various points during the installation and configuration of the app. The most important scripts are described below.
During the installation of an app, the so-called preinst script is executed first. Afterwards, the account for the Docker container is created and the Docker container is started. After that, the setup script is called and finally the join script.
This script is executed on the UCS host system before the app is initialized, even before the app image is downloaded. It is also called a preinst script. Its purpose is to check whether installation will be successful or not. Any exit code other than 0 will result in cancellation of the installation process. This script is also executed if the app is upgraded.
This script is executed in the Docker container. It is normally the heart of the initial app configuration. If the script fails (exit code != 0) the installation is aborted.
This script is executed on the UCS host system after the Docker container is configured. Please refer to the Developer Reference about how to write a join script. In principle a join script is a script that runs after the installation of an app and it has write access to the LDAP directory service. If it runs successfully, the join script may save this information in a status file. If this does not happen, the user is constantly reminded to re-run the join script. So the join script does not need to run successfully. The installation will not be aborted at this point. But of course at some point it should run through successfully.
Apart from the functions documented in the Developer Reference, the below listed functions are available in join scripts for dealing with apps. They require the following line in the script:
. /usr/share/univention-appcenter/joinscripthelper.sh
Furthermore, this call provides access to the following variables:
$APP # app id
$APP_VERSION # app version
$SERVICE # app name
$CONTAINER # docker container id
joinscript_add_simple_app_system_user
adds a domain wide user to the LDAP directory that is
not a real Domain User and offers an authentication
account. It can be used as bind user for the app to
connect to the LDAP directory. The password will be
stored on the Docker Host at
/etc/$APP.secret. The DN will be
uid=$APP-systemuser,cn=users,$ldap_base.
joinscript_add_simple_app_system_user "$@" --set mailPrimaryAddress=...
joinscript_container_is_running returns whether or not the Docker container is currently running. 0: Yes, 1: No. Can be used in an if statement.
joinscript_container_is_running || die "Container is not running"
joinscript_run_in_container runs one command inside the container. Returns the return code of the command.
joinscript_run_in_container service myapp restart || die "Could not restart the service"
joinscript_container_file prints the absolute path for the Docker host for the filename given inside the container.
FILENAME="$(joinscript_container_file "/opt/$APP/my.cnf")"
joinscript_container_file_touch creates a file inside the container. Directories are created along the way. Prints the resulting filename just like "joinscript_container_file".
joinscript_register_schema
registers a LDAP schema file semi automatically. The
schema file allows to extend LDAP objects with new
attributes. The file will be copied to the Docker
host's
/usr/share/univention-appcenter/apps/APPID/APPID.schema
during installation. See the LDAP
documentation for the syntax of a schema file. If an
official object identifier (OID) namespace is needed, Univention
can provide one. It is important to note that shipping the
schema file alone is not enough. It has to be registered with
the mentioned function in the join script. The schema file
content can be provided in the App Provider portal on the
tab, in the section in the field for .
joinscript_register_schema "$@"
During the uninstallation of an app, the so-called prerm script is executed first. Afterwards, the account for the Docker container is removed and the Docker container is stopped. After that, the unjoin script is executed.
This script is executed on the UCS host system. It is also called as prerm script. Its purpose is to check whether an uninstallation is successful or not. For example, the prerm may fail if other software still depends on it. Any exit code other than 0 will result in cancellation of the uninstallation process.
This script is executed on the UCS host system after the Docker container is removed. See the Developer Reference for how to write an unjoin script. It should revert most (if not all) changes done in the join script. With the notable exception of schema registration. An LDAP schema extension should never be removed once it was registered.
It may be necessary to move data from the old container to the new container when the app container is replaced during an upgrade or the app is uninstalled. Therefore, the upgrade scripts can be used.
This script is required if data exists in the container which
should not be removed while the container is replaced with a
new container or if the app is uninstalled.
It is not required if all the data is stored outside the container for
example in a database or a mapped volume.
This script is executed inside the Docker container and it
should copy the relevant data to
/var/lib/univention-appcenter/apps/$APPID/data/.
Afterwards, the data can be restored by one of the
restore_data scripts.
This script is executed inside the Docker container before the setup script is run. Its purpose is to restore the data which has been stored by the store_data script.
This script is executed inside the Docker container after the setup script is run. Its purpose is to restore the data which has been stored by the store_data script.
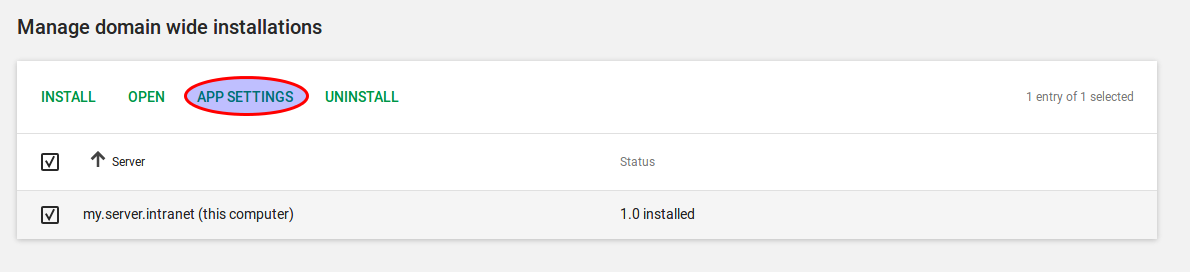
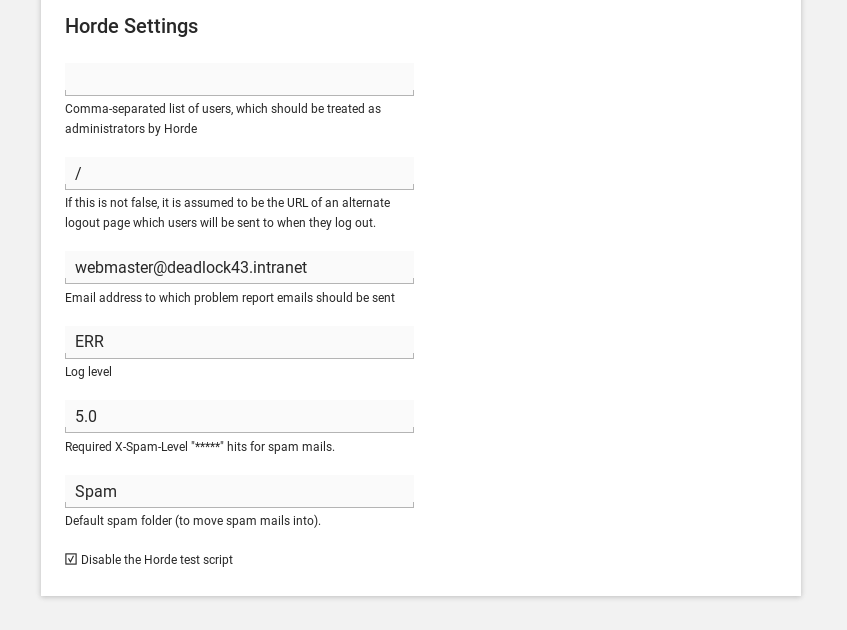
The App settings allow the user to configure the app during its runtime. The App Provider Portal can be used to define which settings are displayed to the user. The app can react accordingly to the changes.
If App settings are defined for an app, the user can reach these settings in the app configuration, see Figure 6.1).
An example for an App settings dialog is in Figure 6.2).
The App settings can be defined on the tab in the App Provider Portal.
The settings are saved inside the Docker container in the file
/etc/univention/base.conf in the type
key: value.
After the settings are changed, two scripts are executed.
First, the script configure_host. This script is run on the
Docker host.
Second, the configure script is
executed. It is executed inside the Docker container. In the
App Provider Portal, the path of the script can be given
() or the script code can be uploaded
().
The App settings are defined in the ini format. The definition can be done in the field . One ini file can contain several settings.
The name of a setting is the name of the section in the ini file, for example
[myapp/mysetting]
It is recommended to use the app ID as a prefix. This prevents collisions.
The type of the attribute is defined with the keyword Type. The following types are supported:
true or false is
set.
The attribute is used to define the description of the setting. It is shown next to the widget so that the user knows what to do with this form. It can be localized by also defining and so on.
The attribute can be used to group
settings. All settings sharing one group will be put under
that label. The default group is Settings. It
is also possible to localize it for example
.
The attribute can be used to define
when the setting should be shown. By default the setting
attribute is shown when the app is up and running. It is also
possible to show the setting attribute during the
installation. The following values are possible
Install, Upgrade,
Remove and Settings. It is possible
to specify more than one value which must be separated by
comma.
The attribute can be used in the same way as . The difference is that the value is not changeable.
The attribute can be used during the installation. If no value for this attribute was given during the installation, the defined value is set.
The attribute can be used to define if this setting has to be set or not.
The attribute is used to specify if
the value is set inside the Docker container
(inside), on the Docker host
(outside) or on both (inside,
outside). The default is inside.
The attributes and are used if a type List is defined. The attribute defines the values shown to the user and the attribute defines the values which are stored. The lists are comma separated and should have the same size. If a comma is necessary inside a label or value, it can be escaped with a \.
The attribute can be used to define the absolute path where the file should be stored. This attribute is needed in case the types or are used.
This is a minimal settings definition:
[myapp/mysetting]
Type = String
Description = This is the description of the setting
Description[de] = Das ist die Beschreibung der Einstellung
These are two more advanced settings
[myapp/myfile]
Type = File
Filename = /opt/myapp/license
Description = License for the App
Description[de] = Lizenz der App
Show = Install, Settings
Group = License and List
Group[de] = Lizenz und Liste
[myapp/list]
Type = List
Description = List of values
Show = Install
ShowReadOnly = Settings
Values = value1, value2, value3
Labels = Label 1, Label 2, Label 3
InitialValue = value2
Scope = inside, outside
Group = License and List
Group[de] = Lizenz und Liste
The first of these two settings will upload a file to
/opt/myapp/license inside the container. The second will save
myapp/list: value2 (or another value)
inside the container and on the Docker host. Both settings
will be shown before the installation. On the App settings
page, the list setting will be read-only.
UCS provides a certificate infrastructure for secure communication protocols. See SSL certificate management in the UCS manual.
Apps may need access to the UCS certificate infrastructure or need to be aware of changes to the certificates. Starting with UCS 4.3-0 errata 91 the Univention App Center provides a simple way to manage certificates inside an app. This is simply a new action named in the app Center which is called automatically during the installation and upgrade of apps (but can also be executed manually) and provides apps a simple way to gain access to certificates and to react to changes to certificates.
# update all apps
-> univention-app update-certificates

# update app "my-app"
-> univention-app update-certificates my-app
What happens update-certificates?
/usr/local/share/ca-certificates/ucs.crt inside the container.
/etc/univention/ssl/ucsCA/CAcert.pem inside the container.
/etc/univention/ssl/docker-host-certificate/{cert.pem,private.key} and /etc/univention/ssl/$FQDN_DOCKER_HOST/{cert.pem,private.key}.
Every app can define a script.
Example:
#!/bin/bash
# cat the UCS root CA to the app's root CA chain
cat /etc/univention/ssl/ucsCA/CAcert.pem >> /opt/my-app/ca-bundle.crt
service my-app-daemon restart
App Appliances are pre-defined images which consist of the App, the UCS management system and the UCS runtime environment. They are run as a virtual machine within a hypervisor and are currently provided as VMware, VMware ESXi, VirtualBox and KVM images. By default the UCS branding is used, but it is possible and recommended to use a custom branding.
To create an appliance, select an app version that has already been published and activate the checkbox on the tab. If the solution needs a minimum size of memory, please specify the needed mega bytes.
If the appliance should include additional apps, please specify them in the section.
The appliance allows customization of the UCS setup wizard and
controls which setup pages and setup fields should be hidden. For
simplicity towards the user, it is recommended to hide the
software page and the
basesystem setup field.
The listing of apps in the App Center UMC module in the appliance can be customized to either whitelist or blacklist certain apps. For example, if the solution is a groupware, other groupware solutions can be hidden from the overview listing. System administrators can only install the whitelisted apps or are not allowed to install the black listed apps.
The appliances are usually configured in such a way that the user can start using them right away. In some cases it may be necessary to provide some information for the first steps. For example, the user needs to know that a user object has to be created and activated for the app first. This could be briefly described in this section. The German translation should be kept in mind and provided.
The appliance also allows to customize the UMC modules which
should be pre-configured for the favorites section in the UCS
management system. The favorites section comes up first, after
a UCS system administrator logs onto the UCS management system.
It is recommended to have the modules
Users, Groups and
App Center listed here.
As soon as the settings are made, , click the button and provide a custom message to let the Univention team know that an appliance is ready to be build. This will create a ticket which helps to keep the communication in one place.
The appliance is automatically built in the Univention build infrastructure. After the build is finished, automatic tests will be started. Build and testing will approximately need four hours.
After the automatic tests have finished successfully, the app provider is informed. A link to the appliance download is sent and a few days are given for testing. If no veto is sent, the Appliance is usually published after the veto deadline. After the release, the appliance will show up for download on the app page in the App Catalog. App Providers are recommended to also place a link to the app detail page from their download page. The link is one criteria for the recommended apps badge in the App Center overview and the App Catalog.
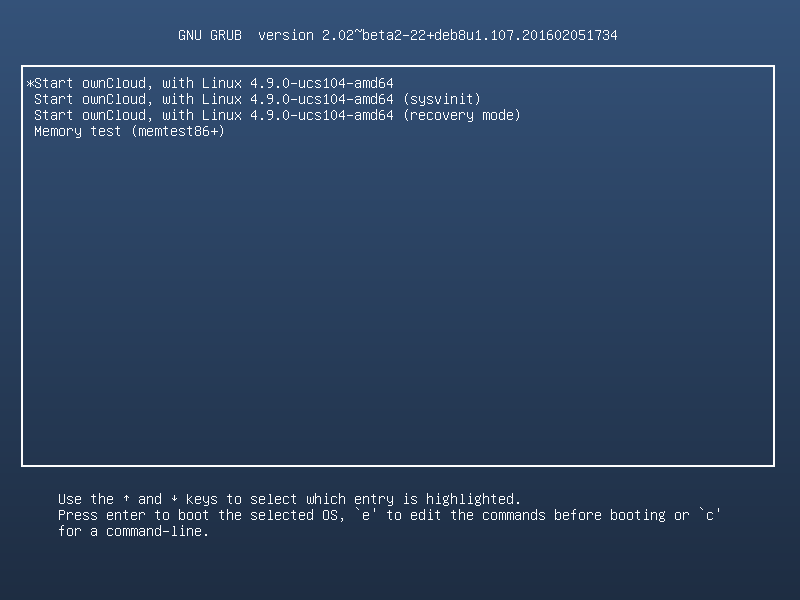
With a customized branding of an appliance the boot loader, the boot splash, the system setup wizard and the portal page can be modified. Please look at the screenshots below and the explanations of the options that control the look.
The background color can be configured for the boot loader. Please define in the setting.
The boot splash can have a custom background and a logo. The logo is defined in . Please provide a SVG file and mind the recommendations in Section 4.1.
The background color is defined in . For a black background,
simply define #000000. A gradient can
for example be defined with linear-gradient(to
bottom, #345279 0%, #1d2c41 100%). For more
information on how to use a gradient, see CSS
linear-gradient() function on
w3schools.
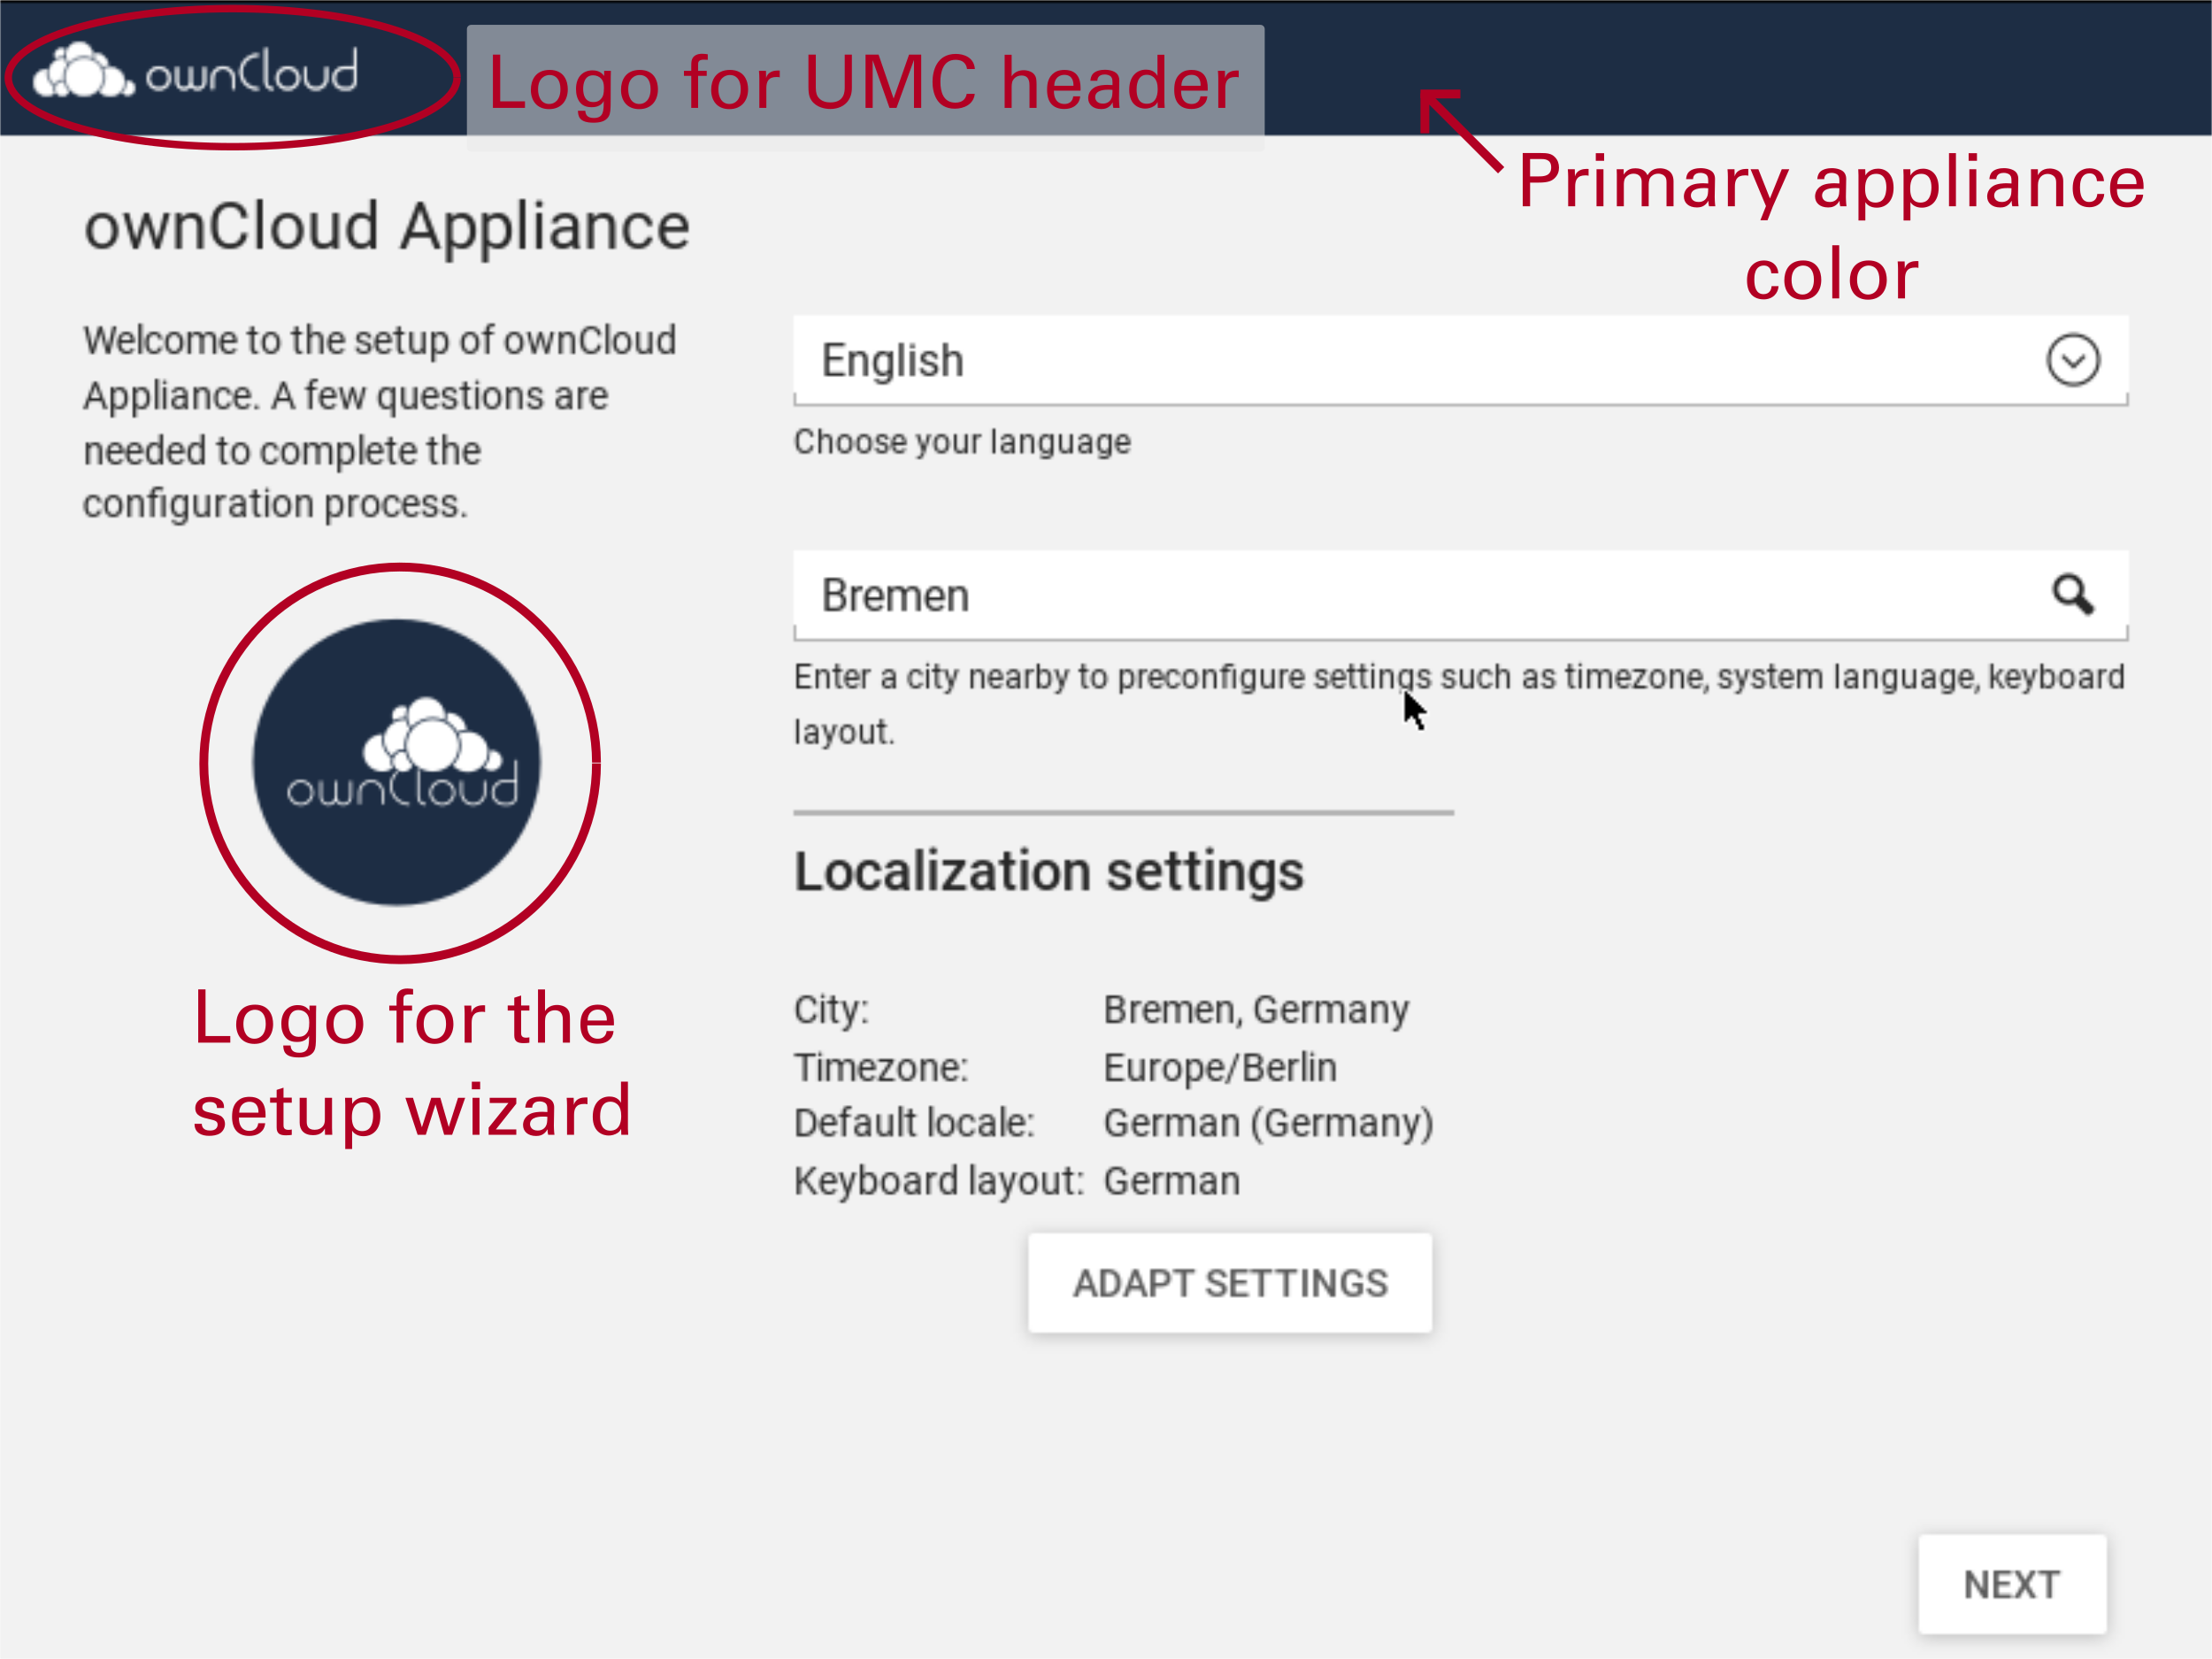
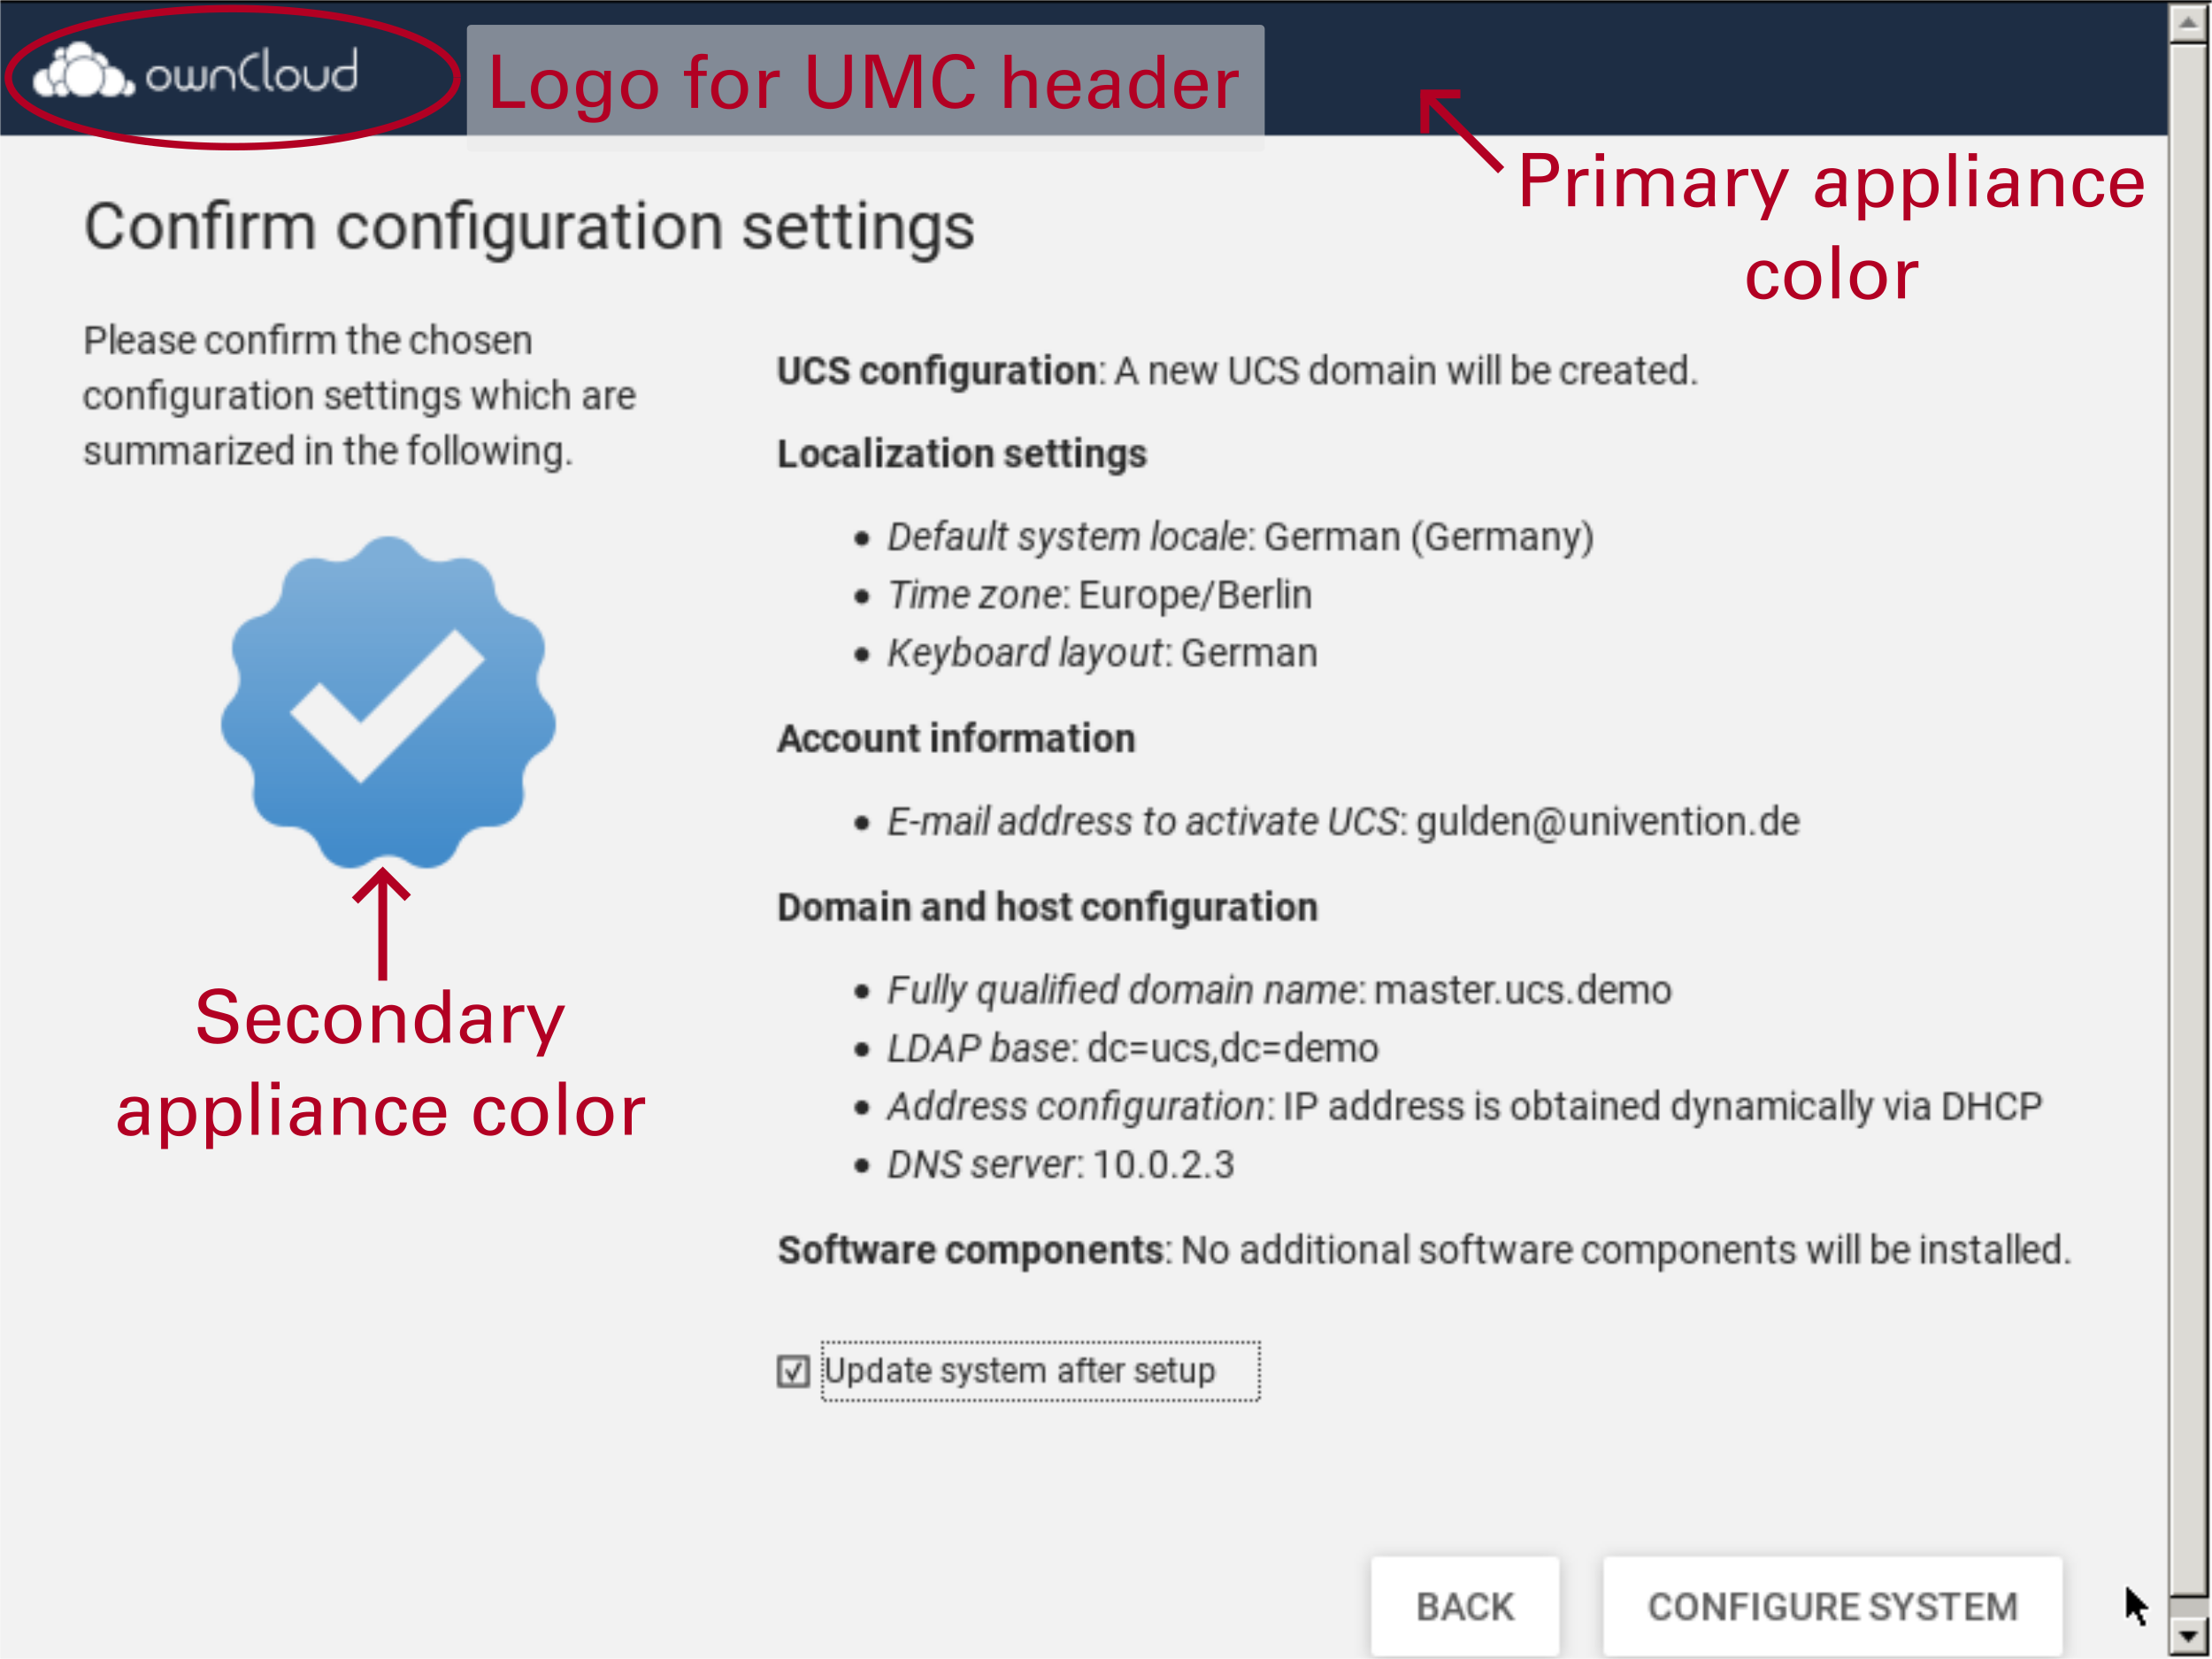
The system setup wizard allows several slots to be customized. In the section in the App Provider Portal, the (the word "appliance" is automatically appended) can be set. It controls the heading in the system setup wizard. Next is the , which is shown on the first page of the system setup wizard.
In the section, the logo on the top left can be changed with the setting. The controls the background color of the UMC header.
The is used as color for smaller graphical elements throughout the setup wizard (see Figure 7.4).
The welcome screen is shown after the appliance setup has been finished and also every time the appliance is started. It offers information on how the user can access the appliance. It uses settings like the Appliance name and the CSS definition of the appliance background. The needs to be a SVG file that is slightly wider than high and which has the fonts converted to paths. Please mind the recommendations in Section 4.1.
Depending on the character of the welcome screen background
(bright or dark), the should be either set to
White or Black.
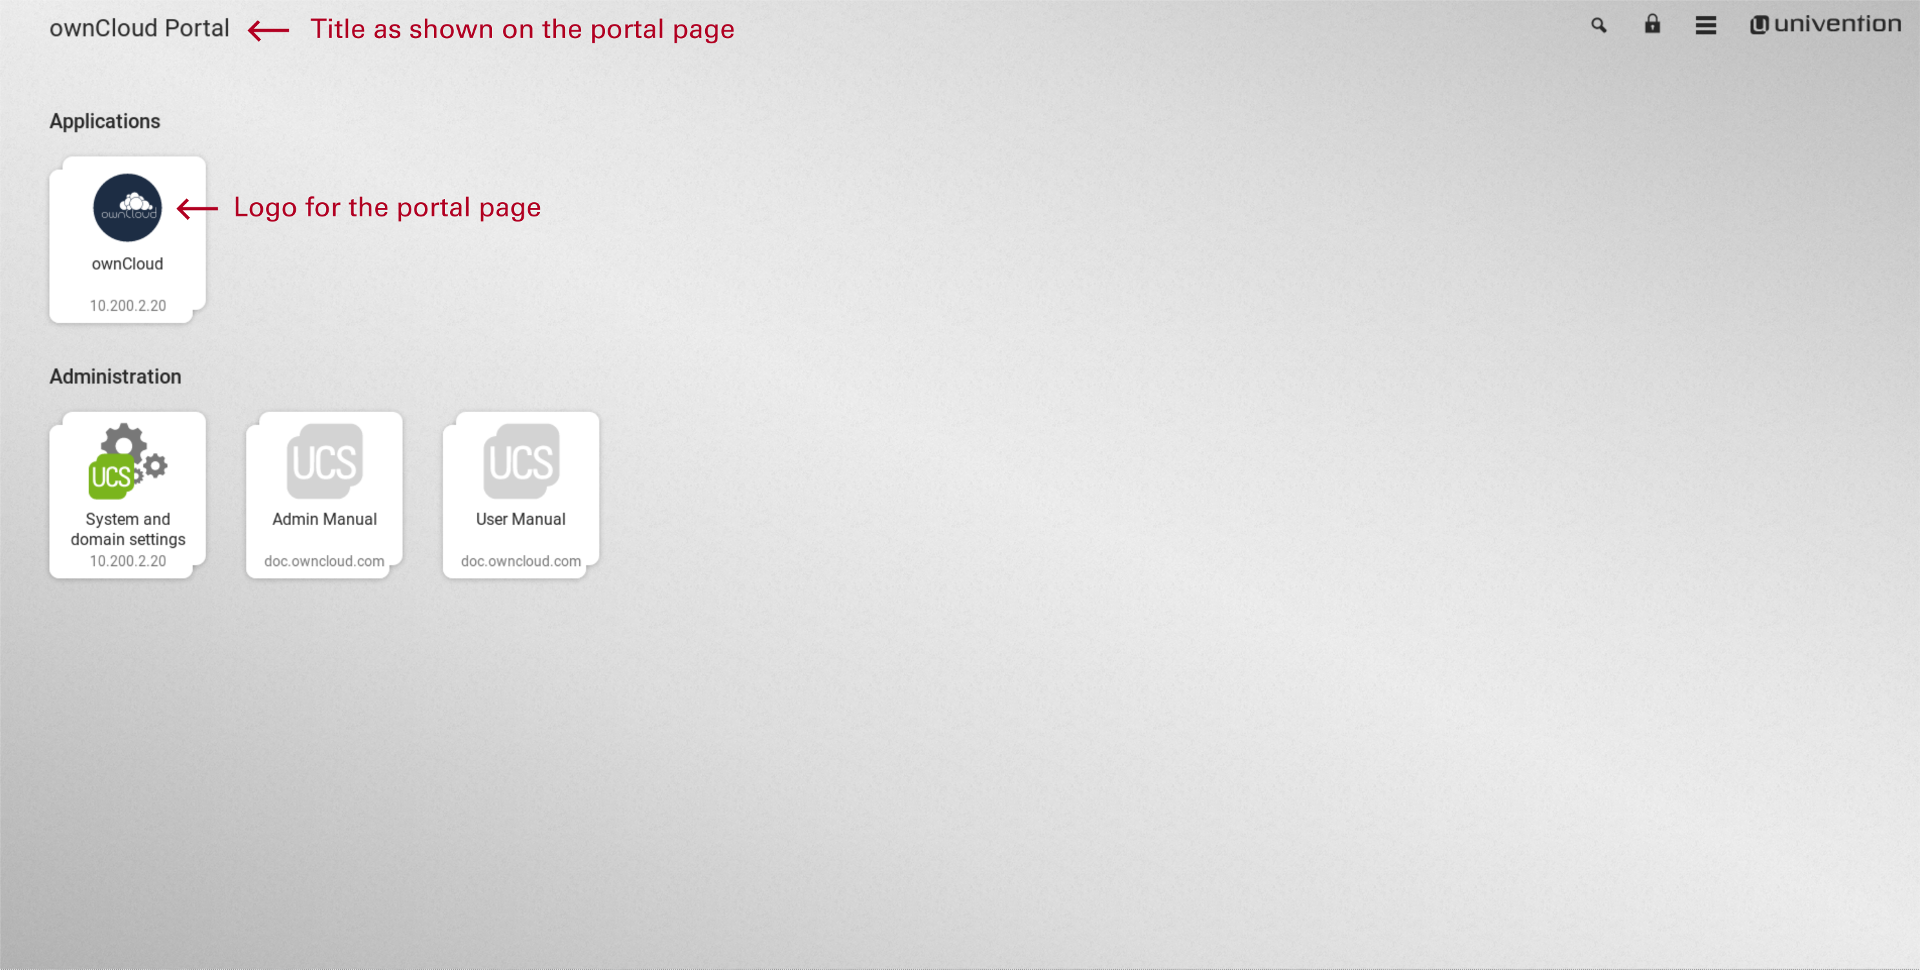
The branding of the portal page is independent from the other sections. The can be defined and it can be configured if the font color shall be black or white. The controls which logo shall be set in the first tile on the portal page. The background can either consist of a background image or a background color or a background color gradient as described in Section 7.2.2.