Table of Contents
Univention Corporate Client (UCC) is a flexible and economic alternative for the operation and administration of PCs, notebooks and thin clients in companies and institutions. The software contains a Linux-based desktop environment optimised for business use. In addition, UCC serves as a platform for access to remote desktop solutions and virtualized desktops as well as browser or terminal server-based applications.
UCC systems are rolled out via an image-based approach: All the user data - and as such also the user settings - are stored on a separate partition. If a new version of the image is installed, the complete operating system installation is overwritten.
UCC clients are part of a UCS domain. The clients are entirely managed through settings from the LDAP. As a result, a UCC system is ready to use after an upgrade or an installation. Features configured from the LDAP include network configuration, hardware settings like dual monitor setups and software selections.
Kubuntu is used as the basis for the images (Version 14.04 in UCC 2.0). Univention provides two preconfigured images: a minimal image for thin clients and a larger image for desktop installations. These two images are maintained and tested by Univention. It is also possible to create modified or completely new images with a minimum of effort using the included image toolkit (see Section 9.1). In contrast to the integration of Ubuntu clients in UCS, UCC clients work out of the box and require no further modification.
UCC systems include the most important UCS base components and integrate into the UCS user management: all users in a UCS domain can log on to UCC clients using their domain password. The integration packages are installed via the Univention App Center.
UCC integrates terminal services provided via XRDP, i.e., the KDE Linux desktop is provided via the RDP protocol. The KDE desktop can be accessed from UCC thin clients or any other RDP client.
UCC supports both a local desktop based on KDE Plasma and working on terminal servers (RDP, Citrix XenApp and remotely used KDE desktops based on xrdp). Access to web-based services can also be configured using a full-screen Firefox browser session. A UCC desktop system be used both in the company network and in mobile use (all user and group information are cached locally for that).
A UCC system is usually installed over a network using PXE. The rollout can be performed fully automatic without user interaction (see Section 4.4).
The CompactFlash storage media typically integrated in thin clients are only designed for a limited number of write operations. Thin clients in UCC are thus started with an OverlayFS file system so that all write accesses on the storage media of a booted system are only performed in the system memory and not written to the hard drive. All the write changes are thus lost once the thin client is switched off. This does not pose any problems for access to terminal services, as all the user activities are performed on the respective terminal servers. The system log of UCC clients is performed remotely.
Univention Corporate Client integrates into the management system of Univention Corporate Server. UCS 3.2 is a prerequisite for the installation of UCC.
The UCS integration packages are installed via the Univention App Center. General information on the Univention App Center can be found in the UCS manual [ucs-manual].
A UCC environment is made up of three components:
UCC clients use the 32-bit Intel architecture (i386). We recommend also installing the UCS server with the i386 architecture. The reasoning for this is that a system with the same architecture is required for the build of adapted UCC images (see Chapter 9). If only the official UCC images are used (or if the UCC images are built on another system), the UCS server can also be installed with the amd64 architecture.
The UCC server can be installed on any UCS server role (master domain controller, backup domain controller, slave domain controller or member server). All available errata updates should be installed on that system.
In the Univention App Center, select the Univention Corporate Client application and click on . The integration in the UCS management system (UMC modules and LDAP schema extensions) are automatically installed on the master domain controller and all backup domain controller via the Univention App Center.
Once the component is installed, click on .
The join scripts are automatically run on master domain controller and backup domain controller systems during the installation of the UCC app. The UMC module must be run on slave domain controller and member server installations and the option selected for the UCC server to be ready for use.
Following the installation, the initial configuration is performed via a wizard in the Univention Management Console (see Section 3.1) or via manually configured policies. The UCS wizard is recommended for the initial setup for small to medium-sized installations.
UCC can be installed on more than one server, e.g., if UCC clients are to be operated at more than one site. Further information can be found in Section 4.7.
Univention provides two preconfigured UCC images: a minimal image for thin clients and a larger image for native desktop installations. These two images are maintained and tested by Univention. The images are downloaded via a Univention Management Console module, see Section 2.3.
UCC systems operated with these images must have at least 512 MB of system memory available. Since UCC 2.0 is based on Ubuntu 14.04, all x86 desktop hardware which is supported in Ubuntu 14.04 is also supported in Univention Corporate Client. You can either test whether your device is compatible or contact the hardware supplier for compatibility information.
The thin client image offers a minimal desktop and support for accessing terminal sessions on Windows and UCC terminal servers. In addition, a local LXDE desktop environment is also available. Thin clients which are to be operated with this image must be equipped with at least 2 GB of local disk space (e.g., CompactFlash or SSD).
The desktop client image offers a KDE Plasma desktop and support for terminal sessions to Windows and UCC terminal servers (support for Citrix XenApp can be subsequently installed). In addition, the desktop image is also the basis for the operation of an XRDP terminal server (see Section 10.1).
Software packages can also be installed or removed to complement the range of functions of the standard UCC images. Software updates can also be initiated through a policy (see Section 5.3)
The UCC images are not delivered in the Debian package format (the format is not best-suited to files in the gigabyte range). Instead, UCC images can be downloaded via the Univention Management Console module . A list of all available images is shown when the module is started. Already downloaded images are shown as ; not yet installed images as . Each image is furnished with a version number; the official UCC images are updated regularly and - if available - shown with an updated version number. The and options can be used to add and remove images.
The images are downloaded from http://ucc-images.software-univention.de/download/ucc-images/. A local UCC mirror can also be used, see Section 2.3.2.
Alternatively, images can also be managed via command line tools:
ucc-image-download can be used to download images. The individual files of
the image are referenced via a spec file containing the file names and SHA256 hashes. The hash
values are checked as part of the download procedure in order to detect erroneous
transmissions. The parameter -s is used to provide the name of the spec
file on the mirror. The full list of available parameters can be queried with the
-h option. The ucc-image-remove -l command can be used
to output an overview of the available images. An image can be deleted using the parameter
-r and specifying a spec file.
The root password of the installed UCC system is initially specified in the image. To avoid
there being an identical root password on all UCC systems operated with the official
Univention images, the root password is "personalised" during the image download: the root
password of the UCS server is set as the root password on the images. For existing images,
the root password can be set subsequently with the command
ucc-image-root-password, e.g.
ucc-image-root-password -i ucc-2.0-desktop-image.img -p
If you are running a number of UCC servers or an infrastructure completely disconnected from
the Internet, you can also operate a local UCC mirror. In this case, the images need to be
stored on an HTTP server. Then the Univention Configuration Registry variable ucc/image/download/url on the UCC
servers needs to be set to the download path.
A Univention Management Console wizard is provided for the initial configuration of a UCC environment. It guides you through the basic setup of a UCC environment with thin clients and/or desktop clients. Different standard policies are created and configured. The setup wizard is suitable for small to medium-sized environments. The policies can also be manually configured in the Univention Management Console for more complex requirements in which different policies are to be used for different containers of the LDAP directory or multiple DHCP subnets are to be operated. The policies required for each option are listed in the respective chapters.
The setup wizard is started via the Univention Management Console module . In the main menu, you can first select whether to set up thin clients and/or desktop systems. UCC images will be downloaded if required.
UCS offers the possibility of centrally managing the IP addresses and DNS/DHCP settings of a network in a network object in the LDAP. This can considerably facilitate the management of IP addresses: When creating a UCC client the next free IP address of the network is selected automatically. Also, DNS and DHCP settings are configured automatically.
In the UCC wizard it is now possible to select an existing network object in the dialogue or create a new one. During the installation of a UCS system, a network object with the name default is created as standard. It uses the network of the master domain controller. If only a certain IP segment is to be used for the UCC systems, a new network object can be created with the dialogue. For example, if the IP addresses 192.168.100.100 to 192.168.100.200 are used for UCC systems, 192.168.100.0 must be entered as the , 24 as the and 192.168.100.100 / 192.168.100.200 entered as the .
The network configuration of UCC clients is managed through DHCP in nearly all cases The wizard checks whether a default gateway is assigned via DHCP. If this is not the case, a dialogue window opens in which the gateway can be configured. In the default setting, fixed IP addresses are assigned only to clients registered in the LDAP.
The next menu item allows you to select whether desktops and/or thin clients should be configured. No additional configuration is required for Linux desktop systems / XRDP terminal servers. The wizards for setting up the thin client access on terminal services are described in the following sections:
Once the wizard is finished, the UCC clients now need to be registered in the Univention Management Console. This is described in Section 3.2.
UCC systems are registered and administrated with the system role Univention Corporate Client in the computer management module of the Univention Management Console. The UCC setup wizard automatically creates three computer containers for thin clients (cn=computers, cn=ucc-thinclients), desktop systems (cn=computers, cn=ucc-desktops) and XRDP terminal servers (cn=computers, cn=ucc-xrdpserver). These should be selected in the input field depending on the type of the UCC client.
In the default setting, the dialogue window for creating a UCC system only shows the most important input fields. Clicking on shows all the options. This is only necessary in exceptional cases.
The following settings must be configured for every UCC client as a minimum:
Each UCC client must be registered in the DNS and DHCP. The network object assigns these entries automatically. If a UCC client is created without a network object (which is only needed in exceptional cases), it is important to ensure that the entries for the , and are configured.
The assigned name server is preconfigured automatically. If it is necessary to adjust the assigned server, the default-settings policy must be edited.
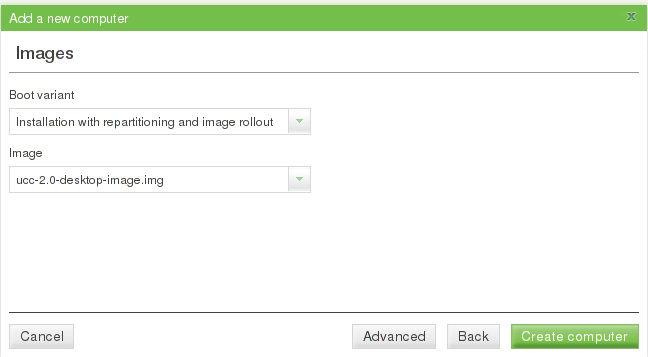
Clicking on configures the assigned UCC image and the boot version. The boot versions are documented in Section 4.1.
Univention Corporate Server integrates Nagios for the monitoring of systems and services. UCC systems can also be integrated in the Nagios monitoring. To this end, the option must be enabled under in the Univention Management Console for the systems to be monitored on the computer object. More information on Nagios can be found in the UCS manual [ucs-manual-nagios].
In the default setting, the NRPE service is not installed on UCC systems. That means that only remote Nagios checks can be applied.
UCC systems are rolled out via an image-based approach: All the user data - and as such also the user settings - are stored on a separate partition. If a new version of the image is installed, the complete operating system installation is overwritten.
When the image is installed, the image installation tool checks whether there is already a computer account available for the client and uses it. If the computer name is not stored in advance, the name can be specified interactively during the installation. The recommended rollout procedure is creating the UCC systems in the Univention Management Console in advance. See Chapter 3 for more information on managing UCC systems in the Univention Management Console.
The image with which a UCC client is operated is configured in the Univention Management Console in the tab on UCC computer objects. All UCC images registered in the UCS management system are available for selection. The registration is effected with join scripts during the installation of the image, see Section 2.3.
The Univention Management Console can also be used to edit several objects at once, which permits the assignment of images to several computers at once. This is documented in the UCS manual [ucs-manual-multiedit].
On UCC systems, user-specific data such as the home directory of the users must be stored separately from the system data on another partition. This is the case in the default partition configuration. The partitioning scheme is specified in the image configuration, see Section 9.2. It is also possible to perform completely new partitioning schemes - e.g. an encrypted hard drive - with an adapted partitioning script, see Section 4.2).
UCC clients can be operated in five different modes, which can be assigned via the field. The client must be configured for PXE boot in the BIOS.
: This mode is used for the initial installation of a UCC client. It is also required whenever a UCC client should be reinstalled completely or switched to a different partition scheme. The partitions of the system are setup as configured in the image configuration. A prompt must be confirmed before the partitioning begins (it can be disabled using the boot option force_partition, see below). After the installation of the image, the system is joined into the UCS domain.
Existing user data on a /home partition of a system are also deleted!
is used to update an existing UCC
installation to a new version. It is detected whether the installed image differs
from the image to be installed. If that is the case, the UCC image on the system is replaced.
In contrast to the partition option above, no new partitioning occurs. All user data on the
/home partition is retained.
: In this boot mode, the locally installed image is started and no check for a newly available image performed. Following a successful installation performed with or , the system returns to this boot mode automatically.
: In the boot versions and , the UCC system is started with PXE and the locally installed system started following the update check. If this option is enabled, a special PXE configuration is created for the computer, with which the PXE firmware of the system does not perform a PXE boot, but instead starts the locally installed system directly. This is comparable to a certain extent with if the boot order in the BIOS of the system were changed over to a local disk, but does not require any adaptation of the BIOS.
The input field can be used to add arbitrary parameters to the initial RAM disk, which performs the installation/rollout. These preconfigured options exist:
In the standard setting the partitioning scheme is configured in the image configuration. A
different partitioning can be configured using partition scripts. They are
stored on the UCS server(s) in the directory
/var/lib/univention-client-boot/partition-scripts. The file name below that
directory needs to be configured in the , see Section 4.1) using the command
partition_script=FILENAME. The filename is specified relative to the
directory, e.g. partition_script=desktop_encrypted.example.
An example configuration which configures an encrypted LUKS hard disk for the UCC desktop image is
shipped as desktop_encrypted.example.
Only UCC clients, which are joined into a UCS domain can be configured centrally. Unjoined clients can be used for special setups like live systems or demo points.
The domain join is typically performed in the scope of the rollout
via PXE (see Section 4.1). The domain
join can also be subsequently performed by
running univention-join. The subsequent domain join
cannot be performed via SSH, but should instead be run via a
local login or, if virtualization is employed, via VNC.
In the default setting, a user name and password must be specified when joining the domain. The rollout of UCC systems can also be completely automated so that user interaction is no longer necessary. Once all the clients to be rolled out have been created in the UCS management system (see Section 3.2), the following steps are necessary:
ucc-image-set-join-information. The parameter -i is
used to specify an image and the join account and its password are interactively
prompted. Alternatively, the account can be specified with -u, the domain
with -d and the password with -p.
While the standard rollout mechanism for UCC systems is PXE-based, it is also possible to perform installations using ISO images, which can be written to USB sticks, DVDs or BluRays.
The images are available at http://ucc-images.software-univention.de/download/ucc-images/.
The client to be installed must be created in the UMC computer management first (see Section 3.2), otherwise it doesn't have an IP address assigned and the domain join would fail.
System data which must be preserved during a UCC update (e.g., the join
status) are stored separately from the system data and automatically restored
after updates. These files and selected Univention Configuration Registry variables are registered in
the UCR variables ucc/persistent/files and
ucc/persistent/ucr. Important standard UCC settings
are preconfigured automatically and can be expanded for local
adaptations. Ten megabytes of disk space are reserved for storing the Univention Configuration Registry settings and the
persistent configuration files.
The rollout of UCC systems usually occurs via PXE (see Section 4.1). If UCC is operated in a single server environment the server distributing the IP adresses to the clients is identical to the PXE server providing the UCC images for installation.
If UCC is used in a distributed environment, there may be DHCP servers not serving as PXE servers. In that case the UCS server distributing the UCC images needs to be configured through a policy. Please see the UCS manual for additional information [ucs-manual-pxeboot].
The CompactFlash storage media typically integrated in thin clients are only designed for a limited number of write operations.
In UCC thin clients are thus started with an OverlayFS file system so that all write accesses on the storage media of a booted system are only performed in the system memory and not written to the hard drive. All the write changes are thus lost once the thin client is switched off. This does not pose any problems for access to terminal services, as all the user activities are performed on the respective terminal servers. The standard write access is selectively enabled for individual operations such as the installation of new UCC images or subsequent installation of software.
If a thin client uses storage media which allows permanent write access, the Overlayfs can also be disabled by adding mount=rw to the of the computer object in the computer management module of the Univention Management Console.
In addition the Univention Configuration Registry variable ucc/thinclientoverlayfs must
be set to false on the affected thin clients using a Univention Configuration Registry policy
(see Section 5.1). This variable allows tools such as
univention-ucc-software-update to detect whether they are running on a thin
client using overlayfs.
Univention Corporate Client uses a BIOS-based boot by default. Alternatively, for systems which no longer support a BIOS boot, it is possible to generate UCC images with which the rollout and operation can be performed via the Unified Extensible Firmware Interface standard.
Not all UEFI-compatible systems also support UEFI booting via PXE. This should be checked in advance and consideration given to updating the UEFI firmware.
An image configuration is delivered with the image build tool for UEFI systems:
/usr/share/doc/ucc-image-toolkit/example/ucc-desktop-efi.cfg.gz. Information
on building an image can be found in Section 9.1.
As standard, the pxelinux.0 boot loader is used for the rollout of BIOS-based
systems and assigned in the Univention Management Console via a policy. A
UEFI-compatible boot loader must be assigned via this type of policy for the UEFI
rollout. syslinux.efi32 must be assigned as the for i386 systems and syslinux.efi64 for amd64 systems.
If a UEFI-compatible image has been generated and the DHCP boot policy defined, the rollout of a UEFI system is not different from the standard rollout via the BIOS.
If a hard disk has been subsequently enlarged - typically if a virtualized disk is used, which is then subsequently enlarged - the rollout may encounter GPT partition data from the previous installation procedure, which no longer correspond to the current size of the disk. Generally speaking, when enlarging the memory of a virtualized system, it is more advisable to add an additional disk.
As a workaround, the system can be started with the debugshell=y boot option (see Section 4.1 and the GPT table rewritten with the following command:
parted -s PARTITIONDEVICE mklabel GPT
In the default configuration UCC thin clients require a connection to an LDAP server to start and receive their configuration from LDAP. For special configurations UCC can also be configured to cope with inaccessible LDAP servers. The exact setup may vary a lot depending on the setup so the following items are not a comprehensive list of necessary changes, but rather building blocks to adapt to such a setup:
ucc/ldap/network/timeout can be used to configure a
timeout for connecting to the LDAP server, by default ten seconds.
/var/cache/ucc/client-policy-*)
These files can be treated as fallback values: If the thin client is able to connect to an
LDAP server during startup, the current values are fetched from LDAP and overwrite the
existing values in /var/cache/ucc/ temporarily (since the thin client image uses overlayfs,
see Section 4.8). If the thin client cannot connect to an LDAP server
the local values are used.
The configuration of UCC system settings is mostly performed using Univention Configuration Registry. Typically, these settings are not saved locally on the UCC client systems, but rather via UCR policies via the LDAP.
The UCC setup wizard (see Section 3.1) creates three Univention Configuration Registry policies automatically, which are linked to the containers for thin clients and desktops: These policies can be edited directly:
Univention Configuration Registry policies can be managed in the Univention Management Console in the menu. At least one UCR variable must be configured with the and fields. Additional variables can be added by clicking on the plus sign. The UCR policies are evaluated when the system is started and then once an hour.
In addition to policies, Univention Configuration Registry variables can also be set via the command line frontend. However, we recommend performing the UCR settings via policies as the locally set variables are lost when image updates are installed or thin clients are switched off (see Section 4.8).
Regularly recurring actions can be defined and run on UCC clients via Cron jobs. The
configuration is performed as in Univention Corporate Server via Univention Configuration Registry or local
configuration files under /etc/cron.d. Further information can be found
in the UCS manual [ucs-manual-cron].
Cron jobs can also be used to execute commands during system startup using the
@reboot option. The following Univention Configuration Registry variables (see Section 5.1) configure the execution of /usr/bin/example as the user root during the system
boot. COMMAND1 can be replaced with arbitrary identifiers:
cron/COMMAND1/command=/usr/bin/example
cron/COMMAND1/time=@reboot
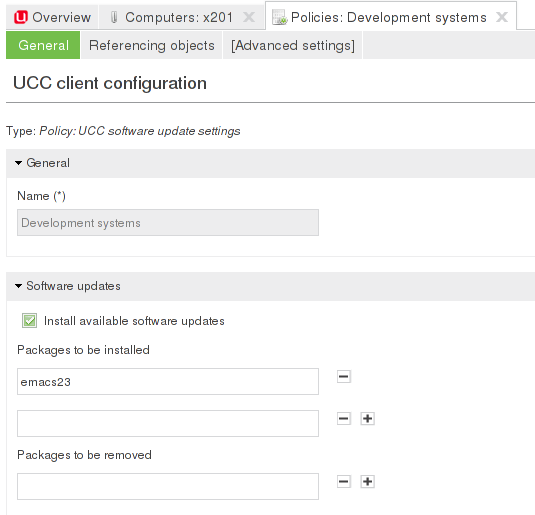
Every UCC image comes with a predefined software package selection. A computer policy in the
UCS management system can be used to install available software updates and install/uninstall
software packages. This check is performed every time the system is started.
The update can also be started manually by running the univention-ucc-software-update
--force command.
The settings are defined with a computer policy in the Univention Management Console:
Always test UCC software updates on a test system before updating all clients. UCC updates have been tested on official UCC images; if individual images have been created for an environment a number of things should be considered before updating.
It is not possible to update the kernel on thin clients; a new image must be rolled out instead.
Additional software packages can also be installed on the command line using
apt-get:
apt-get update
apt-get install emacs24
The installation/updates are logged in
/var/log/univention/software-updates.log.
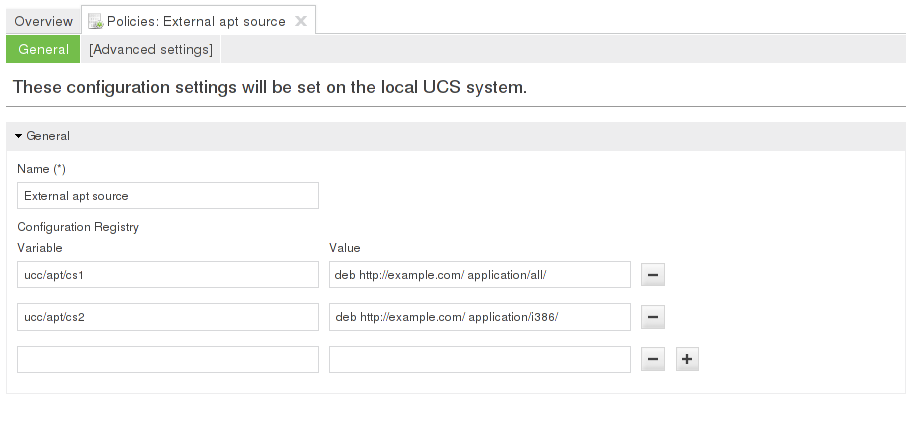
In the default setting, only the UCC repositories are used as package sources. Univention Configuration Registry
policies can be used to add new package sources (see Section 5.1). The
variables must be specified in the form ucc/apt/ID1 = apt source
entry, e.g.:
ucc/apt/cs1=deb http://example.com/ application/all/
ucc/apt/cs2=deb http://example.com/ application/i386/
Thin clients employ an OverlayFS (see Section 4.8). For this reason, the installation of updates is performed in several stages on thin clients: The client is restarted to change to the writeable mode and then following installation of the updates restarted again to change to the OverlayFS mode.
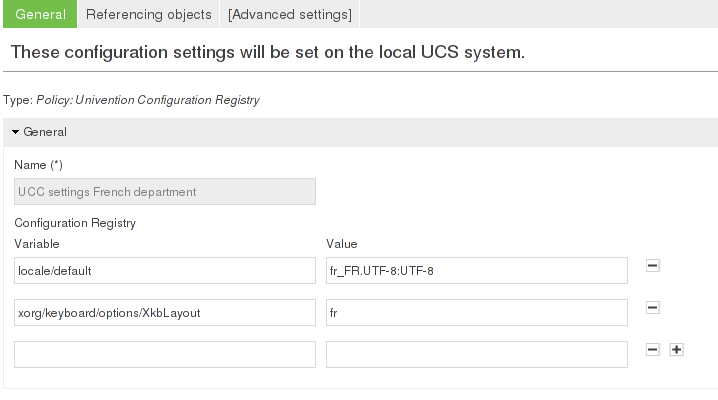
In the standard setting, the keyboard layout and the language setting (locale) of the UCS system acting as PXE server is also employed on the UCC clients. If UCC systems are not installed using PXE, the Univention Configuration Registry variables specified below need to be set via a policy:
The Univention Configuration Registry variable xorg/keyboard/options/XkbLayout can be used to set another
keyboard layout, e.g., de for German or fr for
French.
The Univention Configuration Registry variable locale/default can be used to set a different locale, e.g.,
de_DE.UTF-8:UTF-8 for German or fr_FR.UTF-8:UTF-8
for French. Please note that it may be necessary to install additional language packages for
some locales. The standard thin client image includes German and English; the standard desktop
image includes English, German, French, Dutch and Spanish.
The language and keyboard settings are evaluated every time the system is started.
The univention-ucc-cifshome-pam-mount package allows the automatic mount of a CIFS share with the user's home directory during login. It must be configured using the following Univention Configuration Registry variables. This functionality is only suitable for stationary workstations, mobile systems like notebooks should rather use a local home directory. Further information on configuring Univention Configuration Registry variables can be found in Section 5.1.
ucc/mount/cifshome/server: The name of the server from which the share is
mounted.
ucc/mount/cifshome/share: The name of the share to be mounted.
ucc/mount/cifshome/options: This configures a optional list of mount options. The full
list of available options can be found in the mount.cifs manpage.
In the standard setting, the time zone of the UCS system acting as PXE server is also employed on the UCC clients. If UCC systems are not installed using PXE, the time zone needs to be set via a policy:
The Univention Configuration Registry variable ucc/timezone can be used to set a different time zone. The
available time zones can be found in the /usr/share/zoneinfo/ directory,
for example Europe/Berlin. Further information on configuring Univention Configuration Registry variables can be
found in Section 5.1.
Authentication in UCC is performed through Kerberos. For this reason, synchronised time
sources are essential. When a UCC client joins a domain, the master domain controller of the domain is set
as the time server. The Univention Configuration Registry variable ucc/timeserver can be used to configure a
different server. Further information on configuring Univention Configuration Registry variables can be
found in Section 5.1.
The system time is synchronised via NTP every time the system is started.
UCC can use one or several print servers from the UCS domain. The Univention Configuration Registry variable
ucc/cups/server configures the server(s) to use; multiple servers need to be
separated by a blank character. Further information on configuring Univention Configuration Registry variables can be
found in Section 5.1.
In addition to local logging, the system logging (syslog) of UCC clients can also be performed remotely against a central log host based on rsyslog. As standard, the logging is performed against the UCS system acting as PXE server.
The log files are stored in the /var/log/univention/ucc-clients
directory. A separate log file is maintained for each client. The log files are also rotated
with Logrotate, e.g., syslog-client01.log,
syslog-client01.log.1, etc.
The Univention Configuration Registry variable ucc/pxe/append can be adapted to deactivate the remote logging
(syslog=n) or reroute it to another log host (syslogserver=HOSTNAME). These configuration
options are only set during the installation or update of an UCC system.
As standard, an SSH login is possible on UCC clients. The login is performed with the local root account or a domain account.
A startup animation (bootsplash) is displayed when a UCC client is started. It can be hidden by pressing the Escape key to diagnose the startup in full details.
The Univention Configuration Registry variable ucc/pxe/bootsplash on the UCS system acting as PXE server can be set to
no to deactivate it completely.
The network configuration of UCC clients is generally performed via DHCP. The configuration of MAC and IP addresses, etc., occurs in the UCS management system, see Section 3.2.
The network interfaces of a joined UCC client are managed via the Network Manager. Here you can also configure additional connections uch as a VPN/Wifi access or a static IP address.
During the PXE live boot of a UCC system, the primary interface (eth0) is not managed by Network Manager.
While offline operation is supported for images running the desktop image, thin clients require a permanenent network connection.
The wireless regulatory domain is set to 00 as standard. With some access
points, it can be necessary to configure this to the national code using the command
iw reg set.
The univention-ucc-remote-mount package installed as standard allows
access to the USB-CD/DVD drives, hard drives and sticks connected to a UCC thin client. If a
USB mass storage device is connected to the client, a local mount is performed via a udev
rule. The terminal service solutions then provide this directory through the terminal
session. The additional component cdpinger is used for the integration of
USB-CDROM/DVDROMs. VFAT, NTFS and ext* file systems are supported.
The mounting of mass storage devices is disabled on desktop systems (as mass storage devices
are automatically mounted in the KDE desktop anyway). If you still wish to enable the function
in exceptional cases, this can be done by setting the Univention Configuration Registry variable ucc/mount to
true.
The local mount points are made available in UCC terminal server, Windows terminal server and XenApp terminal server sessions if the option is activated in the policy in the UMC computer management.
Filesystems directly written to devices (such as /dev/sda) are not
mounted by default (only the respective partitions like /dev/sda1). If theUnivention Configuration Registry
ucc/mount/fullpartition is set to true, full partitions
are mounted as well.
In the standard setting, data on thin clients are cached for up to a tenth of a second before
they are written on the USB medium. The behaviour can be adapted with the Univention Configuration Registry variables
ucc/sysctl/dirtywritebackcentisecs and
ucc/sysctl/dirtyexpiredcentisecs.
Setting the Univention Configuration Registry variable ucc/mount/sync to true allows all
changes to be written directly. This generally leads to considerable performance losses.
The access to the mounted USB media is described in the corresponding sections on terminal services (see Chapter 10).
The sound output is activated in UCC clients as standard. Sound is also available in terminal sessions:
Information of the configuration of the sound output in terminal services can be found in Chapter 10.
The drivers to be used are detected automatically during system start and loaded via the
udev device manager. At this point, the necessary device links are also created under
/dev/. If drivers are not detected, kernel modules to be loaded can be
added via the Univention Configuration Registry variable kernel/modules. If more than one kernel module is to be
loaded, these must be separated by a semicolon. The Univention Configuration Registry variable kernel/blacklist
can be used to configure a list of one or more kernel modules for which automatic loading
should be prevented. Multiple entries must also be separated by a semicolon.
UCC uses the Xorg autodetection for the configuration of the graphics adapter. This automatically determines the suitable driver for the graphics card and the appropriate display parameters.
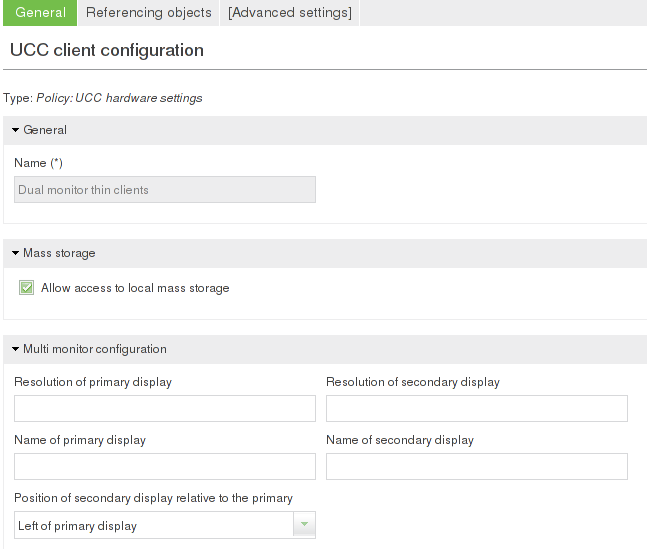
Dual-display setups can be configured using a computer policy in the UCS management system: This is primarily only relevant for thin clients; on desktop systems, the users can also configure their display settings autonomously via the KDE system settings.
To configure a dual-display setup, at least the position of the primary display relative to the secondary display must be specified in the field:
Setting the resolutions via the and
fields is optional: If they are not set,
they are assigned the recommended value (xrandr --auto). The values for
width and height should be separated by an x, e.g.,
1024x768.
The Xorg-internal names of the displays are also automatically detected and listed alphabetically. In this way, the order is always fixed. If automatic determination of the display names is used, a message like the one below is written in the syslog:
Dec 17 13:12:34 x201 logger: The display settings for x201 were
queried automatically, if you want to set them through a policy
use the display names LVDS1 and VGA1
These values can then be specified in the and fields.
For special cases such as the configuration of a third display, a local display setup script
can be configured. This is done by setting the UCR variable Univention Configuration Registry variable
ucc/displayscript to a script, which is then run for the Xorg configuration
instead of the standard script.
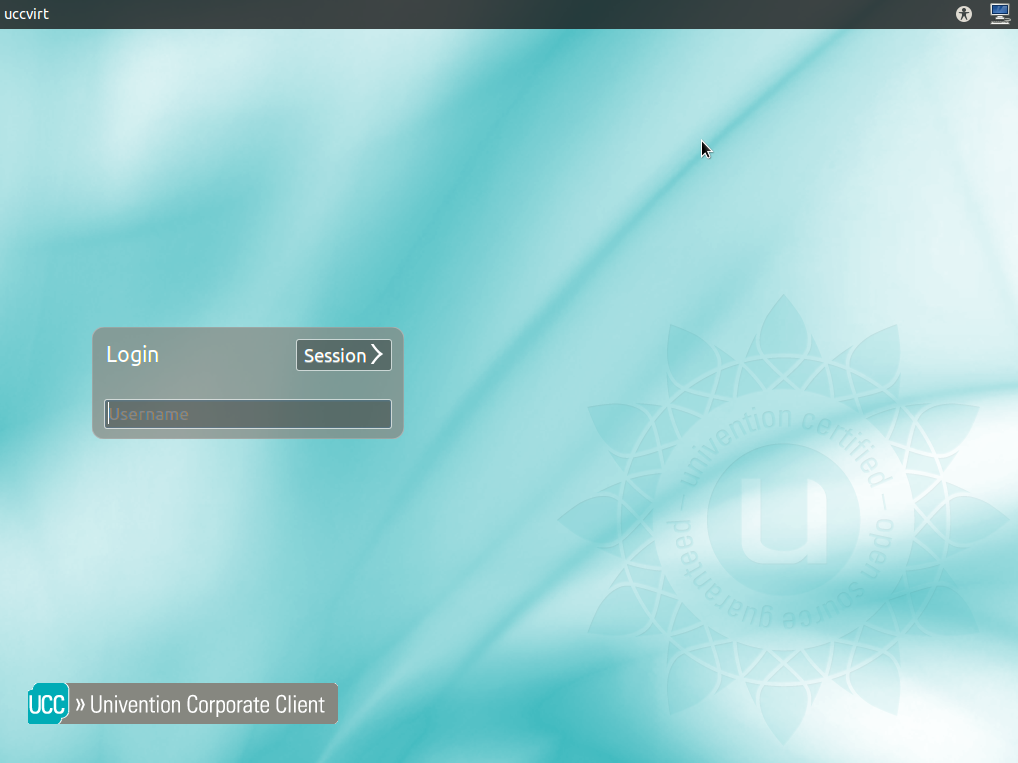
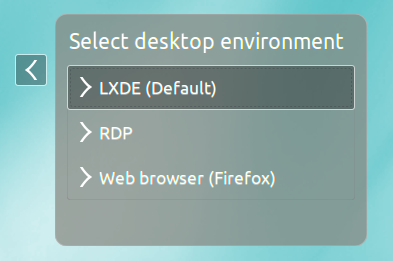
UCC uses LightDM as its login manager. When the UCC client is started, a login mask is shown. The user can choose between different session types using the menu.
If the UCC client is not yet joined or in live boots, an automatic login is performed with a temporary guest user. Such an automatic login can also be configured for joined systems, see Section 7.1.3
If a password has expired or a user is scheduled for a password change the next time she logs in, the password change is performed in the scope of the login. Password changes are currently not possible when using the RDP session script, this will be fixed in a future release.
It must be noted that although the Univention Management Console permits the creation of users with a space in their user name - as these user names are legitimate in Active Directory domains - it is not possible to logon to UCC clients with these user names.
The last chosen user session is cached per user.
The following session scripts are supported:
To configure the default session that is set for a user's first login on a client, the
Univention Configuration Registry variable lightdm/sessiondefault must contain the name of one of the session
scripts in /usr/share/xsessions. For subsequent logins on a client the
last chosen session is cached on a per user basis. If the UCC environment was configured via
the UCC setup wizard (see (Section 3.1), the setting is already
preconfigured.
Instead of an interactive login, it is also possible to configure an automatic login. This is useful for a UCC client which is only used for access to terminal services or to a website (e.g., for kiosk systems).
This is done by setting the Univention Configuration Registry variable lightdm/autologin to
yes and lightdm/autologin/session to a session
script. The session scripts can be found in the /usr/share/xsessions
directory, in other words, firefox for example.
By default a temporary guest user is used for the automatic login. Alternatively, the
Univention Configuration Registry variable lightdm/autologin/user allows the configuration of the user under
which the automatic login should occur.
If an automatic login is configured, the LightDM login dialogue is no longer shown. The session can alternatively also be specified in the user management of the Univention Management Console. This is performed in the input field in the UCC user session policy: Independently of the selection of the session script during the LightDM user login, the login is always performed with the predefined session. The sessions available in the policy can be extended, see Section 7.5.
Scripts can be run at different times during session setup and when exiting the session. All executable scripts in the following directories are run alphabetically with root rights:
/etc/lightdm/session-setup: Is run before the session script is
executed.
/etc/lightdm/session-cleanup: Is run after the session script is
exited.
/etc/lightdm/display-setup: Is run if the greeter is started
/etc/lightdm/greeter-setup: Is run if the greeter starts a session
A user policy can be used to configure environment variables in the user session. All the variables set with the and options are then set in the user session scripts.
The scripts set via the and settings are run before and after the user login with the rights of the accessing user. They must be specified as absolute file names and must not contain any spaces. Also, the scripts must be executable.
UCC systems store user and group information in local files integrated via an NSS module. In combination with caching of the login credentials (see Section 7.3), this allows operation of UCC clients without a connection to an LDAP server of the UCS domain.
The user and group information is extracted via a listener module
(ucc-nss-passwd.py) on the UCS-based UCC servers into a
passwd and a group file.
These files are read from UCC systems via an NSS module (libnss-extrausers). The user and group data are downloaded in two ways:
If the Univention Configuration Registry variable ucc/nss/update/force is set to true, the
user and group information is obtained during every login.
As standard, all of the users in the domain are always copied to the client. For special cases
- such as notebooks, on which only a few users should be present - the Univention Configuration Registry variable
ucc/nss/update/hostspecific should be set to true. In this
case, the download script for the user data on the UCS server searches for the
/var/cache/ucc/HOSTNAME.passwd and
/var/cache/ucc/HOSTNAME.group files in which system-specific user data
can be stored.
Kerberos authentication is performed on UCC systems with a network connection.
In addition, successful login attempts are cached via the PAM module pam_ccreds, i.e., if a user has successfully logged in once with an active network connection, she can also continue to log in with this password when working offline. When logging on with cached credentials, the message is displayed.
Password changes are not immediately visible to PAM modules executed later in the PAM stack; please refer to the release notes for more details.
The Firefox session script starts a Firefox web browser in a fullscreen session. It can be used, for example, to access an intranet page directly from thin clients or to configure a groupware web client.
For setting up the Firefox access to a website, the wizard must be opened in the Univention Management Console. The option must be selected under in the submenu.
The website to be accessed should be entered in the input field. If the wizard is not used, the Univention Configuration Registry variable
firefox/startsite must be configured.
Univention Corporate Client offers a desktop environment based on the KDE Plasma desktop in version 4.13. It offers a compilation of software components suitable for typical business applications.
Extensive documentation and manuals for all the KDE components can be found at http://docs.kde.org/.
LibreOffice is a core application of the Univention Corporate Client and offers the full scope of functions of a modern Office suite. In addition to standardised, open formats such as the OpenDocument format it can also be used to open and edit documents created in other office applications such as Microsoft Office. To ensure uncomplicated distribution, documents can also be easily exported in PDF format. Extensive documentation on Libreoffice can be found at http://www.libreoffice.org/get-help/documentation/.
Mozilla Firefox is also supplied for accessing websites. The Adobe Flash plugin is integrated for the playback of Flash animations.
Thin clients only offer a slimmed down desktop environment based on LXDE. LXDE is only provided for simple administrative environments.
The proxy settings in Firefox and KDE can be centrally configured via Univention Configuration Registry variables
provide by the package univention-ucc-proxy-settings (see Section 5.1). ucc/proxy/http configures a specific proxy,
e.g. http://192.168.0.100:3128. Alternatively the URL to a PAC (proxy
auto-config) file can be provided with the variable ucc/proxy/autoconfig/url.
Proxy settings configured with the variables above are immutable for the user. In Firefox the respective dialogues are greyed out. In the system settings of KDE changes can be made in the dialogues, but they are discarded when clicking .
Beside the official UCC images provided by Univention it is also possible to build custom images. These images are generated via a toolkit run on a UCS server with the UCC app installed. The image generation requires a considerable amount of disk space; we recommend ensuring that there are at least 100 GB of free disk space available on the system.
Image generation is performed with the ucc-image tool in the
ucc-image-toolkit package. The images are defined via a configuration
file (see Section 9.2). In addition to the image, the image toolkit also creates an initial ram disk (initrd) and
a kernel. An ISO image can also optionally be created. In addition, a spec file is generated,
which is used when downloading a UCC image (see Section 2.3).
The configurations of the two official UCC images are also provided in this package and can be used as templates for your own configurations:
/usr/share/doc/ucc-image-toolkit/example/ucc-desktop.cfg/usr/share/doc/ucc-image-toolkit/example/ucc-thinclient.cfg/usr/share/doc/ucc-image-toolkit/example/ucc-desktop-efi.cfg.gz
The images are created with the ucc-image
command as the root user:
/tmp.
After image generation the images need to be copied to the directory
/var/lib/univention-client-boot/ on the UCC servers. The join script needs
to be copied to /usr/lib/univention-install. After that,
univention-run-join-script needs to be executed.
The image generation is logged in /var/log/univention/ucc-image-toolkit.log. The
option -l can also be used to specify a different log file.
The following configuration settings can be used to build a custom UCC image. We recommend using one of the standard configuration files as a template. The configuration file is then processed by the image toolkit, see Section 9.1). The configuration files can be commented with a hash (#):
mkpasswd -H sha-512
	  PASSWORD
can be used to generate the hash
value.iso is specified, the UCC image is integrated into the ISO image.
UCC images can be edited without the need for a complete rebuild, e.g.to preinstall an additional package or to perform various configuration modifications. The following steps need to be executed as root:
mkdir /mnt/img
mount -o loop /var/lib/univention-client-boot/IMAGENAME.img  /mnt/img/
chroot /mnt/img
( perform arbitrary changes.. )
sync
exit
umount /mnt/img
After modifying the UCC image the MD5 checksums need to be recalculated. The MD5 sums determine whether a rolled-out image has been modified:
md5sum /var/lib/univention-client-boot/ucc-2.0-desktop-image.img \
> /var/lib/univention-client-boot/ucc-2.0-desktop-image.img.md5
In addition to the operation of stationary UCC clients, UCC also supports access to terminal services. Login is supported to:
There are three possibilities for configuring access to a terminal service:
UCC integrates terminal services provided via XRDP, i.e., the KDE Linux desktop is provided via the RDP protocol.
UCC terminal servers are installed with the UCC desktop image. The setup is described in Section 3.2. The univention-xrdp package must also be installed on the desktop image. There is a UCC software policy linked to the container cn=computers, cn=ucc-xrdpserver (see Section 5.3), i.e., if the computer object is created in the container, the package is installed automatically during the rollout of the UCC system.
An XRDP terminal server needs to be restarted once following the installation to be able to initialise additional PulseAudio drivers correctly!
The access of an XRDP terminal server from a UCC thin client via the RDP protocol is described in Section 10.2.
If the forwarding of storage devices is enabled, they appear in the user's home directory in
the .~/xrdp_client directory. Forwarding of sound output in terminal sessions is also
possible. This requires a sound card to be present or emulated on the XRDP terminal server.
Access to the XRDP terminal server from other clients is also supported (e.g., Windows PCs, Mac OS X or thin clients with third-party operating systems). For these clients it is sufficient to configure the IP address or hostname of the XDRP server and perform a login with a user from the UCS domain. An XRDP login screen is provided for the login from external devices. It is not necessary to specify a domain when logging on to an XDRP terminal server.
Password changes are currently not yet supported when logging in from an external device. If the password has expired, the login will fail. Password changes are performed in the login manager LightDM when logging in from UCC thin clients.
As standard, UCC uses a KDE profile optimised for remote operation on terminal servers. It
disables e.g. update notifications. The use of this profile can be disabled per UCC terminal
server by setting the Univention Configuration Registry variable on the XRDP terminal server ucc/session/remote/profile to
false (see Section 5.1).
UCC supports login to Windows 2003/2008/2012-based Windows terminal servers via the RDP protocol. The Windows terminal servers can be joined in the UCS domain or alternatively the access can be performed against an external domain.
The login is performed via the RDP session script which uses the NeutrinoRDP client (a fork of the freerdp code base). The password entered by the user during login to LightDM is cached by a PAM module and automatically provided to NeutrinoRDP, i.e., it is not necessary to enter it again when logging in to the terminal server.
The RDP client Remmina is provided as a client with which an RDP connection can be configured and started on the desktop.
The session script for RDP (univention-ucc-session-rdp) is installed on desktop systems and thin clients in the default setting.
For setting up the RDP access to RDP terminal servers, the wizard must be opened in the Univention Management Console. The option must be selected under in the submenu.
The host name of the RDP terminal server must be entered in the input field. If a Windows terminal server is used, the domain name must be entered in the input field. If XRDP is used, the field may be left blank.
If sound is to be transmitted to the accessing client from the terminal session, the option must be enabled. The sound output in the RDP session is transmitted via an RDP session channel.
USB storage devices (USB sticks or CD/DVD drives), which can be inserted in the thin client, can be passed through to the RDP session. This is done by enabling the option. Further details on the mounting of devices can be found in Section 6.2. The transmission is performed via a session channel of the RDP protocol.
The terminal server and the Windows domain of the terminal server can be specified per
user via a UCC user session user policy. Alternatively, the server
and the domain can also be specified per client by setting the Univention Configuration Registry variables
rdp/domainname and rdp/server. If an XRDP server is used as
the terminal server, the rdp/domainname can be left blank.
Mass storage devices mounted on the thin client (see Section 6.2)
is available in the RDP session if the Univention Configuration Registry variable rdp/redirectdisk is set to
true.
Sound output is enabled by default. It can be disabled by setting the Univention Configuration Registry variable
rdp/disable-sound to true.
The RDP client uses the "Network Level Authentication" (NLA) authentication
method as standard. This can be disabled by setting the Univention Configuration Registry variable rdp/checknla to
false.
Verification of the login certificate is also disabled as standard. It can be enabled by
setting the Univention Configuration Registry variable rdp/ignorecertificate to true.
In special cases, it may be necessary to disable the TLS encryption of the RDP
connection entirely. This is done by setting the Univention Configuration Registry variable rdp/tlsencryption
to false.
The Univention Configuration Registry variable rdp/keyboard can be used to configure a different keyboard
layout for the RDP session from that of the current client. The layout is specified in
the same format as the Univention Configuration Registry variable xorg/keyboard/options/XkbLayout.
rdp/user can be used to specify a different user name from the current
one during login.
The Univention Configuration Registry variable rdp/additionaloptions can be used to provide any additional
options to neutrinordp (e.g., to enable additional plugins).
rdp/geometry can be used to specify the screen resolution.
UCC supports access to Citrix XenApp terminal servers. This documentation refers to Citrix XenApp and Citrix Receiver 13.
Citrix XenApp supports two login methods:
UCC only integrates the browser-based login method.
Access to a Citrix terminal service is performed via the XenApp session script. This opens a fullscreen Firefox session with the login web interface of the Citrix installation. If the browser is closed, a menu opens in which you are offered the possibility to log in to Citrix again, shutdown the thin client or select another session.
For setting up access to a Citrix XenApp terminal service, the wizard must be opened in the Univention Management Console. The option must be selected under in the submenu.
For licensing reasons it is not possible to deliver the Citrix Receiver with Univention Corporate Client. Instead, it must be downloaded for the 32 bit Intel architecture as a DEB file using the download link provided and saved in a local directory. Only Citrix Receiver 13.0 is supported in UCC 2.0.
The UCC thin client image in which you wish to install the Citrix Receiver must now be selected in the field. After clicking on and selecting the DEB file of the Citrix Receiver, it will be automatically integrated in the UCC image.
In the default setting, each user of the Citrix terminal server must confirm the end user license agreement (EULA) the first time he/she accesses the terminal server. If the option is enabled, the license is confirmed automatically.
The option is used to configure the URL of the Citrix web interface. The session script then opens the web interface directly in Firefox during login.
As the authentication during the Citrix login occurs on the web interface and if Citrix is the only terminal service, it is not necessary for the user to log on to the thin client again. If the option is enabled, the login to LightDM occurs automatically.
This section provides a brief description of the setting up of the XenApp for complex scenarios in which the UCC setup wizard should not be used. For general information on XenApp and UCC, please see Section 10.3.1.1
The Citrix Receiver for 32 bit systems must be downloaded as a DEB file from http://www.citrix.de/downloads/citrix-receiver/linux/receiver-for-linux-130.html.
The ucc-image-add-citrix-receiver tool can be used to install the Citrix
Receiver in a UCC thin client image. The parameter -i specifies the UCC
image and -d the DEB file with the Citrix Receiver. The
univention-ucc-session-xenapp meta package is installed automatically.
If the EULA is to be confirmed automatically, the Univention Configuration Registry variable citrix/accepteula
must be set to true by means of a policy. The web interface for the
Citrix login must be configured via the citrix/webinterface variable.
To configure a login-less access to the web interface the Univention Configuration Registry variable
lightdm/autologin/session must be set to XenApp and the
Univention Configuration Registry variable lightdm/autologin to yes.
The Citrix Receiver uses /dev/random as a
randomness source as standard. /dev/random blocks access if insufficient entropy is
available from hardware sources. This is the case on many thin clients.
If the Univention Configuration Registry variable citrix/linkdevrandom is set to true,
/dev/random is converted to a symbolic link to
/dev/urandom which prevents these delays.
In the default setting, the Citrix Receiver accesses the thin client's sound card(s) via the
ALSA interface. For special cases - e.g., systems with multiple sound cards - the Univention Configuration Registry variable
citrix/pulseaudio can be set to true. The result of this
is that the PulseAudio sound daemon is started in the XenApp session script (this e.g.
ensures the assignment of a primary sound card).
Configuration parameters such as full screen display or the sound transmission are configured in the Citrix Farm settings. They are then saved in the ICA file generated for the user during login and implemented by the Citrix Receiver.
An USB storage device on a thin client (see Section 6.2) is available under Drive Z: in the Citrix session.
The Citrix Receiver offers the possibility of optimising the playback of Flash videos: instead of streaming the video on the server and transmitting every image, the video is transmitted to the client and played locally in the terminal session. This requires the installation of the Flash plugin on the UCC client (the package is called adobe-flashplugin).
In the default setting the Flash version on the client and the Flash version on the Citrix server need to be identical. Releases of Adobe Flash later than 11.2 are no longer available for Linux. The version check can be disabled on the Citrix server. For this a registry key needs to be added on the Citrix server in the location HKEY_LOCAL_MACHINE -> Software -> Wow6432Node -> Citrix -> HdxMediaStreamForFlash -> Server -> PseudoServer. The new key must be created as a dword, named FlashPlayerVersionComparisonMask and set to 0.
To verify the local Flash playback, you can play a Flash video on the Citrix server and query
the process list on the UCC client using ps aux. If the Flash redirection is
working correctly, you should see a process named FlashContainer.bin.
[ucs-manual] Univention GmbH. 2014. Univention Corporate Server - Manual for users and administrators. http://docs.univention.de/manual-3.2.html.
[ucs-manual-multiedit] Univention GmbH. 2014. Univention Corporate Server - Manual for users and administrators. http://docs.univention.de/manual-3.2.html#central%3Auser-interface%3Aedit.
[ucs-manual-cron] Univention GmbH. 2014. Univention Corporate Server - Manual for users and administrators. http://docs.univention.de/manual-3.2.html#computers%3AExecuting_recurring_actions_with_Cron.
[ucs-manual-nagios] Univention GmbH. 2014. Univention Corporate Server - Manual for users and administrators. http://docs.univention.de/manual-3.2.html#nagios::general.
[ucs-manual-pxeboot] Univention GmbH. 2014. Univention Corporate Server - Manual for users and administrators. http://docs.univention.de/manual-3.2.html#ip-config:Configuration_of_boot_server_PXE_settings.
[ubuntu-repositories] Ubuntu Community Wiki. 2014. Repositories Ubuntu. https://help.ubuntu.com/community/Repositories/Ubuntu.