Table of Contents
Univention Corporate Server (UCS) is a Linux-based server operating system for the operation and administration of IT infrastructures for companies and authorities. UCS implements an integrated, holistic concept with consistent, central administration and can ensure the operation of all the components in an interrelated security and trust context, the so-called UCS domain. At the same time, UCS supports a wide range of open standards and includes extensive interfaces to infrastructure components and management tools from other manufacturers, meaning it can be easily integrated in existing environments.
UCS consists of reliable Open Source software tried and tested in organisations of different sizes. These software components are integrated together via the UCS management system. This allows the easy integration and administration of the system in both simple and complex distributed or virtualized environments.
The central functions of UCS are:
These functions are provided by different software packages in Univention Corporate Server and are handled in detail in the course of this handbook. Basically, the software packages contained in UCS can be assigned to the following three main categories:
The base system encompasses the operating system of the UCS Linux distribution maintained by Univention and based on Debian GNU/Linux. It largely includes the same software selection as Debian GNU/Linux as well as additional tools for the installation, updating and configuration of clients and servers.
The UCS management system realises a single point of administration where the accounts of all domain members (users, groups, and hosts) and services such as DNS and DHCP are managed in a single directory service. Core components of the management system are the services OpenLDAP (directory service), Samba (provision of domain, file and print services for Windows), Kerberos (authentication and single sign on), DNS (network name resolution) and SSL/TLS (secure transmission of data between systems). It can be used either via a web interface (Univention Management Console) or in the command line and in individual scripts. The UCS management system can be extended with APIs (application programming interfaces) and provides a flexible client-server architecture which allows changes to be transferred to the involved systems and be activated there.
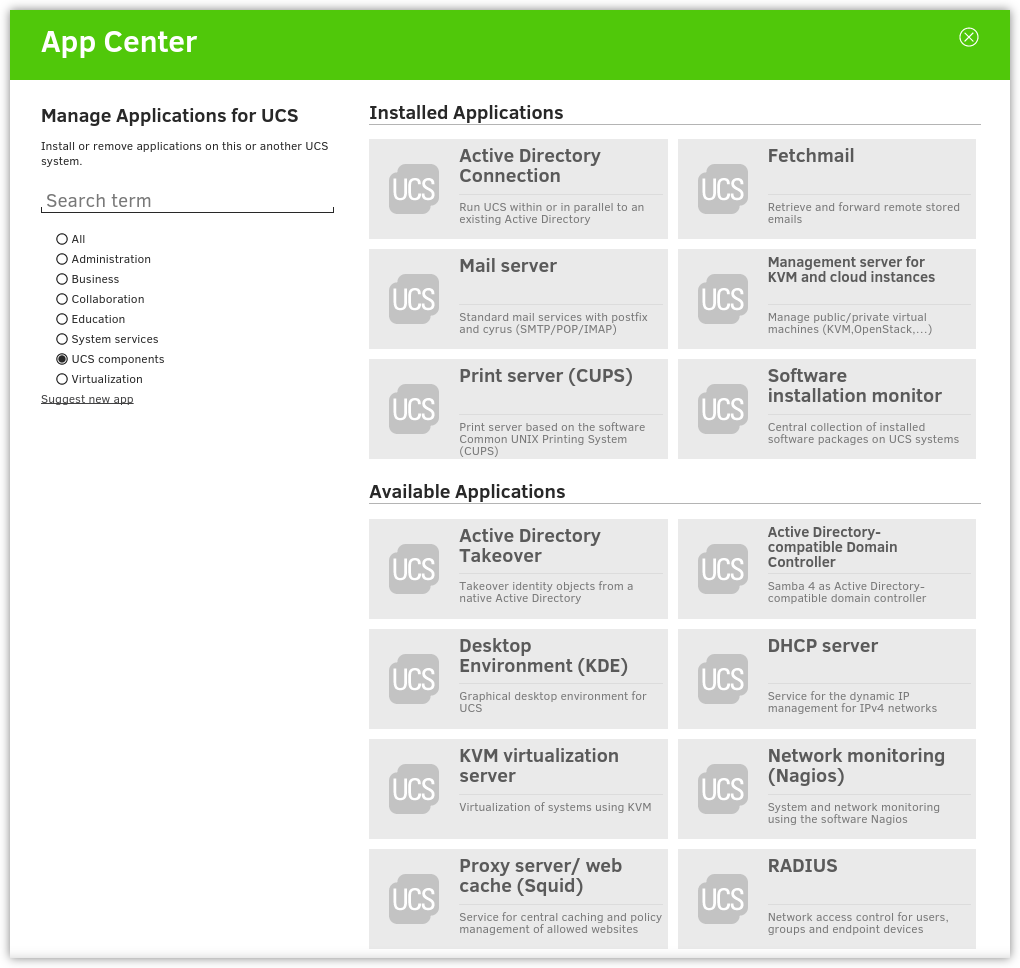
Additional components from Univention and other manufacturers can easily be installed using the App Center. They expand the system with numerous functions such as groupware, document management and services for Windows, meaning that they can also be run from a UCS system and administrated via the UCS management system.
Linux is an operating system which always had a focus on stability, security and compatibility with other operating systems. Therefore Linux is predestined for being used in server operating systems that are stable, secure and highly available.
Built on that base, UCS is a server operating system which is optimised for the simple and secure operation and management of applications and infrastructure services in enterprises and public authorities. For efficient and secure management such applications rely on the tight integration in the user and permission management of the UCS management system.
UCS can be employed as the basis for the IT infrastructure in companies and authorities and provide the central control for it. This makes a considerable contribution to secure, efficient and cost-effective IT operation. The business-critical applications are integrated in a uniform concept, adapted to each other and pre-configured for professional utilisation. Alternatively it can be operated as part of an existing Microsoft Active Directory domain.
The use of UCS begins either with a classic operating system installation on a physical server or as a virtual machine. Further information can be found in Chapter 2.
In an IT infrastructure managed with UCS, all servers, clients and users are contained in a common security and trust context, referred to as the UCS domain. Every UCS system is assigned a so-called server role during the installation. Possible system roles are domain controller, member server and client.
Depending on the system role within the domain, such services as Kerberos, OpenLDAP, Samba, modules for domain replication or a Root CA (certification authority) are installed on the computer. These are automatically configured for the selected system role. The manual implementation and configuration of every single service and application is therefore not required. Due to the modular design and extensive configuration interfaces, tailor-made solutions to individual requirements can nevertheless be realised.
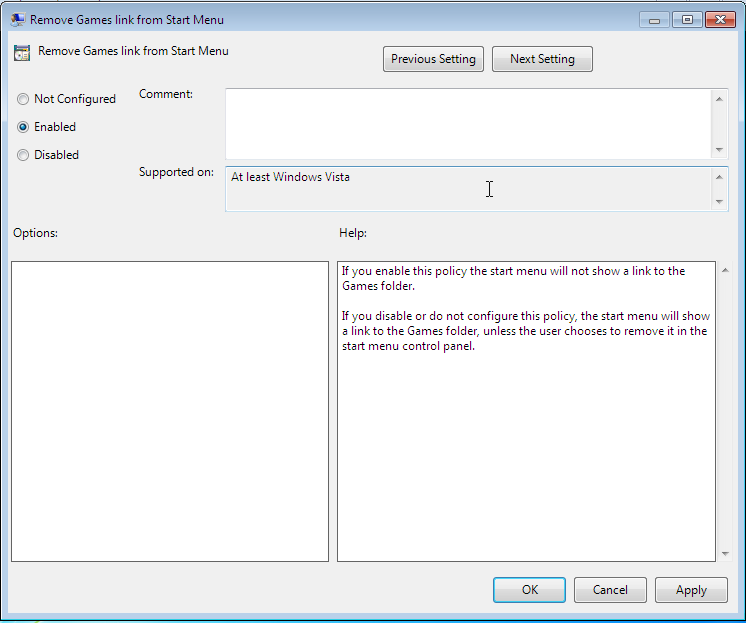
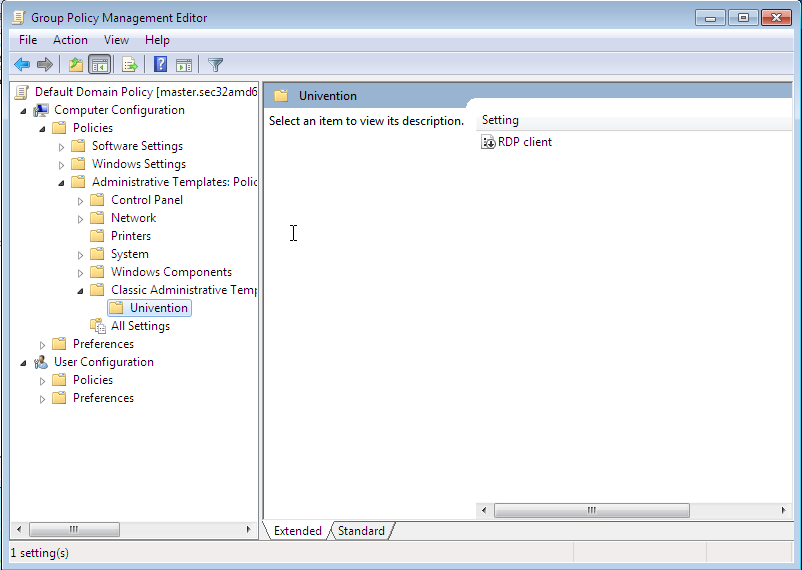
The integration of Samba, which provides the domain service for clients and servers operated with Microsoft Windows, makes Univention Corporate Server compatible with Microsoft Active Directory (AD), whereby the system acts as an Active Directory server for Windows-based systems. Consequently, for example, group policies for Microsoft Windows systems can be administrated in the usual way.
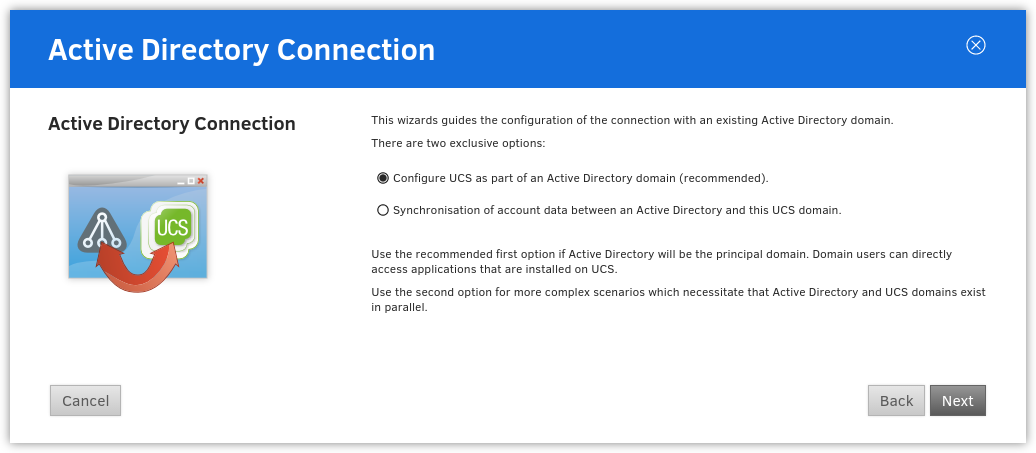
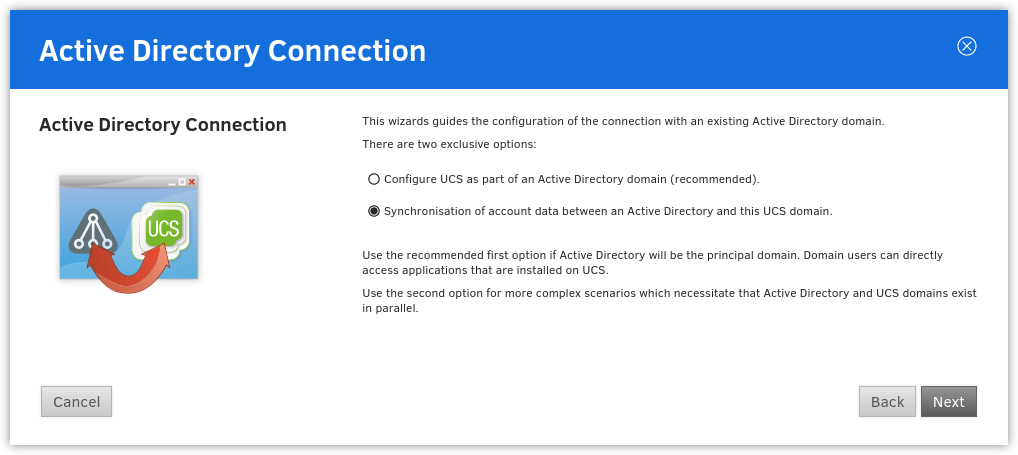
UCS can also be operated as part of an existing Microsoft Active Directory domain. This way, users and groups of the Active Directory domain can access applications from the Univention App Center.
Ubuntu or Mac OS X clients can be integrated in a UCS environment, as well (see Section 8.1.1).
The Univention App Center offers additional UCS components and extensions and a broad selection of business IT software, e.g., groupware and collaboration, file exchange, CRM or backup. These applications can be installed in existing environments with a few clicks and are usually ready to use. In most cases they are directly integrated into the UCS management system such that they are available in Univention Management Console. This provides a central management of data on the domain level and obsoletes the separate management of, e.g., user data in multiple places.
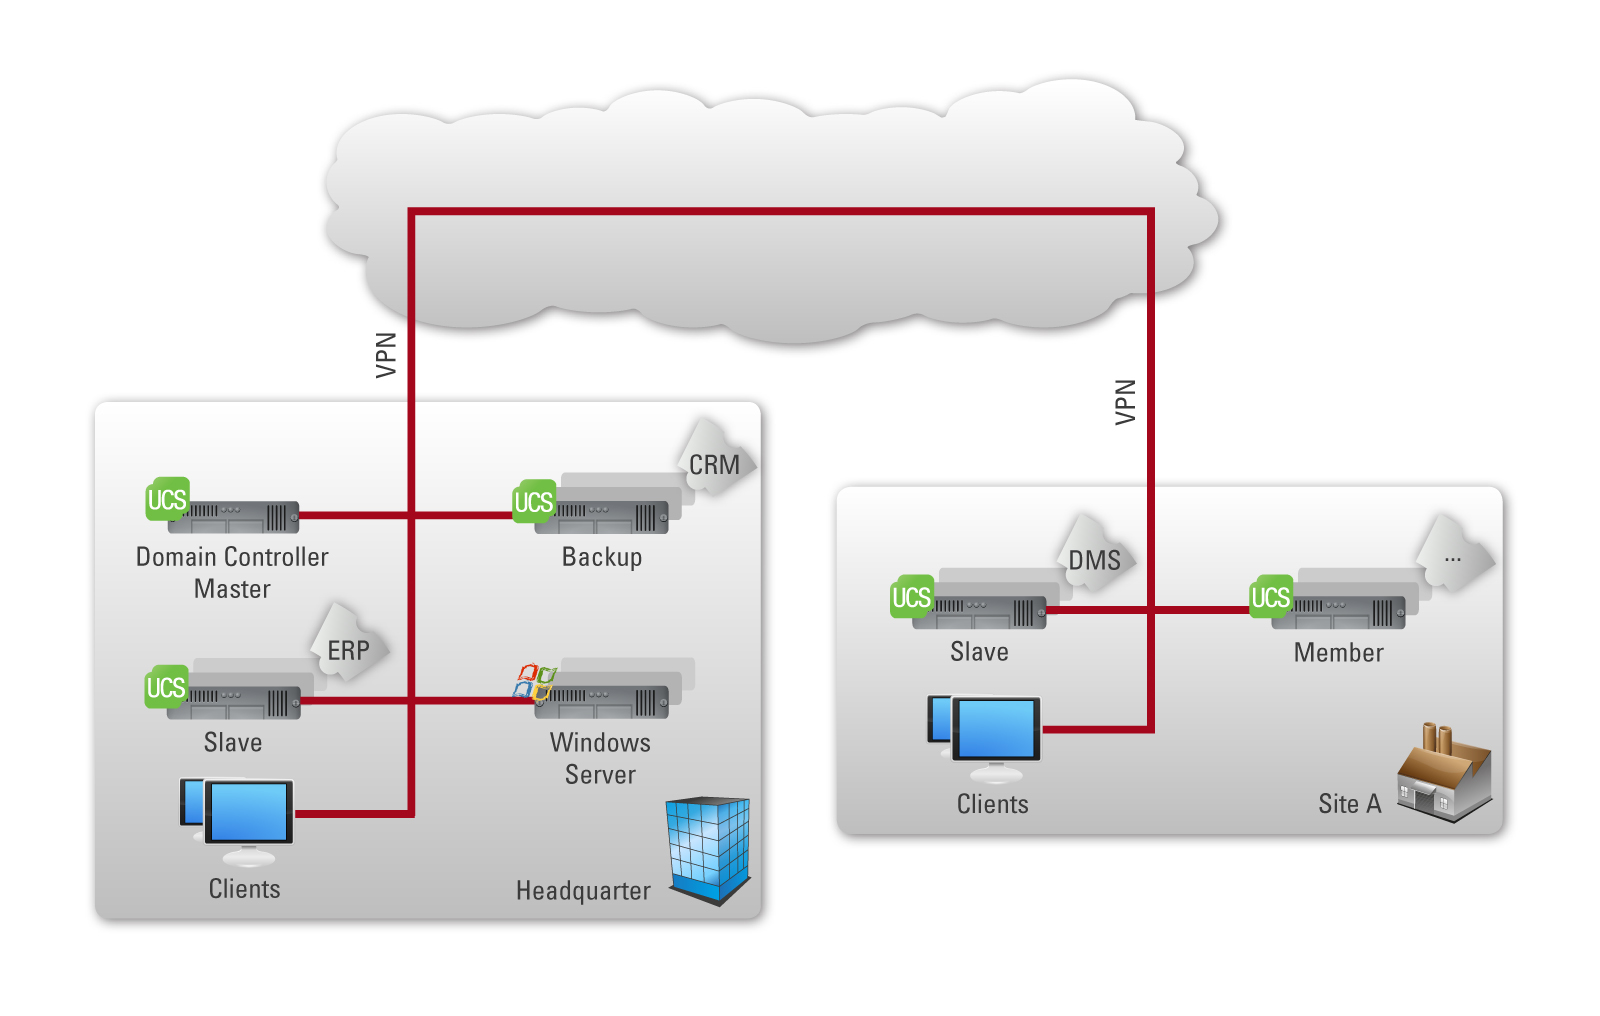
With the UCS management system, all the components of the UCS domain can be centrally administrated across computer, operating system and site boundaries. It thus provides a single point of administration for the domain. One primary element of the UCS management system is an LDAP directory in which the data required across the domain for the administration are stored. In addition to the user accounts and similar elements, the data basis of services such as DHCP is also saved there. The central data management in the LDAP directory avoids not only the repeated entry of the same data, but also reduces the probability of errors and inconsistencies.
An LDAP directory has a tree-like structure, the root of which forms the so-called basis of the UCS domain. The UCS domain forms the common security and trust context for its members. An account in the LDAP directory establishes the membership in the UCS domain for users. Computers receive a computer account when they join the domain. Microsoft Windows systems can also join the domain such that users can log in there with their domain passport.
UCS utilises OpenLDAP as a directory service server. The directory is provided by the master domain controller and replicated on all domain controllers (DCs) in the domain. The complete LDAP directory is also replicated on a DC backup as this can replace the DC master in an emergency. In contrast, the replication on DC slaves can be restricted to certain areas of the LDAP directory using ACLs (access control lists) in order to realize a selective replication. For example, this may be desirable if data should only be stored on as few servers as possible for security reasons. For secure communication of all systems within the domain, UCS integrates a root CA (certification authority).
Further information can be found in Section 3.4.
Access to the LDAP directory is performed via the web-based user interface Univention Management Console (UMC). In addition to this, Univention Directory Manager allows the realisation of all domain-wide administrative tasks via a command line interface. This is particularly suitable for the integration in scripts or automated administrative steps.
Univention Management Console allows to display, edit, delete, and search the data in the LDAP directory via various filter criteria. The web interface offers a range of wizards for the administration of user, groups, networks, computers, directory shares and printers. The administration of computers also comprises comprehensive functions for distributing and updating software. The integrated LDAP directory browser can be used to make further settings and add customer-specific object classes or attributes.
Further information can be found in Chapter 4.
Univention Management Console allows not only the access to the LDAP directory, but also the web-based configuration and administration of individual computers. These include the adaptation of configuration data, the installation of software as well as the monitoring and control of services and the operating system itself. With the UCS management system, domain administration as well as computer and server configuration is possible from any place via a comfortable graphic web interface.
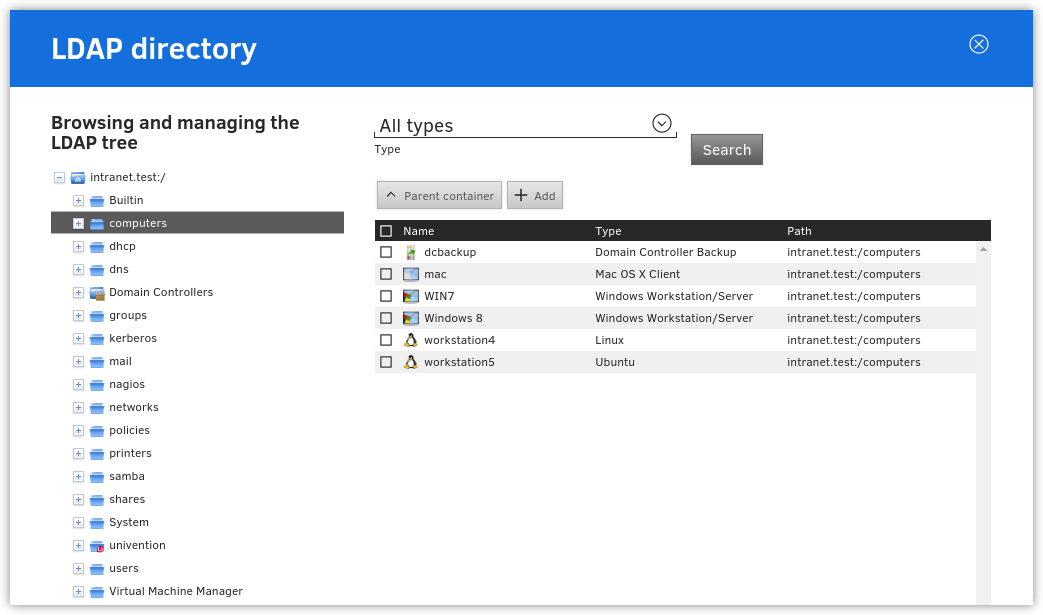
The tree-like structure of LDAP directories is similar to that of a file system It ensures that objects (such as users, computers, etc.) are in one container which itself can be adopted by other containers. The root container is also called the LDAP base object.
Policies describe certain administrative settings which are applied to more than one object. Linked to containers, they facilitate the administration as they are effective for all objects in the container in question as well as the objects in subfolders.
For example, users can be organised in different containers or organisational units (which are a form of containers) depending on which department they belong to. Settings such as the desktop background or accessible programs can then be connected to these organisational units using policies. Subsequently, they apply for all users within the organisational unit in question.
Further information can be found in Section 4.5.
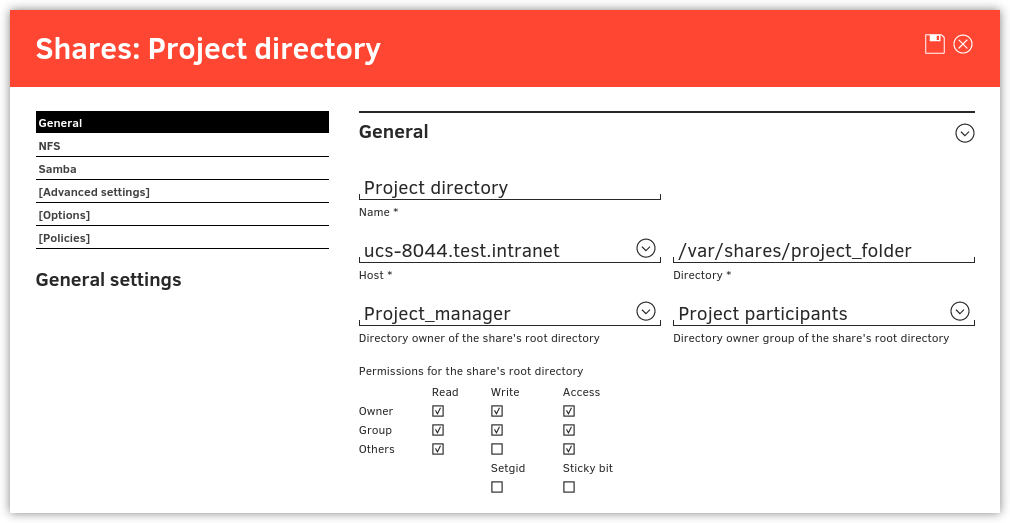
The listener/notifier mechanism is an important technical component of the UCS management system. With this, the creation, editing or deleting of entries in the LDAP directory triggers defined actions on the computers in question. For example, the creation of a directory share with Univention Management Console leads to the share firstly being entered in the LDAP directory. The listener/notifier mechanism then ensures that the NFS and Samba configuration files are also expanded accordingly on the selected server and that the directory is created in the file system of the selected server if it does not already exist.
The listener/notifier mechanism can be easily expanded with modules for further - also customer-specific - procedures. Consequently, it is used by numerous technology partners for the integration of their products in the LDAP directory service and the UCS management system for example.
Further information can be found in Section 3.5.
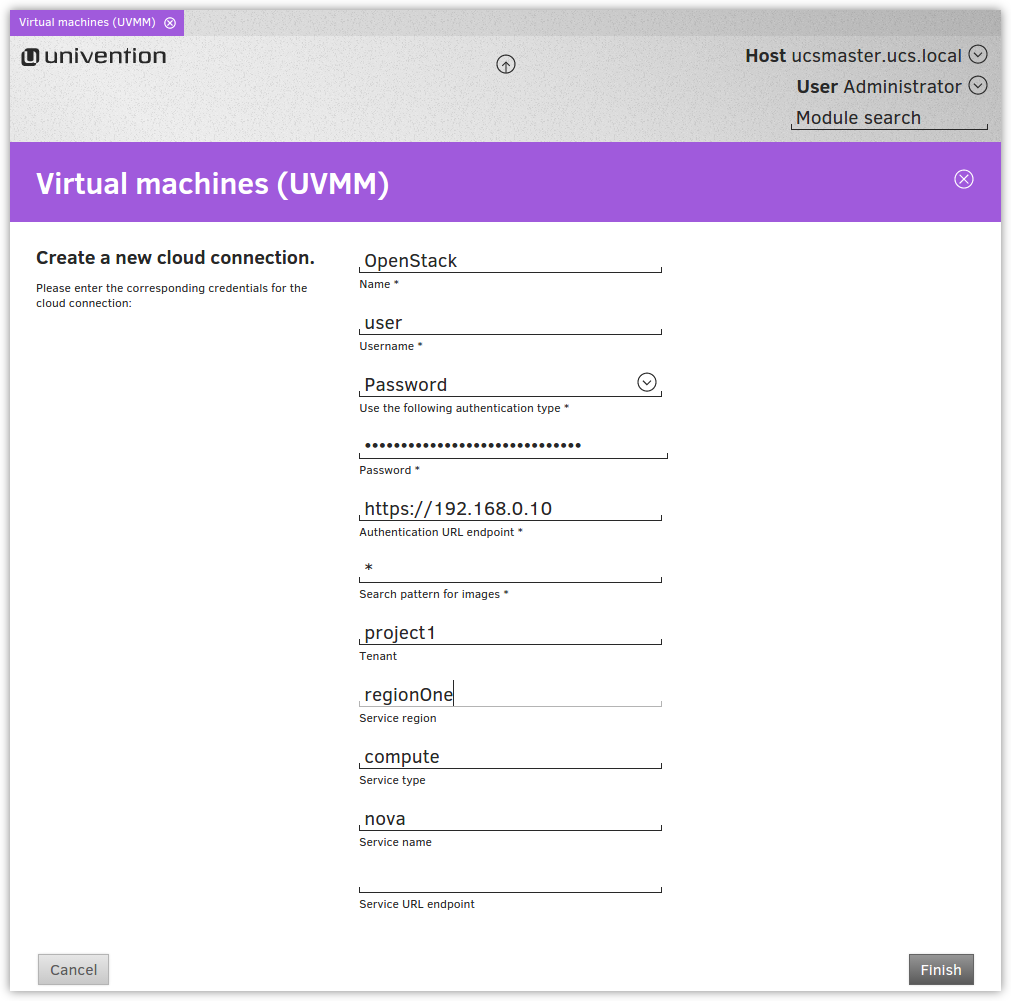
With the UMC module UCS Virtual Machine Manager (UVMM), UCS offers an extensive, powerful tool for the administration of hybrid cloud environments virtualization servers registered in the UCS domain and virtual machines operated on it can be centrally monitored and administrated. In addition UVMM offers the possibility to manage virtual machines in OpenStack or EC2 environments.
Further information can be found in Chapter 15.
This manual addresses just a small selection of the possibilities in UCS. Among other things, UCS and solutions based on UCS provide:
Further documentation related to UCS and further issues is published under [ucs-dokumentationen] and in the Univention Wiki (http://wiki.univention.de/).
The manual uses the following symbols:
Warnings are highlighted.
Notes are also highlighted.
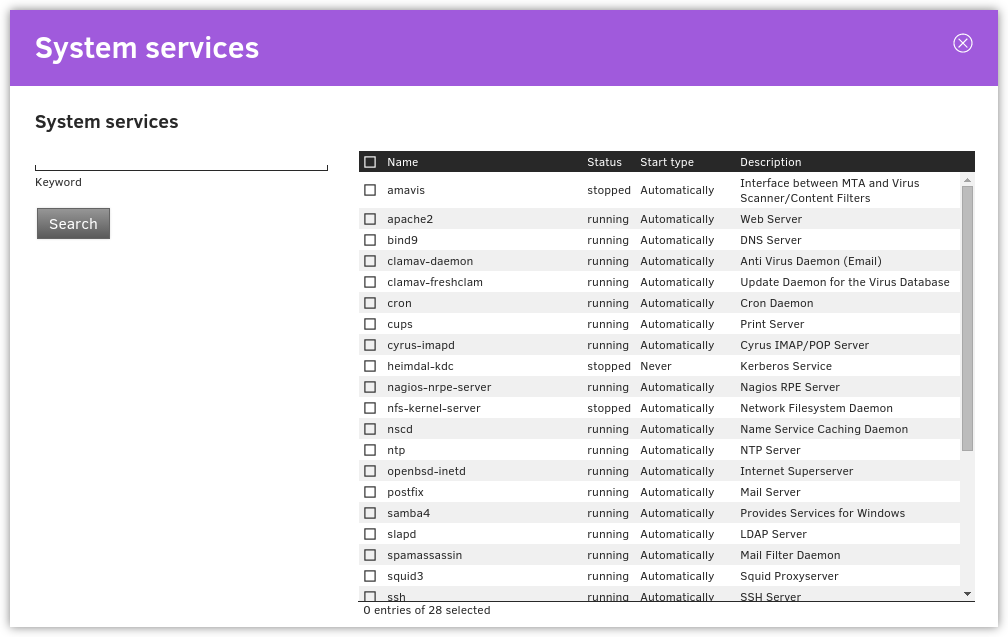
This tables describes the functionality of a UMC module:
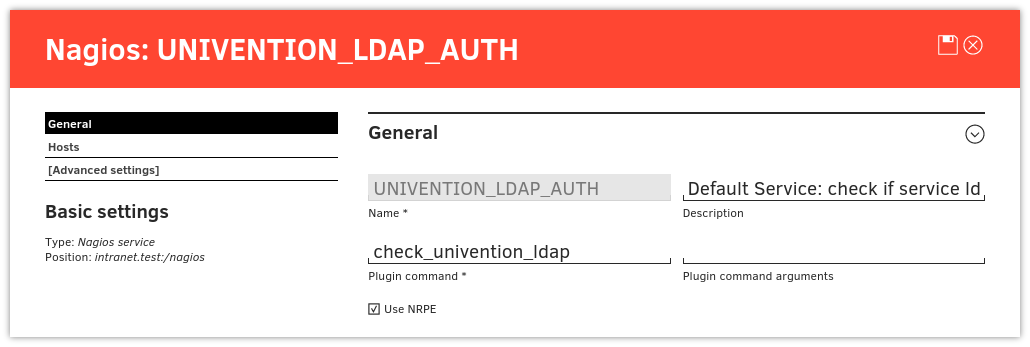
Table 1.1. Tab Nagios service
| Attribute | Description |
|---|---|
| Name | The unique name of a Nagios service. |
| Description | An arbitrary description of the Nagios service. |
Menu entries, button labels, and similar details are printed in lettering. In addition, are represented in square brackets.
Names are in bold.
Computer names, LDAP DNs, program names, file names, file paths,
internet addresses and options are also optically accented.
Commands and other keyboard input is printed in the Courier font.
In addition, excerpts from configuration files, screen output, etc are
printed on a grey background.
A backslash (\) at the end of a line signifies that the subsequent line feed is not to be understood as an end of line. This circumstance may occur, for example, where commands cannot be represented in one line in the manual, yet have to be entered in the command line in one piece without the backslash or with the backslash and a subsequent Enter.
The path to a function is represented in a similar way to a file path. means for example, you have to click in the main menu and in the submenu.
The following documentation describes how to install Univention Corporate Server (UCS). The UCS system is installed from the DVD. The installation is interactive and prompts all the necessary system settings in a graphic interface.
The installation DVD is available for the computer architecture amd64 (64-bit). In addition to support for the widely distributed BIOS systems, the DVD also includes support for the Unified Extensible Firmware Interface (UEFI) standard. The UEFI support on the DVD is also capable of starting systems with activated SecureBoot and installing UCS there.
Following installation on hardware or in a virtualization solution, UCS can also be installed on the Amazon EC2 cloud using an AMI image. Further information can be found in Section 2.14.
The installer's input masks can be operated with the mouse or via the keyboard.
The button can be used to cancel the current configuration step. An earlier configuration step can then be selected again in the menu that is subsequently shown. Under certain circumstances, subsequent configuration steps cannot be directly selected if the earlier steps have not been completed.
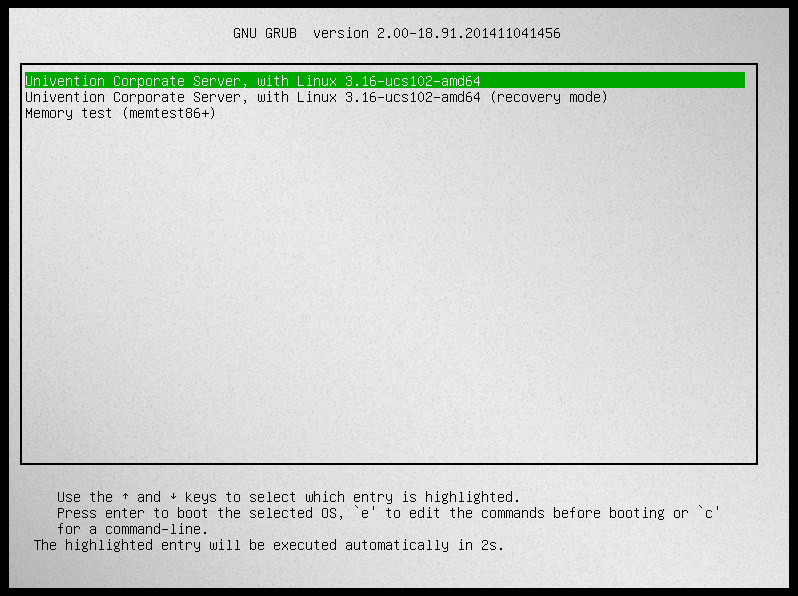
After booting the system from the installation medium, the following boot prompt is displayed:
Now you can choose between several installation procedures.
The submenu offers advanced options for the installation process for selection:
Once one of the installation option is selected, the kernel is loaded from the installation medium. The actual installation is divided into separate modules, which can be loaded from the installation medium subsequently if necessary. There are modules for network configuration or for selecting the software to be installed, among others.
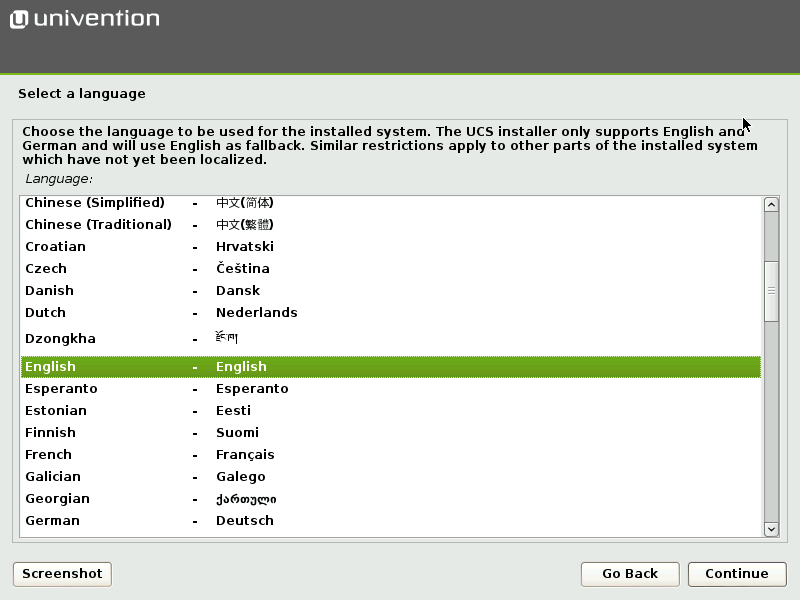
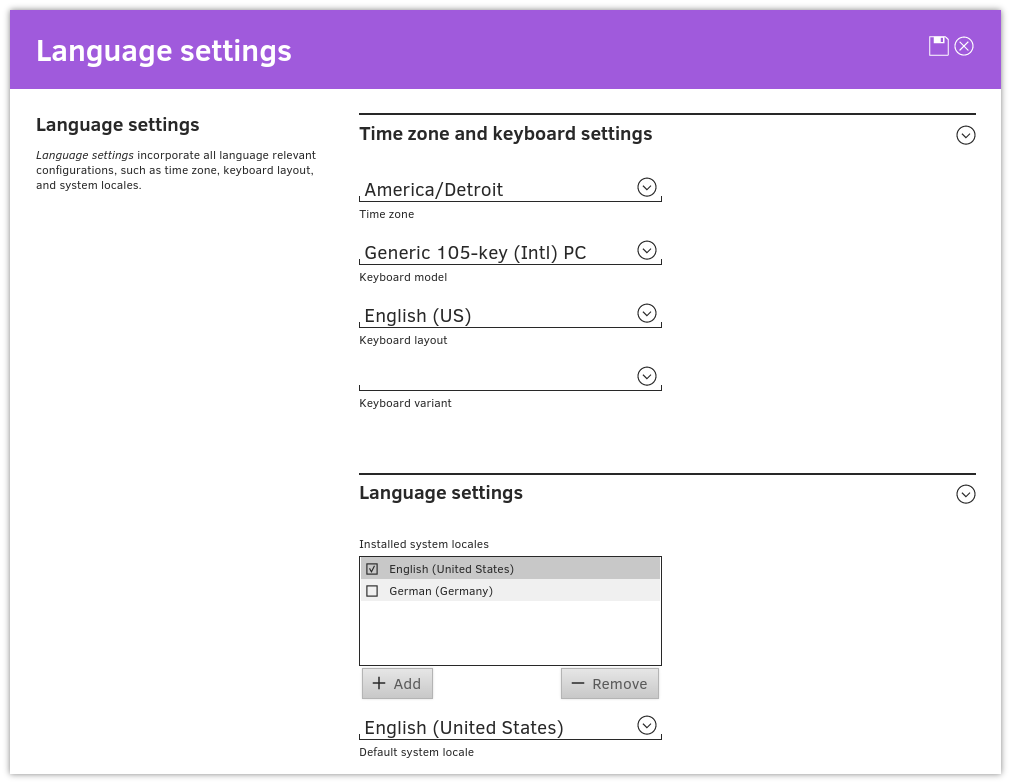
In the first step, you can select the system language you wish to use. The selection has an influence on the use of language-specific characters and permits the representation of program output in the selected languages in the installed UCS system.
If Univention Installer has been translated into the selected language (currently German and English), the selected language is also used during the installation, otherwise the installation is performed in English.
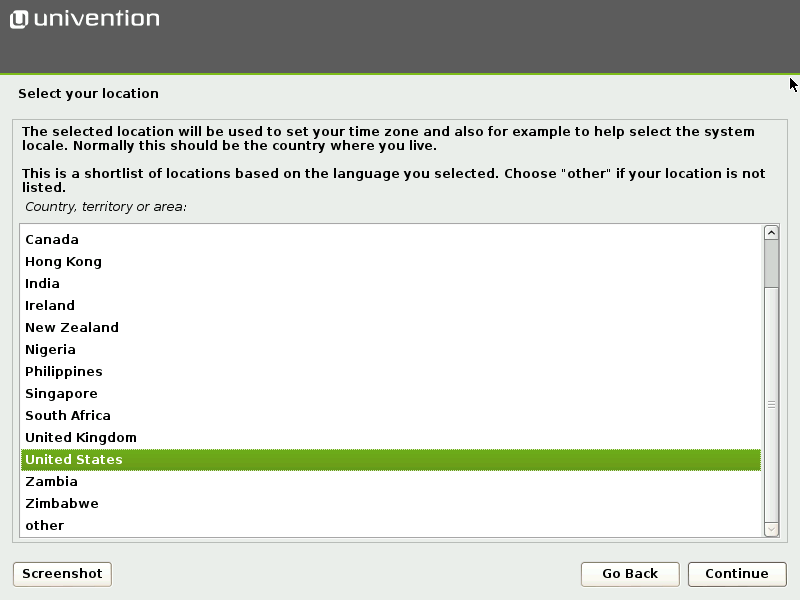
Once the system language has been selected, a small list of locations is displayed based on the selected language. Select a suitable location from the list. The selected location is used to set the time zone or the correct language variant, for example. Should none of the displayed locations be appropriate, a more extensive list can be displayed using the menu entry .
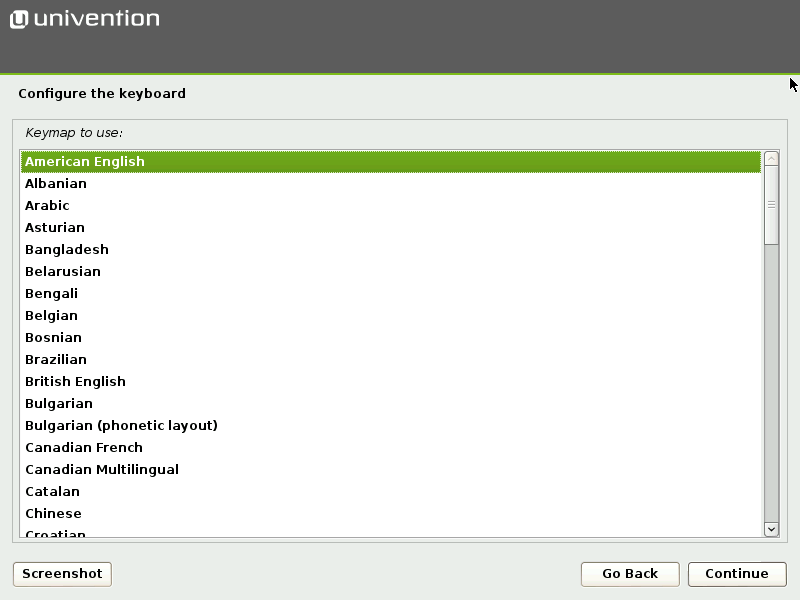
The keyboard layout can be selected independently of the system language. The language selected here should be compatible with the keyboard used as it may otherwise cause operating problems.
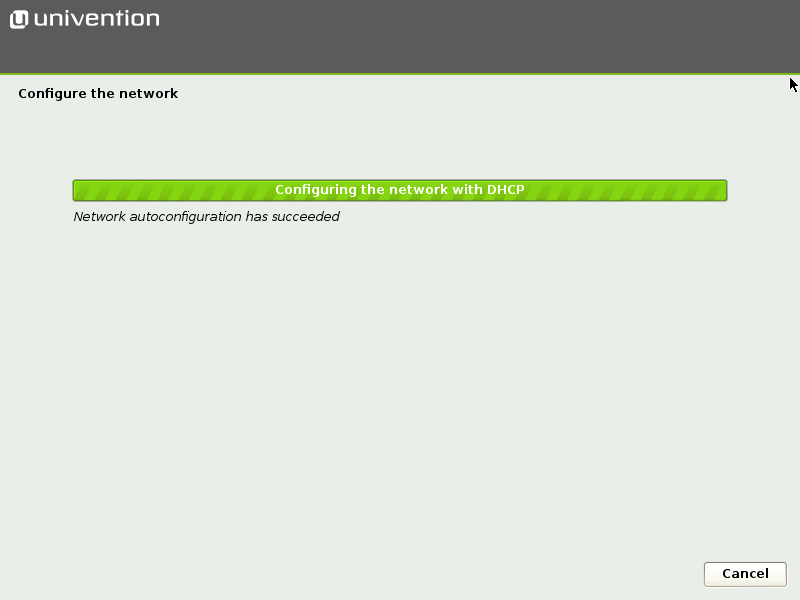
Initially, the Univention Installer attempts to configure the network interfaces automatically. This can be disabled by selecting the menu item from the menu in the GRUB bootloader. Firstly, an attempt is made to determine an IPv6 address via the stateless address autoconfiguration (SLAAC). If this is not successful, the Univention Installer attempts to request an IPv4 address via the Dynamic Host Configuration Protocol (DHCP). If this is successful, the manual network configuration of Univention Installer is skipped.
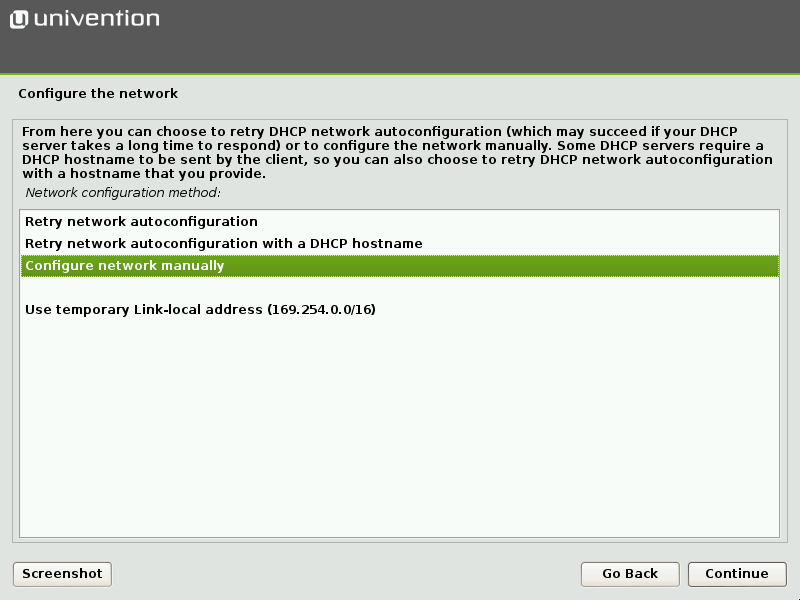
If there is no DHCP server present in the local network or static configuration of the network interface is required, the button can be selected. The Univention Installer then offers to repeat the automatic configuration or to configure the interface manually.
At least one network interface is required for the installation of Univention Corporate Server. If no supported network card is detected, Univention Installer opens a list of supported drivers for selection.
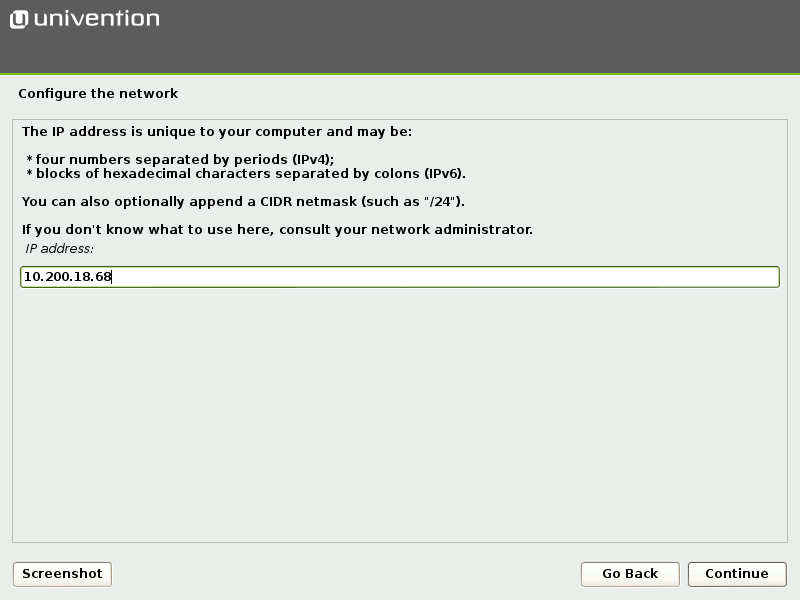
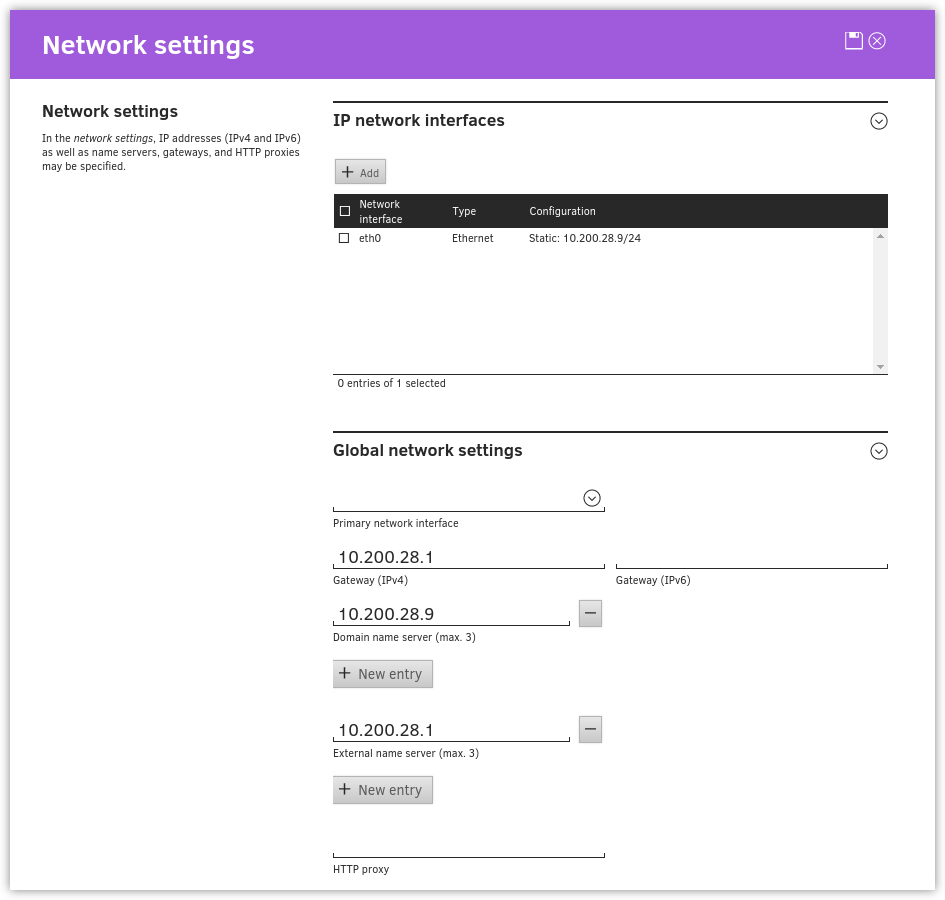
In manual configuration it is possible to specify either a static IPv4 or an IPv6 address for the system. IPv4 addresses have a 32-bit length and are generally written in four blocks in decimal form (e.g., 192.168.0.10), whereas IPv6 addresses are four times as long and typically written in hexadecimal form (e.g., 2001:0DFE:FE29:DE27:0000:0000:0000:0000).
In addition to entering a static IP address, values for network masks, gateways and DNS servers are also requested.
The following points must be taken into consideration when specifying a DNS server manually. They depend on the intended subsequent use of the UCS system.
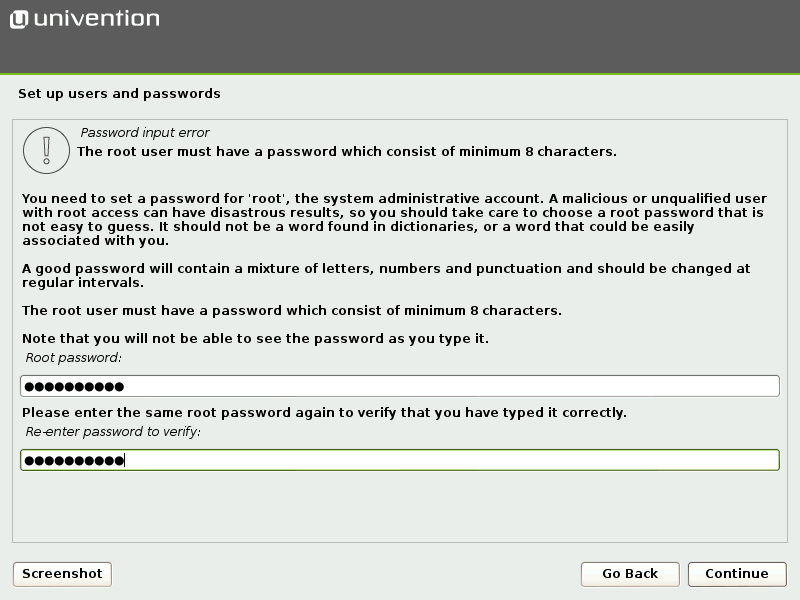
Setting of a password for the root user is required for logging on to the installed system.
If a master domain controller is installed, this password is also employed for the
administrator user.
In later operation, the passwords for the root and administrator
users can be managed independently of each other. The password must be re-entered in the second entry field.
The password must contain at least eight characters for security reasons.
The Univention Installer supports the partitioning of hard drives and the creation of different file systems (e.g., ext4 and XFS). In addition, it is also possible to set up mechanisms such as the logical volume manager (LVM), RAID or partitions encrypted with LUKS.
As of UCS 4.0, the Univention Installer selects a suitable partition model (MBR or GPT) automatically depending on the size of the selected hard drive. On systems with the Unified Extensible Firmware Interface (UEFI), the GUID Partition Table (GPT) is used automatically.
The Univention Installer offers guided installations to make installation simpler. In the guided installation, certain standard schemes with respect to the partitioning and formatting are applied to the selected hard drive. In addition, it is also possible to perform partitioning manually.
There are three schemes available for selection for guided partitioning:
In all three versions, the data already on the selected hard drive are deleted during the partitioning!
The next step is to select a hard drive from the list of those detected to which the partitioning version should be applied.
There are three subversions for each partitioning version, which differ in the number of file systems created:
/ file system saved there.
/, an additional file system is also created for /home/.
/, an additional file system is also created each for /home/, /usr/, /var/ and /tmp/.
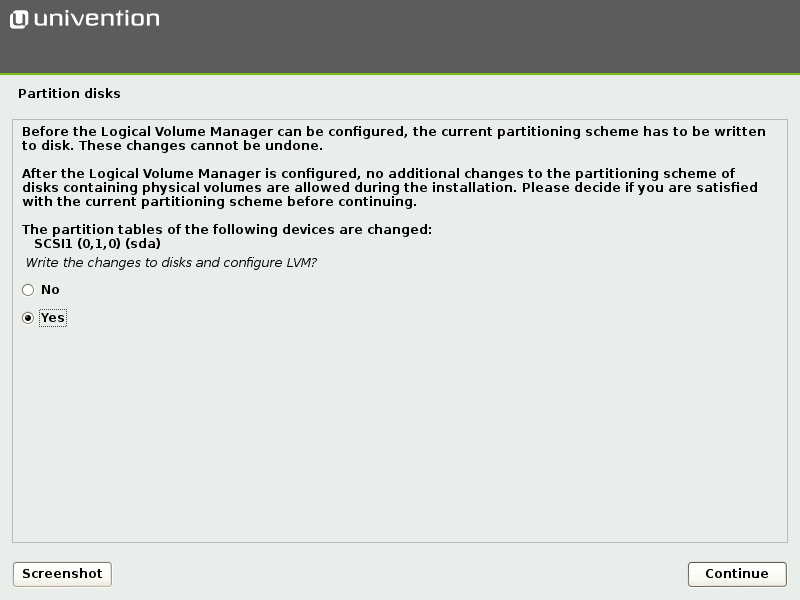
Before every active change to the hard drive, the change is displayed again in an additional dialogue and must be confirmed explicitly.
Once the partitioning is complete, the UCS basic system and additional software is installed automatically. This can take some time depending on the speed of the hardware used. The system is then made ready to boot via the installation of the GRUB bootloader.
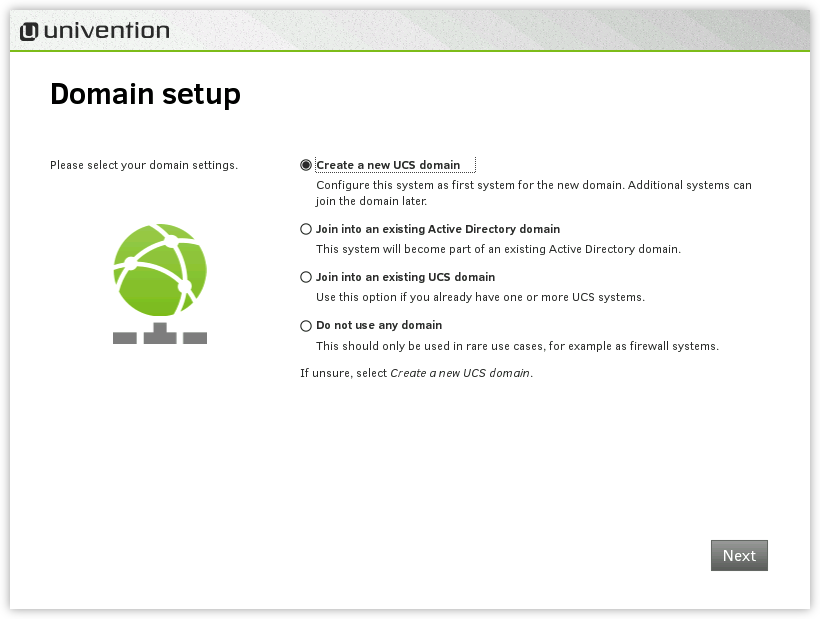
The final configuration of the UCS system is started by selecting a domain mode. There are four modes available, which influence the following configuration steps:
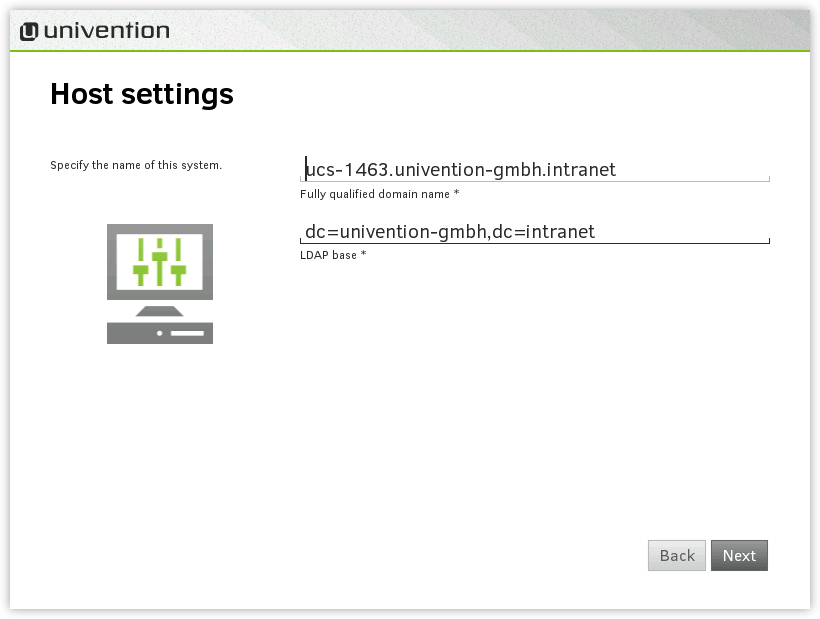
Once the mode has been selected, an organisation name, an e-mail address, a fully qualified domain name and an LDAP base are requested in the following two steps.
Specification of an organisation name is optional and it is used in the second step to generate a domain name and the LDAP base automatically.
If a valid e-mail address is specified, this is used to activate a personalised license, which is required for the use of the Univention App Center. The license is generated automatically and sent to the specified e-mail address immediately. The license can then be imported via the Univention Management Console license dialogue.
The name of the UCS system to be configured and the name of the DNS domain are determined from the fully qualified domain name (host name including domain name) entered here. A suggestion is generated automatically from the organisation name entered in the previous step. It is recommended not to use a publicly available DNS domain, as this can result in problems during the name resolution.
A LDAP base needs to be specified for the initialisation of the directory service. A suggestion is also derived here automatically from the fully qualified domain name. This value can usually be adopted without any changes.
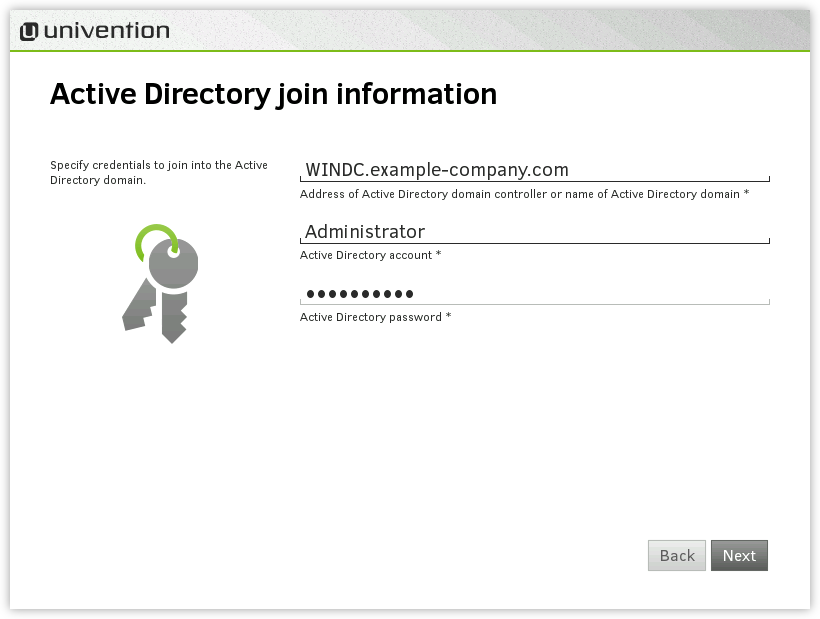
If the DNS server of an Active Directory domain was specified during the network configuration, the name of the Active Directory domain controller is suggested automatically in the step. If the suggestion is incorrect, the name of another Active Directory domain controller or another Active Directory domain can be entered here.
The specification of an Active Directory account and the corresponding password is required for joining the Active Directory domain. The user account must possess the right to join new systems in the Active Directory domain.
In addition, a host name must be entered for the UCS system to be configured. The suggested host name can be adopted or a new host name entered. The domain name of the computer is derived automatically from the domain DNS server. In some scenarios (e.g., a public mail server) it can prove necessary to use a specific fully qualified domain name. The UCS system will join the Active Directory domain with the host name specified here. Once set up, the domain name cannot be changed again once the configuration is completed.
In a UCS domain, systems can be installed in different system roles. The first UCS system, that joins an Active Directory domain, is automatically installed with the master domain controller system role. If this mode is selected during installation of additional UCS systems, the system role selection dialogue is shown. The system roles are described within the following section.
In a UCS domain, systems can be installed in different system roles. The first system in a UCS domain is always installed with the master domain controller system role. Additional UCS systems can join the domain at a later point in time and can be configured with one of the following system roles.
The backup domain controller is the fallback system for the DC master. If the latter should fail, a DC backup can adopt the role of the DC master permanently. All the domain data and SSL security certificates are saved as read-only copies on servers with the backup domain controller role.
All the domain data are saved as read-only copies on servers with the slave domain controller role. In contrast to the backup domain controller, however, not all security certificates are saved. As accesses to the services running on a slave domain controller are performed against the local LDAP directory service, DC slave systems are ideal for site servers and the distribution of high-load services.
member server are server systems without a local LDAP directory service. Access to domain data here is performed via other servers in the domain. They are therefore suitable for services which do not require a local database for authentication, for example, such as print and file servers.
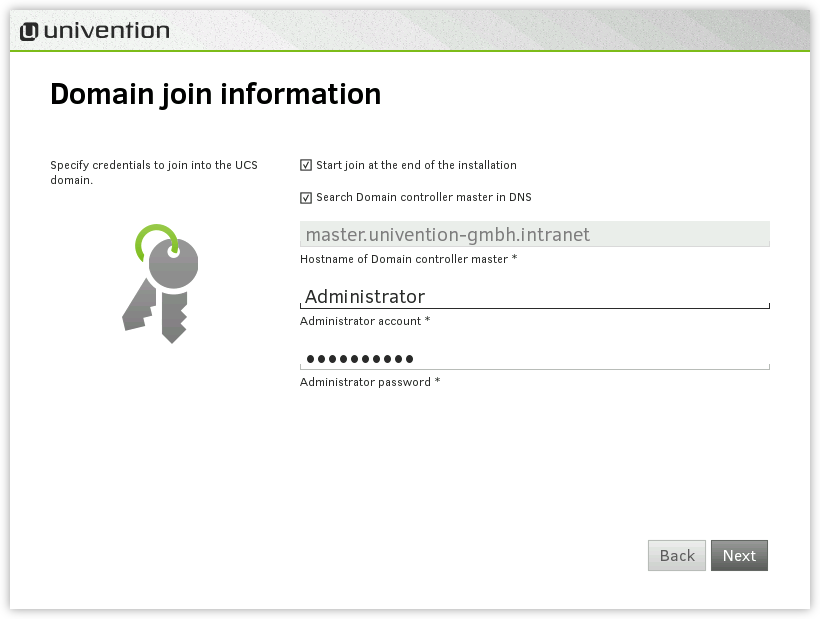
Once the UCS system role has been selected, further information on the domain join is requested. If the domain join is not intended to occur automatically during the installation, the option can be disabled. If the correct DNS server was selected during the network configuration, Univention Installer can determine the name of the master domain controller system automatically. If the decision is taken to join another UCS domain, the option can be disabled and the fully qualified domain name of the preferred master domain controller entered in the input field below. The access information required for the domain join must be entered in the and input fields.
In addition, a host name must be entered for the UCS system to be configured in the next step. The suggested host name can be adopted or a new host name entered. The domain name of the computer is derived automatically from the domain DNS server. In some scenarios (e.g., a public mail server) it can prove necessary to use a certain fully qualified domain name. Once set up, the domain name cannot be changed again once the configuration is completed.
The configuration of the mode requires the specification of a host name for the UCS system to be configured. The suggested host name can be adopted or a new host name entered. The domain name of the computer is derived automatically from the domain DNS server.
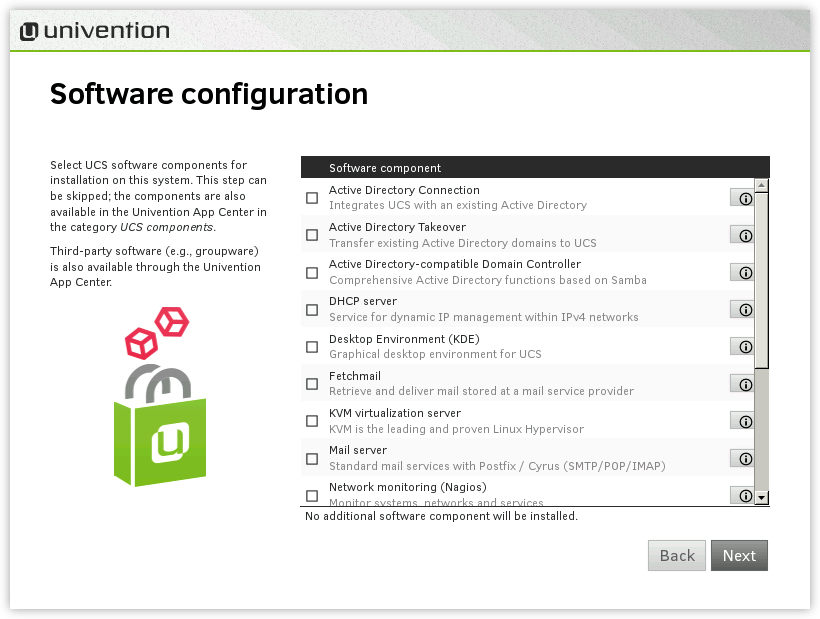
The step offers the possibility of installing additional UCS components during the installation. The applications are also available after the installation via the Univention App Center in the category and can be installed and uninstalled there subsequently.
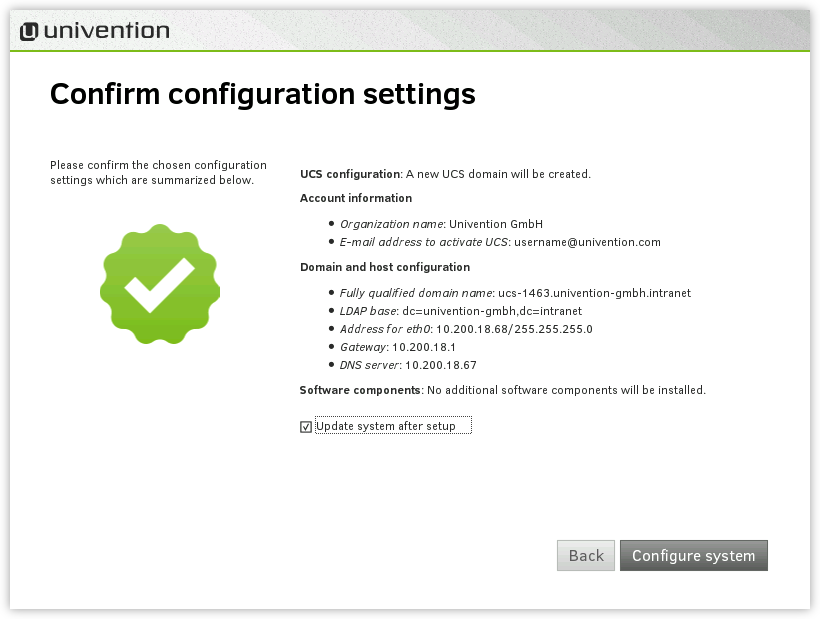
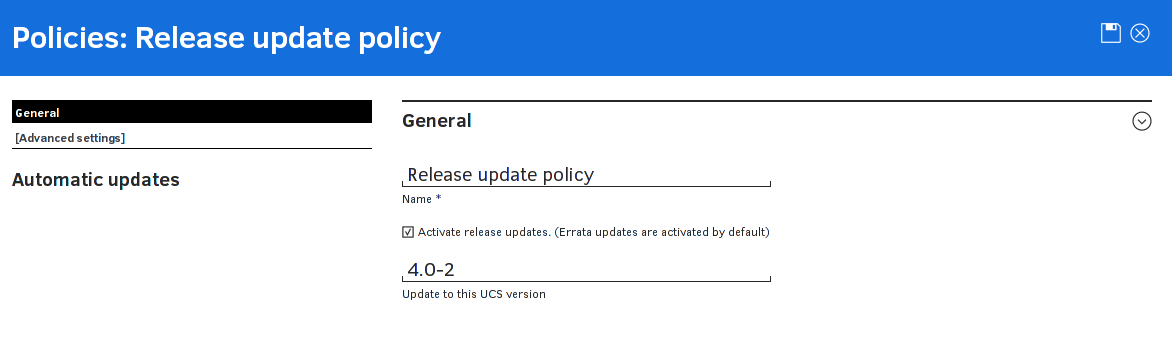
This dialogue shows the major settings that were made. If all the settings are correct, the button can be used to start the configuration of the UCS system, see Figure 2.16.
The option allows the automatic installation of available Errata updates. In addition, all patch level updates and Errata updates available are installed on a master domain controller. On all other system roles, all the patch level updates are set up to the installation status of the master domain controller. (You need to log on to the master domain controller to check the installation status. This is done using the login data specified in the join options).
During the configuration, a progress bar displays the progress of the installation.
The installation protocol of the Univention Installer is saved in the following files:
/var/log/installer/syslog
/var/log/univention/management-console-module-setup.log
Completion of the configuration must be confirmed with the button. The UCS system is then prepared for the first booting procedure and restarted.
The system will then boot from the hard drive. Following the boot procedure, the root and administrator users can log on via the web frontend Univention Management Console (see Chapter 4), which can be reached under the IP address set during the installation or the host name.
If the computer was installed as the first system in the UCS domain (master domain controller), the license can now be imported (see Section 4.2.2).
Information on possible installation problems can be found in the Univention Support database at http://sdb.univention.de in the subitem Installation.
On systems that showed a problem with the graphic variant of Univention Installer, the installation may be also started in text mode. To achieve this, in the DVD boot menu the entry has to be selected.
During installation in text mode Univention Installer shows the same information and asks for the same settings. After partitioning the hard drive, the system is prepared for the first boot and finally restarted.
After restart the configuration may be resumed by using a web browser. The URL
https:// or SERVER-IP-ADDRESShttp:// has to be opened
within the browser (HTTPS is recommended). After loading the URI a login as user
SERVER-IP-ADDRESSroot is required.
The configuration process asks for location and network setting and then resumes with the same steps as the graphic variant of the installation, i.e. section domain settings.
Univention provides an Amazon Machine Image (AMI) for the Amazon EC2 cloud for UCS. This generic image for all UCS system roles is used to derive an individual instance which can be configured via the Univention Management Console (domain name, software selection, etc.).
The process for setting up a UCS instance based on Amazon EC2 is documented in the Univention Wiki [ec2-quickstart].
If UCS is installed as a guest in VMware, the option must be selected as the (UCS is based on Debian but the templates for Debian cannot be used).
The Linux kernel used in UCS includes all the support drivers necessary for operation in VMware
(vmw_balloon, vmw_pvsci, vmw_vmci, vmwgfx and vmxnet3).
The open source version of the VMware Tools (Open VM Tools) is delivered with UCS. The tools can be installed using the open-vm-tools package (they are not required but do, for example, allow synchronisation of the time on the virtualization server with the guest system).
The process for setting up a UCS instance in Citrix XenServer is documented in the Univention Wiki [xenserver-installation].
To display the GRUB menu correctly, an adaption to the XenServer configuration is necessary; this is described in [release-notes].
Univention Corporate Server offers a cross platform domain concept with a common trust context between Linux and/or Windows systems. Within this domain a user is known to all systems via his username and password stored in the UCS management system and can use all services which are authorised for him. The management system keeps the account synchronised for the windows log-in, Linux/POSIX systems and Kerberos. The management of user accounts is described in Chapter 6.
All UCS and Windows systems within a UCS domain have a host domain account. This allows system-to-system authentication. Domain joining is described in Section 3.2.
The certificate authority (CA) of the UCS domain is operated on the master domain controller. A SSL certificate is generated there for every system that has joined the domain. Further information can be found in Section 3.6.
Every computer system which is a member of a UCS domain has a system role. This system role represents different permissions and restrictions, which are described in Section 3.3.
All domain-wide settings are stored in a directory service on the basis of OpenLDAP. Section 3.4 describes how to expand the managed attributes with LDAP scheme expansions, how to set up an audit-compliant LDAP documentation system and how to define access permissions to the LDAP directory.
Replication of the directory data within a UCS domain occurs via the Univention Directory Listener/Notifier mechanism. Further information can be found in Section 3.5.
Kerberos is an authentication framework the purpose of which is to permit secure identification in the potentially insecure connections of decentralised networks. Every UCS domain operates its own Kerberos trust context (realm). Further information can be found in Section 3.7.
A UCS, Ubuntu or Windows system must join the domain after installation. The following describes the different possibilities to do this:
In addition to UCS, Ubuntu and Mac OS X, arbitrary Unix systems can be integrated into the domain. This is documented in [ext-doc-domain].
There are three possibilities for a UCS system to join an existing domain;
directly after installation in the Univention Installer (see Section 2.9.3) or subsequently using the command
univention-join or using Univention Management Console.
The master domain controller should always be installed at the most up-to-date release stand of the domains, as problems can arise with an outdated domain control master when a system using the current version joins.
When a computer joins, a computer account is created, the SSL certificates are synchronised and an LDAP copy is initiated if necessary. The join scripts are also run at the end of the join process. These register further objects, etc., in the directory service using the software packages installed on the system (see Section 3.2.1.3).
The joining of the domain is registered on the client side in the
/var/log/univention/join.log log file, which can be used
for reference in error analysis. Actions run on the domain controller master
are stored in the
/home/ log
file.
Join-Account/.univention-server-join.log
The joining process can be repeated at any time. Systems may even be required to rejoin following certain administrative steps (such as changes to important system features on the master domain controller).
univention-join
univention-join retrieves a number of essential parameters
interactively; however, it can also be configured using a number of parameters:
-dcname HOSTNAME parameter. The computer name must then be
entered as a fully qualified name, e.g.,
master.company.com.
Administrator user or a member of the Domain
Admins group. The join account can be assigned using the
-dcaccount ACCOUNTNAME parameter.
-dcpwd FILE
parameter. The password is then read out of the specified file.
-verbose parameter is used to add additional debug
output to the log files, which simplify the analysis in case of errors.
A domain join can also be carried out web based via the UMC module .
As the Administrator user does not yet exist on a system which has yet to join
the domain, the login to Univention Management Console is done as user root.
As for the domain joining procedure via the command line, username and password of a user account authorised to add computers to a domain must be entered in the resulting dialogue. Likewise, the master domain controller will be determined automatically via a DNS request, but can also be entered manually.
The option can be used to repeat the domain join at any time.
Join scripts are run during the domain join. Examples for changes made by join scripts are the registration of a print server in the domain or the adaptation of DNS entries. Join scripts are components of the individual software packages. In the same way, there are also unjoin scripts, which can reset these changes following uninstallation of software components.
Join scripts are stored in the /usr/lib/univention-install/
directory and unjoin scripts in /usr/lib/univention-uninstall/. Each
join/unjoin script has a version. An example: A package has already been installed and
the join script already run. The new version of the package now requires additional
changes and the version number of the join script is increased.
The univention-check-join-status command can be used to check whether
join/unjoin scripts need to be run (either because they have yet to be run or an older version
was run).
If there are join/unjoin scripts on a system which have not yet been run or which can only be run for an older version, a warning message is shown upon login to Univention Management Console.
Join scripts that have not been run can be executed via the UMC module by clicking on the menu entry .
The univention-run-join-scripts command is used to run all
of the join/unjoin scripts installed on a system. The scripts check automatically
whether they have already been executed.
The name of the join/unjoin script and the output of the script are also recorded in
/var/log/univention/join.log.
If univention-run-join-scripts is run on another system role
than the master domain controller, the user will be asked to input a username and
password. This can be performed on the master domain controller via the
--ask-pass option.
The procedure for joining a Windows system to a UCS domain made available via Samba is now described for Windows 7/8 and Windows 2012. The process is similar for other Windows versions. In addition to the client versions, Windows server systems can also join the domain. Windows servers join the domain as member servers; joining a Windows systems as a domain controller is not supported.
Only domain-compatible Windows versions can join the UCS domain, i.e., it is not possible for the Home versions of Windows to join a domain.
Two different versions of Samba can be used in UCS: Samba 3 implements a Windows domain based on NT domain technology, while Samba 4 implements an Active Directory directory. Further information can be found in Section 9.1.
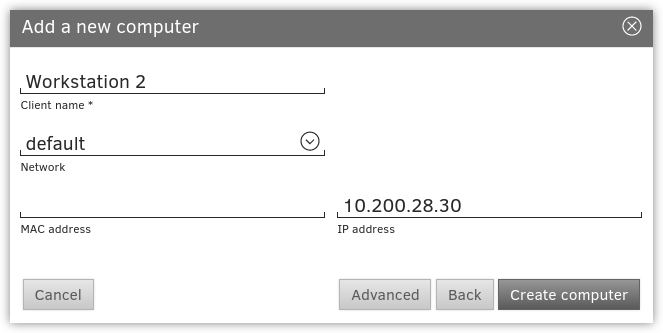
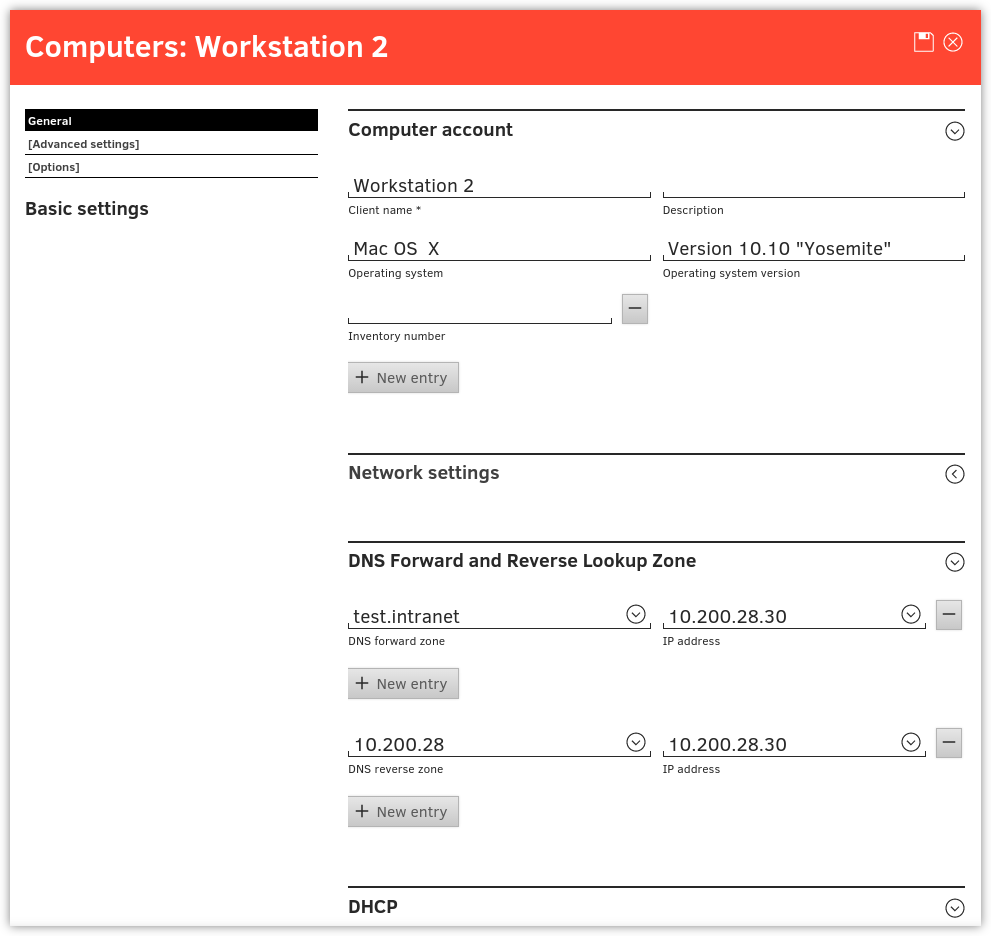
A host account is created for the Windows client automatically when it joins the domain (see Section 8.1). Information concerning MAC and IP addresses, the network, DHCP or DNS can be configured in Univention Management Console prior to or after joining the domain.
Domain joining is usually performed with the local Administrator account on the Windows system.
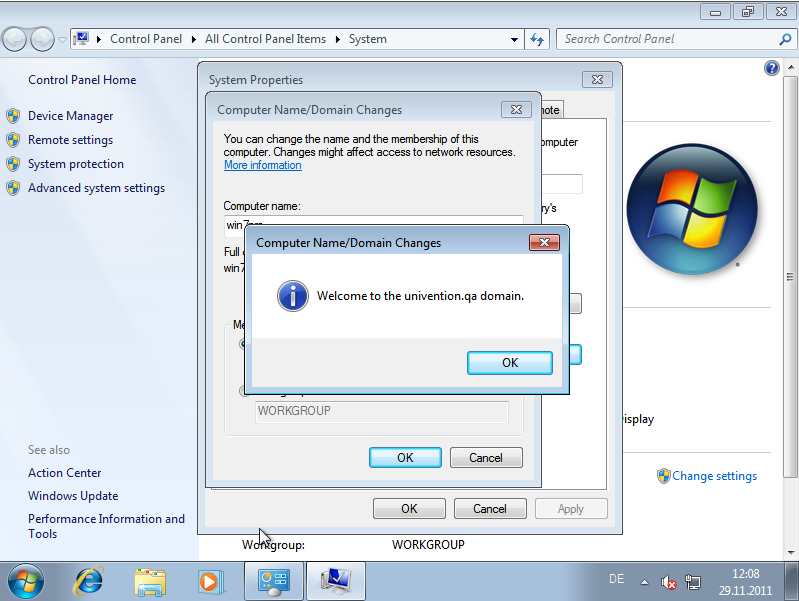
Joining the domain takes some time and the process must not be cancelled prematurely. After successful joining a small window appears with the message . This should be confirmed with . The computer must then be restarted for the changes to take effect.
Domain names must be limited to 13 characters as they are otherwise truncated at the Windows client and this can lead to log-in errors.
For a domain join against a domain controller based on Samba 3, it must be ensured that the NetBIOS name of the domain can be resolved. It may prove necessary to configure a WINS server for this (see [ext-doc-windows-nt]).
For a domain join against a domain controller based on Samba 4, the DNS configuration of the client must be set up in such a way that DNS entries from the DNS zone of the UCS domain can also be resolved. In addition, the time on the client system must also be synchronised with the time on the domain controller.
The joining of domains is only possible with the Pro and Enterprise editions of Windows 8.
When using Windows 8 to a domain based on Samba 3, certain settings must be made in the Windows registry before joining the domain. A corresponding REG file can be downloaded from SDB 1102. The system must then be restarted. This step is not necessary with Samba 4.
The control panel can be reached by moving the cursor to the bottom right-hand corner of the screen. The Control Panel can then be searched for under . must be clicked on under .
The option field must be ticked and the name of the
Samba domain entered in the input field for the domain join. After clicking on
the button, the
Administrator must be entered in the input field
and the password from
uid=Administrator,cn=users, transferred to
the input field. The process for joining the domain
can then be started by clicking on .
base DN
The joining of domains is only possible with the Professional, Enterprise or Ultimate editions of Windows 7.
When using Windows 7 to a domain based on Samba 3, certain settings must be made in the Windows registry before joining the domain. A corresponding REG file can be downloaded from SDB 1102. The system must then be restarted. This step is not necessary with Samba 4.
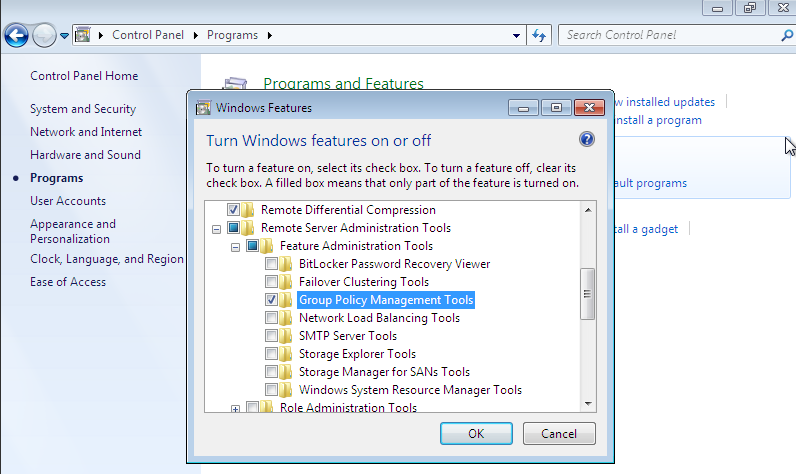
The basic configuration dialogue is found under . must be selected and clicked under .
The option field must be ticked and the name of the
Samba domain entered in the input field for the domain join. After clicking on
the button, the
Administrator must be entered in the input field
and the password from
uid=Administrator,cn=users, transferred to
the input field. The process for joining the domain
can then be started by clicking on .
base DN
When using Windows 8 to a domain based on Samba 3, certain settings must be made in the Windows registry before joining the domain. A corresponding REG file can be downloaded from SDB 1102. The system must then be restarted. This step is not necessary with Samba 4.
The control panel can be reached by moving the cursor to the bottom right-hand corner of the screen. The Control Panel can then be searched for under . must be clicked on under .
The option field must be ticked and the name of the Samba
domain entered in the input field for the domain join. After clicking on the
button, the Administrator must be
entered in the input field and the password from
uid=Administrator,cn=users, transferred to the
input field. The process for joining the domain can then be
started by clicking on .
base DN
The integration of Ubuntu clients into a UCS domain is described in Section 8.1.1.
UCS supports domain joins of Mac OS X clients into a UCS environment using Samba 4. This documentation refers to Mac OS X 10.8.2.
The domain join can be performed using the system preferences menu or the
dsconfigad command line tool.
After the domain join it is possible to automatically mount CIFS shares to subfolders in
/Volumes when logging in with a domain user. For that, the following
line has to be added to the file /etc/auto_master:
/Volumes auto_custom
In addition, the file /etc/auto_custom needs to be created and the
shares which should be mounted have to be listed in it in the following way:
subfolder name-fstype=smbfs ://fqdn/sharename
Note that the automounted shares are not displayed in the finder's sidebar.
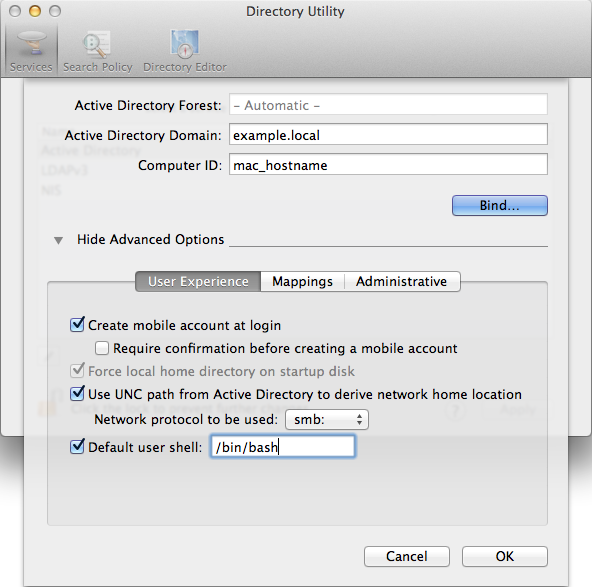
In the System Preferences via the entry, the can be reached. After authenticating by clicking on the lock in the lower left corner and providing credentials of a local Administrator account, the button needs to be clicked. From that menu it is possible to open the .
In the advanced options section, the option should be activated. A mobile account has the advantage that, when the domain is not available, the user can log into the Mac OS X system with the same account used for logging into the domain.
After filling in the domainname in the field
and the hostname of the Mac OS X client in the field , the
join process is initiated after clicking the button . The
username and password of an account in the Domain Admins group
needs to be entered, e.g. Administrator.
The domain join can also be performed on the command line using dsconfigad:
dsconfigad -amac hostname-domainfqdn-ou "CN=Computers,ldap_base" \ -uDomain Administrator-mobile enable
Additional configuration options are available through dsconfigad -help.
In a UCS domain systems can be installed in different system roles. The following gives a short characterisation of the different systems:
A system with the master domain controller role (DC master for short) is the primary domain controller of a UCS domain and is always installed as the first system. The domain data (such as users, groups, printers) and the SSL security certificates are saved on the DC master.
Copies of these data are automatically transferred to all servers with the backup domain controller role.
All the domain data and SSL security certificates are saved as read-only copies on servers with the backup domain controller role (backup DC for short).
The backup domain controller is the fallback system for the master DC. If the latter should fail, a backup DC can take over the role of the DC master permanently (see Section 3.9).
All the domain data are saved as read-only copies on servers with the slave domain controller role (slave DC for short). In contrast to the backup domain controller, however, not all security certificates are synchronised.
As access to the services running on a slave domain controller are performed against the local LDAP server, slave DC systems are ideal for site servers and the distribution of load-intensive services.
A slave DC system cannot be promoted to a master DC.
member server are server systems without a local LDAP server. Access to domain data here is performed via other servers in the domain.
A base system is an autonomous system which is not a member of the domain. It is not connected to any LDAP server. It still provides the UCS update mechanism and Univention Configuration Registry for configuration, but not the graphical administration interface Univention Management Console.
A basic system is thus suitable for services which are operated outside of the trust context of the domain, such as a web server or a firewall.
Ubuntu clients can be managed with this system role, see Section 8.1.1.
This system role is used for the integration of other Linux systems than UCS and Ubuntu, e.g., for Debian or CentOS systems. The integration is documented in [ext-doc-domain].
A Univention Corporate Client is a desktop or thin client system based on Univention Corporate Client.
Mac OS X systems can be joined into a UCS domain using Samba 4. Additional information can be found in Section 3.2.4.
A domain trust account is set up for trust relationships between Windows and UCS domains.
An IP managed client allows the integration of non-UCS systems into the IP management (DNS/DHCP), e.g., for network printers or routers.
Windows domain controllers in a Samba 4 environment are operated with this system role.
Windows clients and Windows member servers are managed with this system role.
Univention Corporate Server saves domain-wide data in a LDAP directory service based on OpenLDAP. This chapter describes the advanced configuration and coordination of OpenLDAP.
Often several LDAP servers are operated in a UCS domain. The configuration of the server(s) used is described in Section 8.4.5.
Schema definitions specify which object classes exist and which attributes they include, i.e., which data can be stored in a directory service. Schema definitions are saved as text files and included in the OpenLDAP server's configuration file.
UCS uses standard schemas where possible in order to allow interoperability with other LDAP applications. Schema extensions are supplied for Univention-specific attributes - such as for the policy mechanism.
To keep the efforts required for small extensions in LDAP as low as possible,
Univention Corporate Server provides its own LDAP scheme for customer extensions. The LDAP object
class univentionFreeAttributes can be used for extended
attributes without restrictions. It offers 20 freely usable attributes
(univentionFreeAttribute1 to
univentionFreeAttribute20) and can be used in connection
with any LDAP object (e.g., a user object).
If LDAP schema extensions are to be delivered as part of software packages, there is also the possibility of packaging them and distributing them to all the backup domain controller servers in the domain using a Univention Directory listener module. Further information is available in [packaging-schema-extensions].
The replication of the LDAP schemas is also automated via the listener/notifier mechanism (see Section 3.5). This relieves the administrator of the need to perform all schema updates manually on all the OpenLDAP servers in the domain. Performing the schema replication before the replication of LDAP objects guarantees that this doesn't fail as a result of missing object classes or attributes.
On the master domain controller, a checksum for all the directories with schema definitions
is performed when the OpenLDAP server is started. This checksum is compared
with the last saved checksum in the
/var/lib/univention-ldap/schema/md5 file.
The actual replication of the schema definitions is initiated by the Univention Directory Listener. Prior to every request from the Univention Directory Notifier for a new transaction ID, its current schema ID is requested. If this is higher than the schema ID on the listener side, the currently used sub-schema is procured from the notifier system's LDAP server via an LDAP search.
The output sub-schema is included on the listener system in LDIF format in the
/var/lib/univention-ldap/schema.conf file and the local
OpenLDAP server restarted. If the schema replication is completed with this
step, the replication of the LDAP objects is continued.
The univention-directory-logger package allows the logging of all
changes in the LDAP directory service. As each data record contains the hash value of the
previous data record, manipulations of the log file - such as deleted entries - can be
uncovered.
Individual areas of the directory service can be excluded from the logging. These branches
can be configured using the Univention Configuration Registry variables ldap/logging/exclude1,
ldap/logging/exclude2, etc. As standard, the container is excluded in
which the temporary objects are stored (cn=temporary,cn=univention). The LDAP changes are
logged by a Univention directory listener module. The Univention directory listener
service must be restarted if changes are made to the Univention Configuration Registry variables.
The logging is made in the /var/log/univention/directory-logger.log
file in the following format:
START Old Hash: Hash sum of the previous data record DN: DN of the LDAP object ID: Listener/notifier transaction ID Modifier: DN of the modifying account Timestamp: Time stamp in format dd.mm.yyyy hh:mm:ss Action: add, modify or delete Old Values: List of old attributes, empty when an object is added New Values: List of new attributes, empty when an object is deleted END
A hash sum is calculated for each logged data record and also logged in the daemon.info section of the Syslog service.
The Univention Configuration Registry variable ldap/idletimeout is used to configure a time
period in seconds after which the LDAP connection is cut off on the server
side. When the value is set to 0, no expiry period is in use. The timeout
period has been set at six minutes as standard.
In addition to the UMC web interface, there are also a range of programs with which one can access the LDAP directory from the command line.
The univention-ldapsearch tool simplifies the authenticated
search in the LDAP directory. A search filter needs to be specified as an
argument; in the following example, the administrator is searched for using the
user ID:
univention-ldapsearch uid=Administrator
The slapcat command makes it possible to save the current
LDAP data in a text file in LDIF format, e.g.:
slapcat > ldapdata.txt
Access to the information contained in the LDAP directory is controlled by
Access Control Lists (ACLs) on the server side. The ACLs are defined in the
central configuration file /etc/ldap/slapd.conf and
managed using Univention Configuration Registry. The slapd.conf is managed using a
multifile template; further ACL elements can be added below
/etc/univention/templates/files/etc/ldap/slapd.conf.d/
between the 60univention-ldap-server_acl-master and
70univention-ldap-server_acl-master-end files or the
existing templates expanded upon.
If LDAP ACL extensions are to be delivered as part of software packages, there is also the possibility of packaging them and distributing them to all the LDAP servers in the domain using a Univention Directory listener module. Further information is available in [packaging-acl-extensions].
The default setting of the LDAP server after new installations with UCS does
not allow anonymous access to the LDAP directory. This behaviour is configured
with the Univention Configuration Registry variable ldap/acl/read/anonymous. Individual IP
addresses can be granted anonymous read permissions via Univention Configuration Registry variable
ldap/acl/read/ips.
Following successful authentication on the LDAP server, all attributes of a user account can be read out by this user.
In addition, an extra, internal account, the root DN, also has full write access.
In addition, UCS offers a number of further ACLs installed as standard which
suppress access to sensitive files (e.g., the user password) and establish
rules which are necessary for operation (e.g., necessary accesses to computer
accounts for log-ins). The read and write access to this sensitive information
if only intended for members of the Domain Admins
group. Nested groups are also supported. The Univention Configuration Registry variable
ldap/acl/nestedgroups can be used to deactivate the nested
groups function for LDAP ACLs, which will result in a speed increase for
directory requests.
To facilitate the delegation of the privilege to reset user passwords, the
univention-admingrp-user-passwordreset package can be
installed. It uses a join script to create the User Password
Admins user group, in so far as this does not already exist.
Members of this group receive the permission via additional LDAP ACLs to reset
the passwords of other users. These LDAP ACLs are activated automatically
during the package installation. To use another group, or a group that already
exists, instead of the User Password Admins group, the DN
of the group to be used can be entered in the Univention Configuration Registry variable
ldap/acl/user/passwordreset/accesslist/groups/dn. The LDAP
server must be restarted after making changes.
Passwords can be reset via Univention Management Console. In the default setting, Univention Management Console only
offers the user wizard to the Administrator user, which
allows the setting of new passwords. During the installation a new
default-user-password-admins policy is created
automatically, which is linked to the members of the User
Password Admins group and can be assigned to a corresponding
container in the LDAP directory. Further information on the configuration of UMC
policies can be found in Section Section 4.8.
The policy makes it possible to search for users and create an overview of all the attributes of a user object. If an attempt is made to modify further attributes in addition to the password when the user does not have sufficient access rights to the LDAP directory, Univention Directory Manager denies him write access with the message Permission denied.
The package should be installed on the domain controller master and the domain controller backup systems. During the installation, the LDAP server is restarted and is thus temporarily unavailable.
Password resets via the password group can be prevented for sensitive users or groups
(e.g., domain administrators). The Univention Configuration Registry variables
ldap/acl/user/passwordreset/protected/uid and
ldap/acl/user/passwordreset/protected/gid can be used to configure
users and groups. Multiple values must be separated by commas.
After changes to the variables, it is necessary to restart the LDAP server using the
/etc/init.d/slapd restart command. In the default setting, the
members of the Domain Admins group are protected against having
theirs password changed.
If access to additional LDAP attributes should be necessary for changing the
password, the attribute names can be expanded in Univention Configuration Registry variable
ldap/acl/user/passwordreset/attributes. After the change, the
LDAP directory service must be restarted for the change to take effect. This
variable is already set appropriately for a UCS standard installation.
With the Name Service Switch, the GNU C standard library
(glibc) used in Univention Corporate Server offers a modular interface for
resolving the names of users, groups and hosts.
The LDAP NSS module is used on UCS systems for access to the domain data (e.g.,
users) as standard. The module queries the LDAP server specified in the
Univention Configuration Registry variable ldap/server/name (and if necessary the
ldap/server/addition).
What measures should be taken if the LDAP server cannot be reached can be
specified by the Univention Configuration Registry variable nssldap/bindpolicy. As standard, if
the server cannot be reached, a new connection attempt is made. If the variable
is set to soft, then no new attempt is made to
connect. This can considerably accelerate the boot of a system if the LDAP
server cannot be reached, e.g., in an isolated test environment.
The syncrepl replication service can also be activated parallel to the notifier service for the synchronisation of OpenLDAP servers not installed on UCS systems. Syncrepl is a component of OpenLDAP, monitors changes in the local directory service and transmits them to other OpenLDAP servers.
As standard, the OpenLDAP server is configured in such a way that it also accepts requests from ports 7389 and 7636 in addition to the standard ports 389 and 636.
If Samba 4 is used, the Samba domain controller service occupies the ports 389
and 636. In this case, OpenLDAP is automatically reconfigured so that only
ports 7389 and 7636 are used. This must be taken into account during the
configuration of syncrepl in particular (see Section 3.4.7). univention-ldapsearch
uses the standard port automatically.
The content of the LDAP directory is backed up daily on the master domain controller and all backup domain controller systems via a Cron job.
The LDAP data are stored in the /var/univention-backup/ directory in
the naming scheme ldap-backup_DATE.ldif.gz in LDIF format. They can
only be read by the root user.
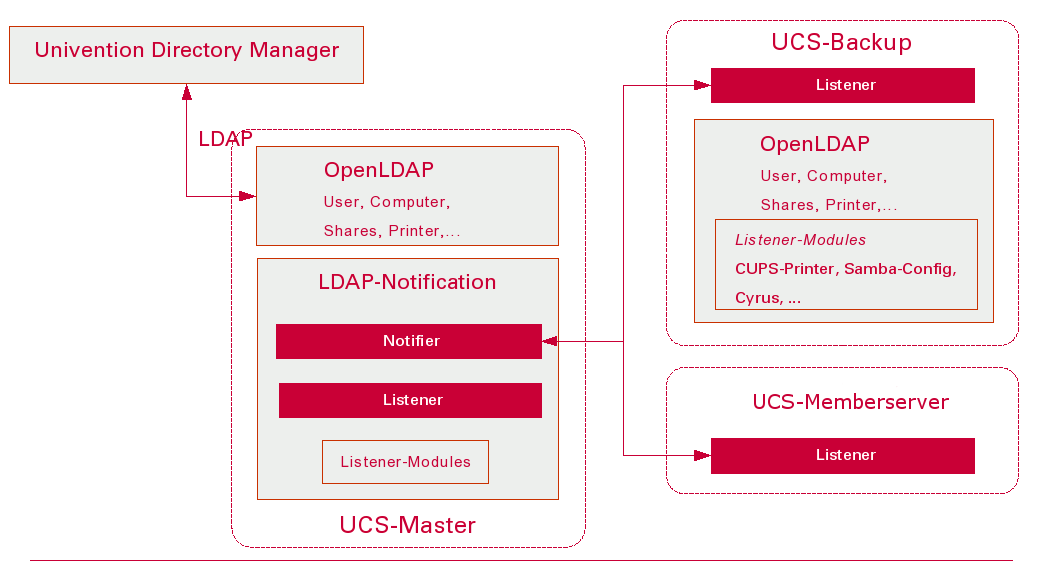
Replication of the directory data within a UCS domain occurs via the Univention Directory Listener/Notifier mechanism:
The active Univention Directory Listener instances in the domain connect to a Univention Directory Notifier service. If an LDAP change is performed on the master domain controller (all other LDAP servers in the domain are read-only), this is registered by the Univention Directory Notifier and notified to the listener instances.
Each Univention Directory Listener instance uses a range of Univention Directory Listener modules. These modules are shipped by the installed applications; the print server package includes, for example, listener modules which generate the CUPS configuration.
Univention Directory Listener modules can be used to communicate domain changes to services which are not
LDAP-compatible. The print server CUPS is an example of this: The printer definitions are not
read from the LDAP, but instead from the /etc/cups/printers.conf
file. Now, if a printer is saved in the UMC printer management, it is stored
in the LDAP directory. This change is detected by the Univention Directory Listener module
cups-printers and an entry added to, modified or deleted in
/etc/cups/printers.conf based on the data in the LDAP.
Additional information on the setup of Univention Directory Listener modules and developing your own modules can be found in [developer-reference].
LDAP replication is also performed by a listener module. If the LDAP server to be replicated to
is not accessible, the LDAP changes are temporarily stored in the
/var/lib/univention-directory-replication/failed.ldif file. The contents
of the file are automatically transferred to the LDAP when the LDAP server is available again.
The listener/notifier mechanism works based on transactions. A transaction ID is increased for every change in the LDAP directory of the master domain controller. A Univention Directory Listener instance which has missed several transactions - for example, because the computer was switched off - automatically requests all the missing transactions once the connection is available again until its local transaction ID corresponds to that of the master domain controller.
All status messages from the Univention Directory Listener and the executed listener modules
are logged in the /var/log/univention/listener.log file. The level of
detail of the log messages can be configured using the Univention Configuration Registry variable
listener/debug/level. The possible values are from 0 (only error messages)
to 4 (all status messages). Once the debug level has been changed, the Univention Directory Listener must be restarted.
Status messages from the Univention Directory Notifier service are logged in the
/var/log/univention/notifier.log file. The debug level can be
configured using the notifier/debug/level variable (also from 0-4).
Once the debug level has been changed, the Univention Directory Notifier must be restarted.
When the domain replication is running normally (normal system load, no network problems), the delay between the change being made in Univention Management Console and replicated to, for example, a slave domain controller is barely noticeable. An incomplete replication can be identified by comparing the transaction IDs of the listener and notifier services.
The transactions registered by the notifier service are written in the
/var/lib/univention-ldap/notify/transaction file in ascending order
on the master domain controller. An example:
root@dcmaster:~# tail -1 /var/lib/univention-ldap/notify/transaction 836 cn=dcslave3,cn=dc,cn=computers,dc=firma,dc=de m
The last transaction received by the listener system is stored in the
/var/lib/univention-directory-listener/notifier_id file:
root@dcslave1:~# cat /var/lib/univention-directory-listener/notifier_id 836
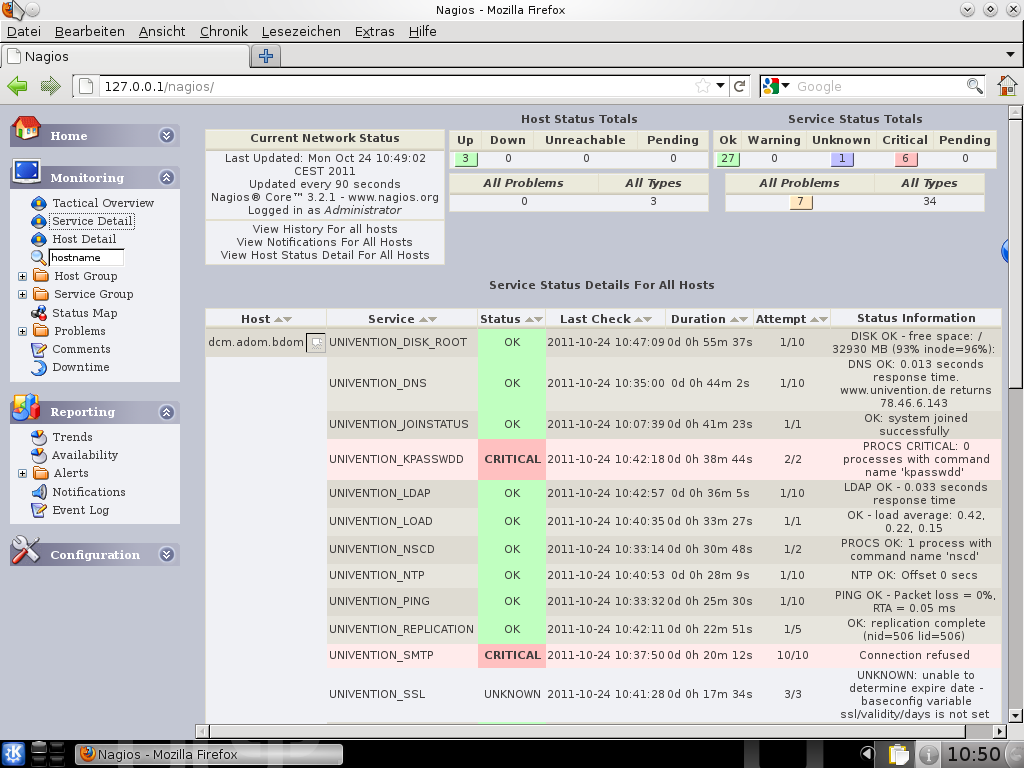
This check can also be performed automatically by the Nagios service
UNIVENTION_REPLICATION (see Section 14.2.1).
If there are problems in running a listener module, there is the option of reinitialising the module. In this case, all LDAP objects with which the listener module works are passed on again.
The name of the listener module must be supplied to the command for the renewed
initialisation. The installed listener modules can be found in the
/var/lib/univention-directory-listener/handlers/ directory.
The following command can be used to reinitialise the printer module, for example:
univention-directory-listener-ctrl resync cups-printers
In UCS, sensitive data are always sent across the network encrypted, e.g., via the use of SSH for the login to systems or via the use of protocols based on SSL/TLS. (Transport Layer Security (TLS) is the current protocol name, the name of the previous protocol Secure Socket Layer (SSL), however, is still more common and is also used in this documentation).
For example, SSL/TLS is employed in the listener/notifier domain replication or for HTTPS access to Univention Management Console.
Both communication partners must be able to verify the authenticity of the key used for encrypted communication between two computers. To this end, each computer also features a so-called host certificate, which is issued and signed by a certification authority (CA).
UCS provides its own CA, which is automatically set up during installation of the master domain controller and from which every UCS system automatically procures a certificate for itself and the CA's public certificate when joining the domain. This CA appears as the root CA, signs its own certificate and can sign certificates for other certification authorities.
The properties of the CA are generated automatically during the installation based on system settings such as the locale. These settings can be subsequently adapted on the master domain controller in the UMC module .
If the UCS domain contains more than one system, all other host certificates need to be reissued after changing the root certificate! The procedure required for this is documented in SDB 1183.
The UCS-CA is always found on the master domain controller. A copy of the CA is stored on every backup domain controller, which is synchronised with the CA on the domain controller master by a Cron job every 20 minutes.
The CA is synchronised from the master domain controller to the backup domain controller and not vice-versa. For this reason, only the CA on the master domain controller should be used.
If a backup domain controller is promoted to the master domain controller (see Section 3.9), the CA on the new master domain controller can be used directly.
The UCS root certificate has a specified validity period - as do the computer certificates created with it.
Once this period of time elapses, services which encrypt their communication with SSL (e.g., LDAP or domain replication) no longer function.
It is thus necessary to verify the validity of the certificate regularly and to
renew the root certificate in time. A Nagios plugin is provided for the
monitoring of the validity period. In addition, a warning is shown when logging
on to Univention Management Console if the root certificate is going to expire soon (the warning
period can be specified with the Univention Configuration Registry variable ssl/validity/warning;
the standard value is 30 days).
The renewal of the root certificate and the other host certificates is documented in SDB 1183.
On UCS systems, a Cron job verifies the validity of the local computer
certificate and the root certificate daily and records the expiry date in the
Univention Configuration Registry variables ssl/validity/host (host certificate) and
ssl/validity/root (root certificate). The values entered there reflect
the number of days since the 1/1/1970.
In Univention Management Console, the effective expiry date of the computer and root certificate can be accessed via the upper right user menu and the entry .
Kerberos is an authentication framework the purpose of which is to permit secure
identification in the potentially insecure connections of decentralised networks. In Kerberos,
all clients use a foundation of mutual trust, the Key Distribution Centre
(KDC). A client authenticates at this KDC and receives an authentication token, the so-called
ticket which can be used for authentication within the Kerberos environment (the so-called
Kerberos realm). The name of the Kerberos realm is configured as part of the installation of
the master domain controller and stored in the Univention Configuration Registry variable kerberos/realm. It is not possible
to change the name of the Kerberos realm at a later point in time.
Tickets have a standard validity period of 8 hours; this is why it is vital for a Kerberos domain to have the system time synchronised for all the systems belonging to the Kerberos realm.
Univention Corporate Server uses the Heimdal Kerberos implementation. An independent Heimdal service is started on UCS domain controller systems without Samba 4, while Kerberos is provided by a Heimdal version integrated in Samba on Samba 4 DCs. In a environment composed of UCS domain controllers without Samba 4 and Samba 4 domain controllers both Kerberos environments are based on identical data (these are synchronised between Samba 4 and OpenLDAP via the Univention S4 connector (see Section 9.2.2.4)).
As standard, the KDC is selected via a DNS service record. The KDC used by a system can be
reconfigured using the Univention Configuration Registry variable kerberos/kdc. If Samba 4 is installed on a
system in the domain, the service record is reconfigured so that only the Samba 4-based KDCs
are offered. In a mixed environment it is recommended only to use the Samba 4 KDCs.
The Kerberos admin server, on which the administrative settings of the domain can be made,
runs on the master domain controller. Most of the settings in Univention Corporate Server are taken from
the LDAP directory, so that the major remaining function is changing passwords. This can be
achieved by means of the Tool kpasswd; the passwords are then changed in
the LDAP too. The Kerberos admin server can be configured on a system via the Univention Configuration Registry variable
kerberos/adminserver.
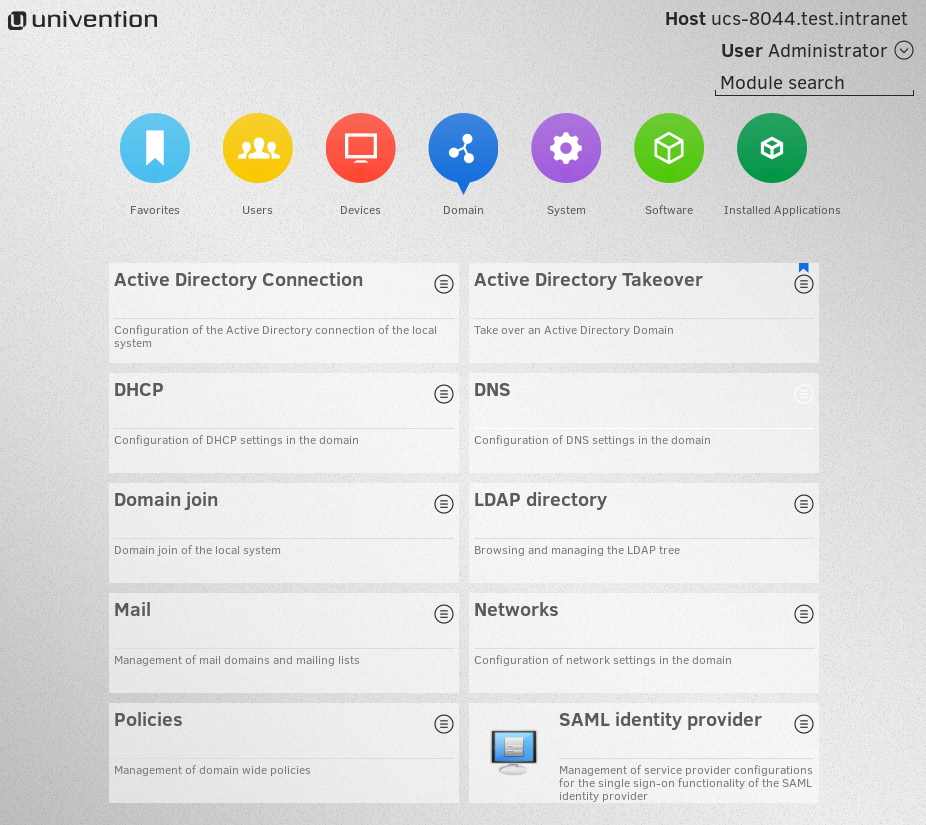
SAML (Security Assertion Markup Language) is an XML-based standard for exchanging authentication information, which allows single sign-on across domain boundaries among other things. UCS provides a SAML identity provider: The external service (e.g., Salesforce) is then securely registered via a cryptographic certificate and trusts the identity provider. The user then only needs to authenticate himself in UCS and can use the mounted service without renewed authentication.
The SAML identify provider can be installed via the Univention App Center (see Section 5.3). The registration of services and the sharing of services for individual users is described under [wiki-saml].
A backup domain controller stores all the domain data and all SSL security certificates as read-only copies. However, in contrast to the master domain controller, no writing changes can be performed.
Any backup domain controller can be converted to a master domain controller. There are two typical application scenarios for this:
The conversion cannot be reversed. If the previous master is to be used again, it must be reinstalled and joined as a backup domain controller for it to be used again. The promotion of a backup domain controller to a master domain controller is a far-reaching configuration step and should be prepared thoroughly!
The conversion primarily involves the changeover of the services relevant for authentication such as LDAP, Kerberos and Samba. The installed software needs to be adjusted manually (this can be done using the UMC modules or ). For example, if the mail component was installed on the previous DC master, it is not automatically on the new DC master after the conversion.
If additional LDAP schema packages were installed on the master domain controller, they must also be installed on the backup domain controller prior to the conversion. The package list of the old master domain controller should be saved prior to the promotion in order to allow subsequent comparison of the installed packages. The package list can be created with the following command:
COLUMNS=200 dpkg --list > packagelist.txt
In addition, the Univention Configuration Registry inventory needs to be saved so that it is possible to compare the configuration adjustments on the new master domain controller. This can be achieved with the following command:
ucr dump > ucr.txt
The conversion of a DC backup to the new DC master is performed by running the
/usr/lib/univention-ldap/univention-backup2master command.
The system must be rebooted after the conversion. The process is logged in the
/var/log/univention/backup2master.log log file.
The computer name and/or the IP address of the master domain controller is automatically changed to the new name in all configurations managed from the UCS LDAP or via Univention Configuration Registry in the scope of the promotion. If the name is referenced in configuration files or on systems which are not managed by Univention Configuration Registry, it must be adapted accordingly following the promotion.
Univention Management Console (UMC) is the central tool for web-based administration of the UCS domain. There are various modules available for the administration of the different aspects depending on the respective system role. New UMC modules may be added to a system when installing further software components.
UMC modules for the administration of all the data included in the LDAP directory (such as users, groups and computer accounts) are only provided on master domain controller and backup domain controller. Changes made in these modules apply for the whole domain.
UMC modules for the configuration and administration of the local system are provided on all system roles. These modules can be used to install additional applications and updates, adapt the local configuration via Univention Configuration Registry or start/stop services, for example.
Section 4.2 first describes the general operation of Univention Management Console. The following sections explain among other things the work with the LDAP directory browser (Section 4.4), the use of administrative settings via policies (Section 4.5), the extension of the scope of function of the domain administration with extended attributes (Section 4.6) and delegating administration rights to additional user groups (Section 4.8). Lastly, the command line interface of the domain administration is displayed (Section 4.9) and the evaluation of domain data via the UCS reporting function are explained (Section 4.10).
Univention Management Console uses numerous JavaScript and CSS functions to display the web interface. Cookies need to be permitted in the browser. The following browsers are supported.
Users with older browsers may experience display problems.
Univention Management Console is available in German and English; the language to be used can be selected during login via the select list in the upper right corner.
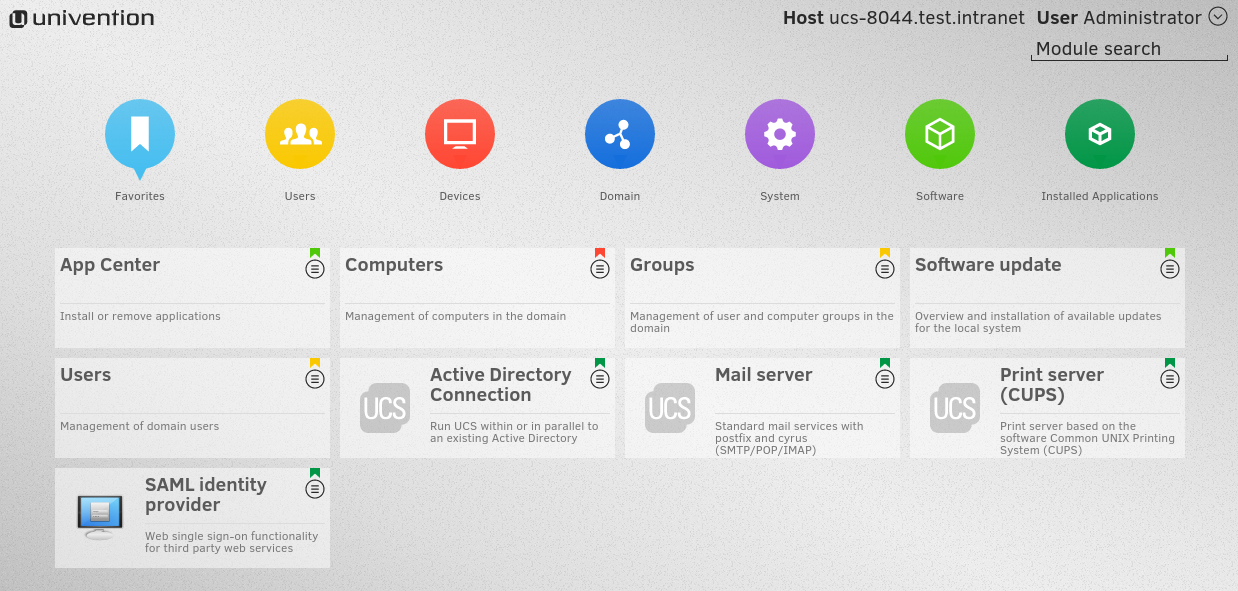
The overview page can be opened on any UCS system via the URL
https://servername/. Alternatively, access is also possible via the server's
IP address. All the services which are offered on a system are linked here. In the
tab, Univention Management Console can then be opened using the
or the link.
If there are services installed on
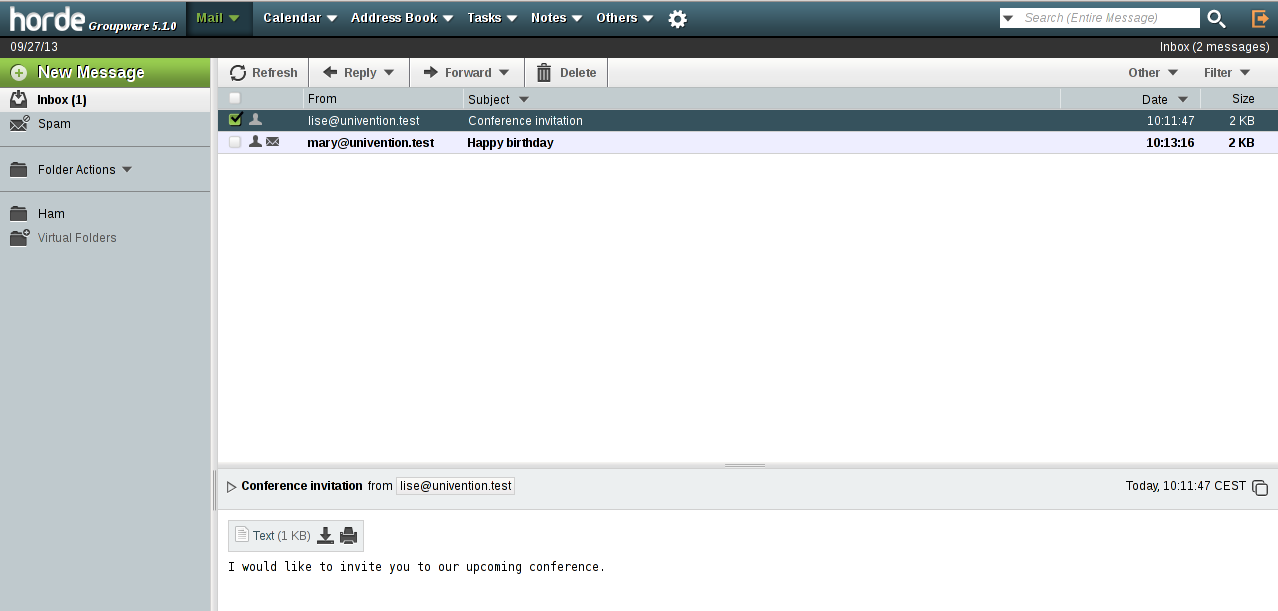
the system which include their own web service (e.g., Horde web mail), they are linked
in the tab.
Under certain circumstances it may be necessary to access
Univention Management Console over an insecure connection (e.g., if no SSL
certificates have been created for the system yet). In this
case, http must be used instead of https in the
URL. In this case, passwords are sent over the network in plain text!
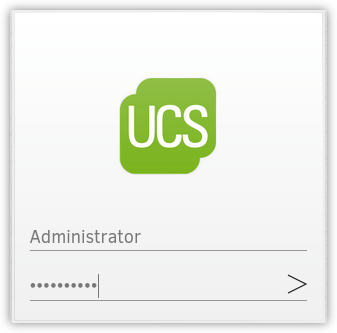
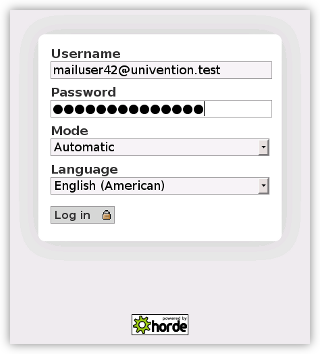
Once the URL has been opened, a login mask is displayed in which the and need to be entered:
root account (see
Section 8.4.1), only the UMC modules for the administration
and configuration of the local system are displayed.
Administrator account on
the master domain controller or backup domain controller, UMC modules for the administration of data
in the LDAP directory are displayed, as well.
During the first login, an introduction wizard is shown, which informs the user of the collection of usage statistics (see Section 4.3) and allows license activation (see Section 4.2.2) among other things.
Following ten minutes of inactivity, the browser session is automatically closed and it is
necessary to login again. This interval can be adjusted in seconds with the Univention Configuration Registry variable
umc/http/session/timeout.
Users who are already logged in can use additional UMC instances in the domain without having to log in again: If a host is selected in the title bar under , a new window opens with the system's Univention Management Console.
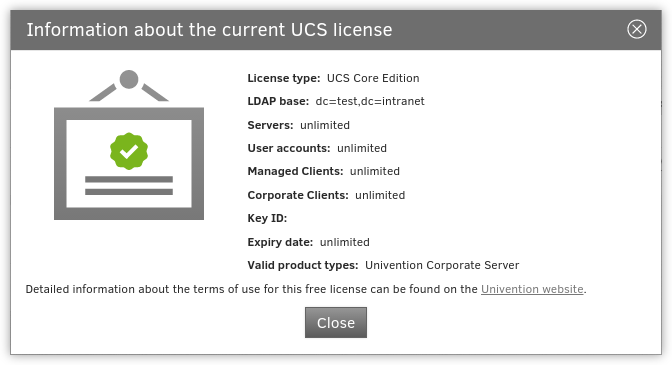
The current license status can be shown on a master domain controller of a domain by clicking on the user menu in the top right line of the screen. Below the menu item the entry can be selected to open a corresponding information dialogue.
The menu entry opens a dialogue in which a new license key can be activated (otherwise the core edition license is used as default license). A license file can be selected and imported via the button . Alternatively, the license key can also be copied into the input field below and activated with .
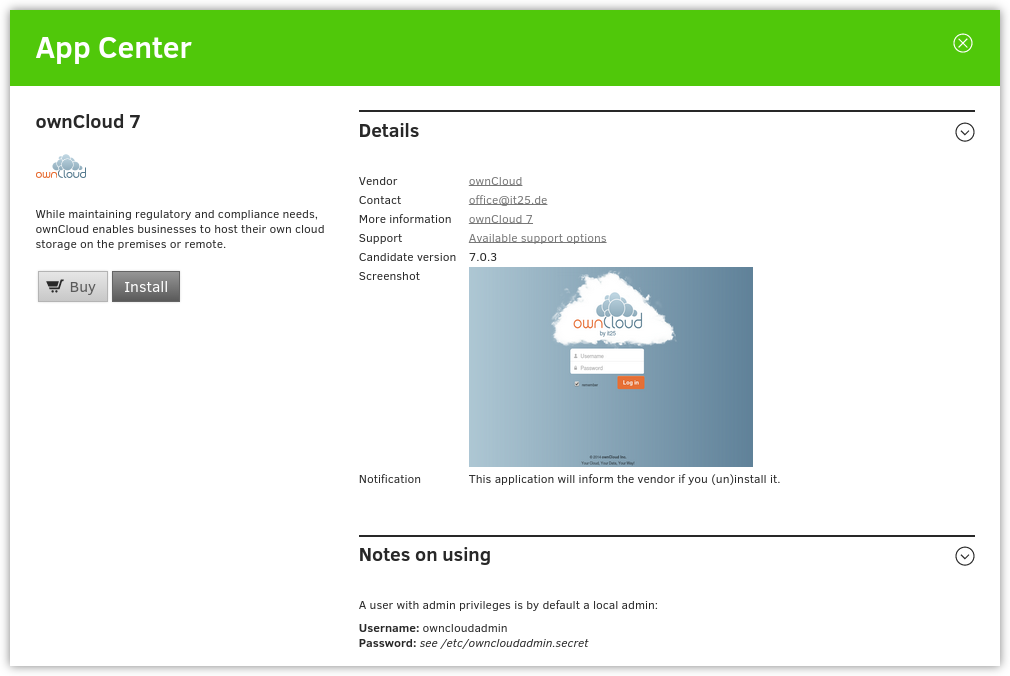
Installation of most of the applications in the Univention App Center requires a personalised license key. UCS core edition licenses can be converted by clicking . The current license key is sent to Univention and the updated key returned to a specified e-mail address within a few minutes. The new key can be imported directly. The conversion does not affect the scope of the license.
If the number of licensed user or computer objects is exceeded, it is not possible to create any additional objects in Univention Management Console or edit any existing ones unless an extended licence is imported or no longer required users or computers are deleted. A corresponding message is displayed on the UMC start page if the licence is exceeded.
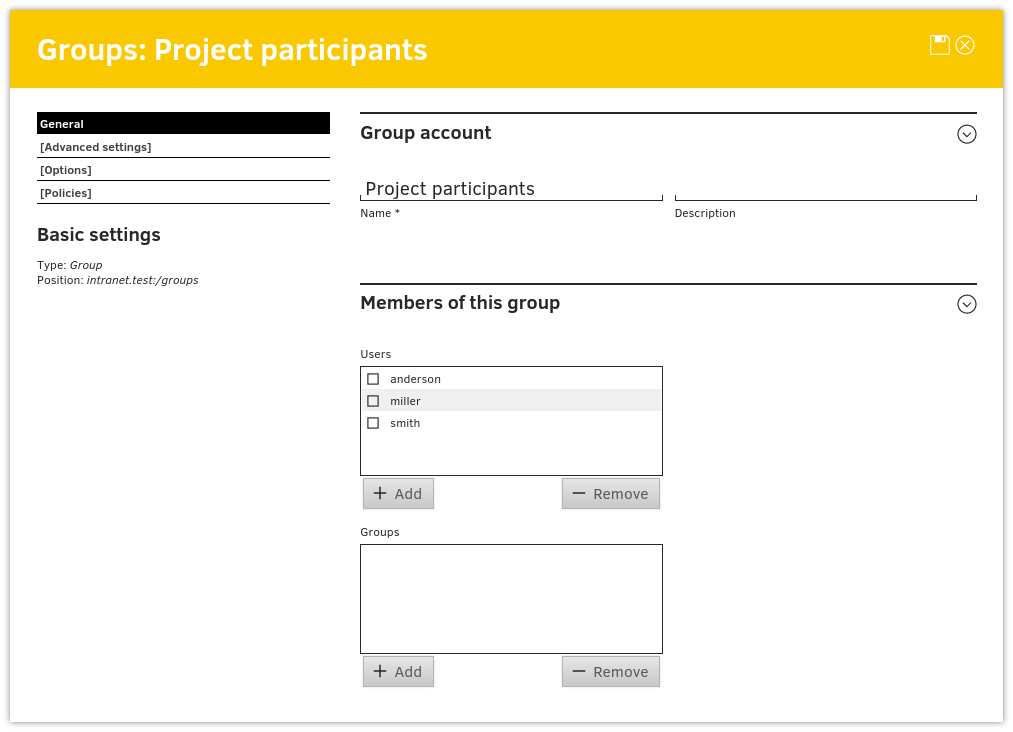
All UMC modules for managing LDAP directory objects such as user, group and computer accounts or configurations for printers, shares, mail, Nagios and policies are controlled identically from a structural perspective. The following examples are presented using the user management but apply equally for all modules. The operation of the DNS and DHCP modules is slightly different. Further information can be found in Section 10.2.2 and Section 10.3.2.
The configuration properties/possibilities of the modules are described in the following chapters:
The use of policies (Section 4.5) and the LDAP navigation (Section 4.4) are described separately.
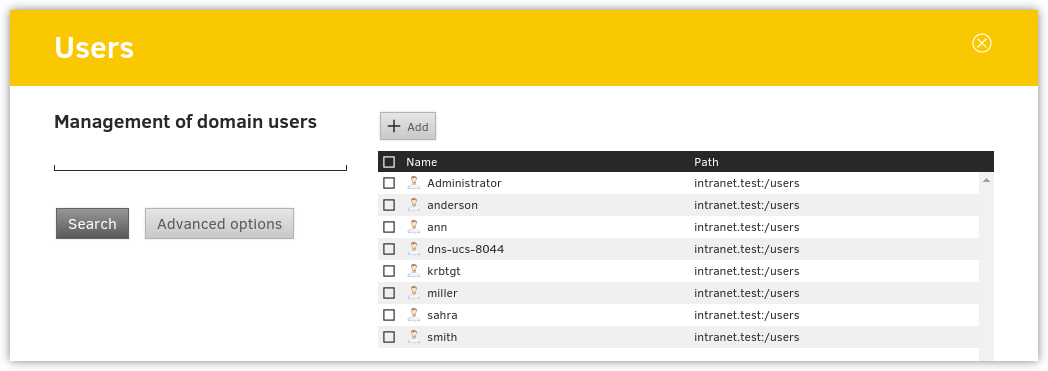
The module overview lists all the objects managed by this module. performs a search for a selection of important attributes (e.g., for user objects by first and last name, primary e-mail address, description, employee number and user name). A wildcard search is also possible, e.g., m*.
Clicking on displays additional search options:
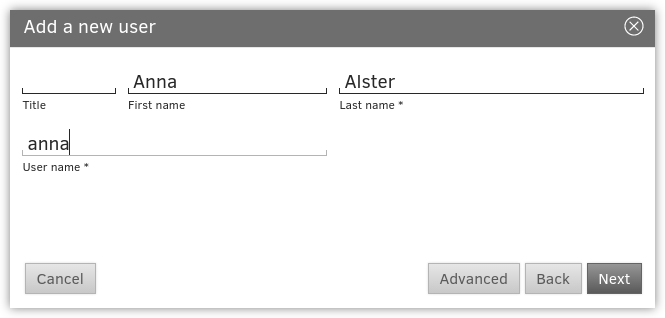
The line above the table with the objects includes an actions toolbar which can be used to create a new object using .
There are simplified wizards for some UMC modules (users, hosts), in which only the most important settings are requested. All attributes can be shown by clicking on .
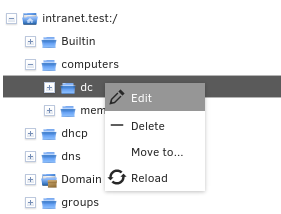
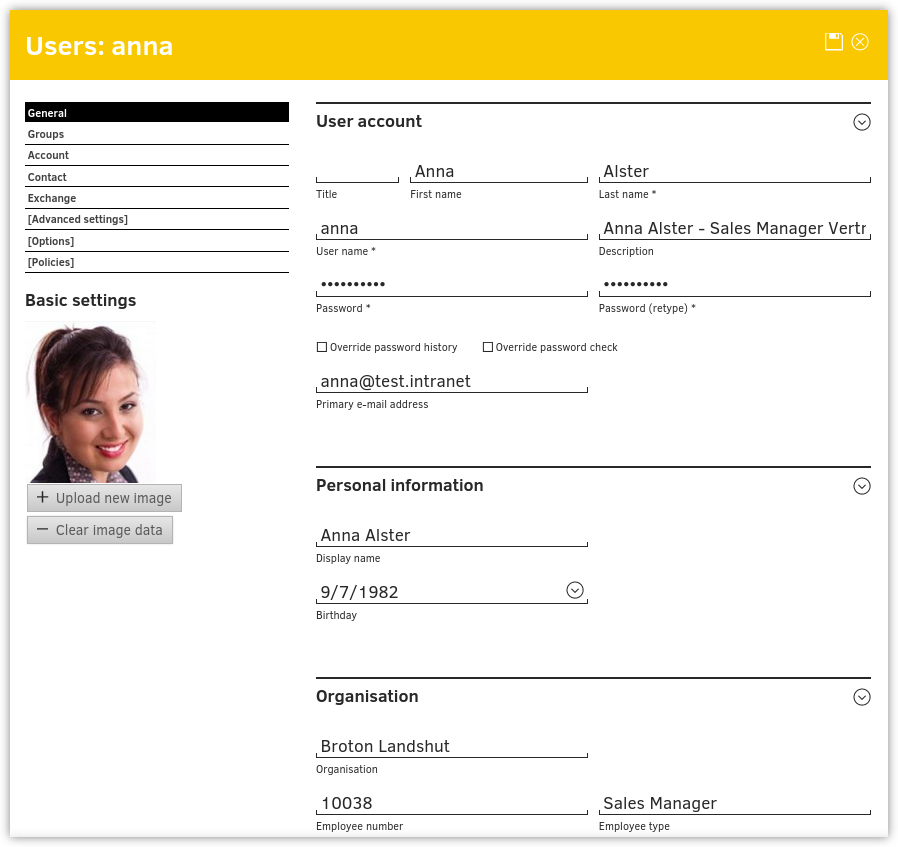
Right-clicking on an LDAP object and selecting allows to edit the object. The individual attributes are described in the individual documentation chapters. By clicking on the floppy disk symbol in the coloured module bar, all changes are written into the LDAP directory. The X symbol cancels the editing and returns to the previous search view.
In front of every item in the result list is a selection field with which the individual objects can be selected. The selection status is also displayed in the lowest screen line, e.g., If more than one object is selected, clicking on the stylised pen in the selection status bar activates the multi edit mode. The same attributes are now shown as when editing an individual object, but the changes are only accepted for the objects where the tick is activated. Only objects of the same type can be edited.
Right-clicking on an LDAP object and selecting allows to delete the object. The prompt must be confirmed. Some objects use internal references - e.g., a DNS or DHCP object - can be associated with computer objects. These can also be deleted by selecting the option.
Similar to the selection of multiple objects when editing objects, it is also possible to delete multiple objects at once.
Right-clicking on an LDAP object and selecting allows to to select an LDAP position to which the object should be moved.
Similar to the selection of multiple objects when editing objects, it is also possible to move multiple objects at once.
Commonly used UMC modules are shown in the category . Clicking on a UMC module with the right mouse button opens a context menu. and can be used to mark a UMC module as a favorite or remove it again.
By choosing the option in the upper right user menu of Univention Management Console, you can provide feedback on UCS and Univention Management Console via a web form.
UMC modules can deploy system messages to alert the user to potential errors - e.g., join scripts which have not been run - or necessary actions such as available updates. The messages are shown on the right side and can be dismissed with a mouse click.
Anonymous usage statistics on the use of Univention Management Console are collected when using the core edition version of UCS (which is generally used for evaluating UCS). Further information can be found in SDB 1318.
The UMC module can be used to navigate through the LDAP directory. When doing so, new objects can be created, modified or deleted in the LDAP directory.
The left half of the screen shows the LDAP directory as a tree structure whose elements can be shown and hidden using the plus and minus buttons.
Clicking on an element of the tree structure switches to this LDAP position and displays the objects at this LDAP position in the overview in the left side of the screen. The selection list can be used to limit the display to selected attributes.
The option can be used to add new objects here too. Similar to the control elements described in Section 4.2, existing objects can also be edited, deleted or moved here.
Right-clicking on an element in the tree structure allows editing the properties of the container or the LDAP base with .
Policies describe administrative settings which can be practically be used on more than one object. They facilitate the administration as they can be connected to containers and then apply to all the objects in the container in question and the objects in sub containers. The values are applied according to the inheritance principle. For every object, the applied value is always that which lies closest to the object in question.
If, for example, the same password expiry interval is to be defined for all users of a location, then a special container can be created for these users. After moving the user objects into the container, a password policy can be linked to the container. This policy is valid for all user objects within the container.
An exception to this rule is a value which was defined in a policy in the form of . Such values cannot be overwritten by subordinate policies.
The command line program univention-policy-result can be
used to show in detail which policy applies to which directory service
object.
Every policy applies to a certain type of UMC domain object, e.g., for users or DHCP subnets.
Policies can be managed via the UMC module . The operation is the same as for the functions described in Section 4.2.
The attributes and properties of the policies are described in the corresponding chapters, e.g. the DHCP policies in the network chapter.
The names of policies must not contain any umlauts.
provides a list of all containers or LDAP objects for which this policy currently applies.
The expanded settings host some general policy options which are generally only required in special cases.
sambaSamAccount object class could be demanded here.
Policies can be assigned in two ways:
The configuration dialogue is functionally identical; however, all policy types are offered when assigning policies to a LDAP container, whilst only the policy types applicable for the object type in question are offered when assigning policies to an LDAP object.
A policy can be assigned to the LDAP object or container under . The values resulting from this policy are displayed directly. The setting means that the settings are adopted from a superordinate policy again - when one exists.
If an object is linked to a policy, or inherits policy settings which cannot be applied to the object, the settings remain without effect for the object. This makes it possible, for example, to assign a policy to the base entry of the LDAP directory, which is then valid for all the objects of the domain which can apply this policy. Objects which cannot apply to this policy are not affected.
Policies can be edited and deleted in the UMC module . The interface is described in Section 4.2.
When editing a policy, the settings for all the objects linked to this policy are changed! The values from the changed policy apply to objects already registered in the system and linked to the policy, in the same way as to objects added in the future.
The policy tab of the individual LDAP objects also includes the option, which can be used to edit the policy currently applicable for this object.
The domain management of Univention Management Console allows the comprehensive management of the data in a domain. Extended attributes offer the possibility of integrating new attributes in the domain management which are not covered by the UCS standard scope. Extended attributes are also employed by third party vendors for the integration of solutions in UCS.
Extended attributes are managed in the UMC module .
There one needs to switch to
the univention container and then to the custom attributes
subcontainer. Existing attributes can be edited here or a
new object created
here with .
Extended attributes can be internationalized. In this case, the name and description should be compiled in English as this is the standard language for Univention Management Console.
Table 4.1. 'General' tab
| Attribute | Description |
|---|---|
| Unique name | The name of the LDAP object which will be used to store the extended attribute. Within a container, the name has to be unique. |
| UDM CLI name | The specified attribute name should be used when employing the command line interface Univention Directory Manager. When the extended attribute is saved, the Unique name of the General tab is automatically adopted and can be subsequently modified. |
| Short description | Used as title of the input field in Univention Management Console or as the attribute description in the command line interface. |
| Translations of short description |
Translated short descriptions can be saved in several languages so that the title of
extended attributes is also output with other language settings in the respective
national language. This can be done by assigning the respective short description to a
language code (e.g., de_DE or fr_FR) in this
input field.
|
| Long description | This long description is shown as a tool tip in the input fields in Univention Management Console. |
| Translations of long description |
Additional information displayed in the tool tip for an extended attribute can also be
saved for several languages. This can be done by assigning the respective long
description to a language code (e.g., de_DE or
fr_FR) in this input field.
|
Table 4.2. 'Module' tab
| Attribute | Description |
|---|---|
| Modules to be extended | The Univention Directory Manager module which is to be expanded with the extended attribute. An extended attribute can apply for multiple modules. |
| Required options/object classes | Some extended attributes can only be used practically if certain object classes are activated on the (Options) tab. One or more options can optionally be saved in this input field so that this extended attribute is displayed or editable. |
| Hook class | The functions of the hook class specified here are used during saving, modifying and deleting the objects with extended attributes. Additional information can be found in [developer-reference]. |
Table 4.3. 'LDAP' tab
| Attribute | Description |
|---|---|
| LDAP object class |
Object class to which the attribute entered under LDAP attribute belongs.
Predefined LDAP schema extensions for extended attributes are provided with the
object class Each LDAP object which should be extended with an attribute is automatically extended with the LDAP object class specified here if a value for the extended attribute has been entered by the user. |
| LDAP attribute | The name of the LDAP attribute where the values of the LDAP object are to be stored. The LDAP attribute must be included in the specified object class. |
| Remove object class if the attribute is removed | If the value of a extended attribute in Univention Management Console is deleted, the attribute is removed from the LDAP object. If no further attributes of the registered object class are used in this LDAP object, the LDAP object class will also be removed from the LDAP object if this option is activated. |
Table 4.4. 'UMC' tab
| Attribute | Description |
|---|---|
| Do not show this extended attribute in the UMC | This option can be activated if an attribute should only be administrated internally instead of by the administrator, e.g., indirectly by scripts. The attribute can then only be set via the command line interface Univention Directory Manager and is not displayed in the Univention Management Console. |
| Exclude from UMC search |
If it should not be possible to search for an extended attribute in the search window of a wizard, this option can be activated to remove the extended attribute from the list of possible search criteria. This is only needed in exceptional cases. |
| Ordering number |
If several extended attributes are to be managed on one tab, the order of the individual attributes on the tab can be influenced here. They are added to the end of the tab or the group in question in ascending order of their numbers. Assigning consecutive position numbers results in the attributes being ordered on the left and right alternately in two columns. Otherwise, the positioning starts in the left column. If additional attributes have the same position number, their order is random. |
| Overwrite existing widget |
In some cases it is useful to overwrite predefined input fields with extended
attributes. If the internal UDM name of an attribute is configured here, its
input field is overwritten by this extended attribute. The UDM attribute name can be
identified with the command univention-directory-manager (see Section 4.9). This option may cause problems if it is applied to a
mandatory attribute.
|
| Span both columns | As standard all input fields are grouped into two columns. This option can be used for overlong input fields, which need the full width of the tab. |
| Tab name |
The name of the tab in Univention Management Console on which the extended attribute should be displayed. New tabs can also be added here. If no tab name is entered, user-defined will be used. |
| Translations of tab name |
Translated tab names can be assigned to the corresponding language code
(e.g. de_DE or fr_FR) in this input field.
|
| Overwrite existing tab | If this option is activated, the tab in question is overwritten before the extended attributes are positioned on it. This option can be used to hide existing input fields on a predefined tab. It must be noted that this option can cause problems with compulsory fields. If the tab to be overwritten uses translations, the overwriting tab must also include identical translations. |
| Tab with advanced settings | Settings possibilities which are rarely used can be placed in the extended settings tab. |
| Group name |
Groups allow the structuring of a tab. A group is separated by a grey horizontal bar and can be shown and hidden. If no group name is specified for an extended attribute, the attribute is placed above the first group entry. |
| Translations of group name |
To translate the name of the group, translated group names for the corresponding
language code can be saved in this input field (e.g., de_DE or
fr_FR).
|
| Group ordering number | If multiple groups are managed in one tab, this position number can be used to specify the order of the groups. They are shown in the ascending order of their position numbers. |
Table 4.5. 'Data type' tab
| Attribute | Description |
|---|---|
| Syntax class |
When values are entered, Univention Management Console performs a syntax check.
Apart from standard syntax definitions (
The syntax |
| Default value | If a preset value is defined here, new objects to be created will be initialised with this value. The value can still be edited manually during creation. Existing objects remain unchanged. |
| Multi value | This option establishes whether a single value or multiple values can be entered in the input mask. The scheme definition of the LDAP attribute specifies whether one or several instances of the attribute may be used in one LDAP object. |
| Value required | If this option is active, a valid value must be entered for the extended attribute in order to create or save the object in question. |
| Editable after creation | This option establishes whether the object saved in the extended attribute can only be modified when saving the object, or whether it can also be modified subsequently. |
| Value is only managed internally | If this option is activated, the attribute cannot be modified manually, neither at creation time, nor later. This is useful for internal state information configured through a hook function or internally inside a module. |
Containers and organisational units (OU) are used to structure the data in the LDAP directory. There is no technical difference between the two types, just in their application:
Containers and organisational units are managed in the UMC module and are created with and the object types and .
Containers and OUs can in principle be added at any position in the LDAP; however, OUs cannot be created below containers.
Table 4.6. 'General' tab
| Attribute | Description |
|---|---|
| Name | A random name for the container / organisational unit. |
| Description | A random description for the container / organisational unit. |
Table 4.7. 'Advanced settings' tab
| Attribute | Description |
|---|---|
Add to standard object type containers | If this option is activated, the container or organisational unit will be regarded as a standard container for a certain object type. If the current container is declared the standard user container, for example, this container will also be displayed in users search and create masks. |
In the default setting, only the members of the Domain Admins group can
access all UMC modules. Policies can be used to configure the access to UMC modules for
groups or individual users. For example, this can be used to assign a helpdesk team the
authority to manage printers without giving them complete access to the administration of the
domain.
UMC modules are assigned via a policy which can be assigned to user and group objects. The evaluation is performed additively, i.e., general access rights can be assigned via ACLs assigned to groups and these rights can be extended via ACLs bound to user (see Section 4.5).
In addition to the assignment of UMC policies, LDAP access rights need to be taken
into account, as well, for modules that manage data in the LDAP directory.
All LDAP modifications are applied to the whole UCS domain.
Therefore, in the default setting, only members of the Domain Admins
group and some internally used accounts have full access to the UCS LDAP.
If a module is granted via a UMC policy, the LDAP access must also be allowed
for the user/group in the LDAP ACLs. Further information on LDAP ACLs can be found in
Section Section 3.4.5.
Table 4.9. Policy 'UMC'
| Attribute | Description |
|---|---|
| List of allowed UCS operation sets | All the UMC modules defined here are displayed to the user or group to which this ACL is applied. The names of the domain modules begin with 'UDM'. |
For access to UMC, only policies are considered that are assigned to groups or directly to user and computer accounts. Nested group memberships (i.e., groups in groups) are not evaluated.
The Univention Directory Manager is the command line interface of the domain management function of Univention Management Console. It expands the web-based interface of the Univention Management Console and functions as a powerful tool for the automation of administrative procedures in scripts and for the integration in other programs.
Univention Directory Manager can be started with the
univention-directory-manager command (short form
udm) as the root user on the master domain controller.
Univention Management Console and Univention Directory Manager use the same domain management modules, i.e., all functions of the web interface are also available in the command line interface.
A complete list of available modules is displayed if the
udm is run with the modules parameter:
# univention-directory-manager modules Available Modules are: computers/managedclient computers/computer computers/domaincontroller_backup computers/domaincontroller_master computers/domaincontroller_slave [...]
There are up to five operations for every module:
list lists all existing objects of this typecreate creates a new objectmodify for the editing of existing objectsremove deletes an objectmove is used to move an object to another position in the LDAP directoryThe possible options of a UDM module and the operations which can be used on it can be output by specifying the operation name, e.g.,
univention-directory-manager users/user move [...] create options: --binddn bind DN --bindpwd bind password [...] modify options: --binddn bind DN --bindpwd bind password --dn Edit object with DN [...] remove options: --binddn bind DN --bindpwd bind password --dn Remove object with DN --arg Remove object with ARG [...] list options: --filter Lookup filter [...] move options: --binddn bind DN --bindpwd bind password [...]
The following command outputs further information, the operations and the options for every module. This also displays all attributes of the module:
univention-directory-manager category/modulename
With the create operation, the attributes marked with
(*) must be specified when creating a new object.
Some attributes can be assigned more than one value (e.g., mail
addresses to user objects). These multi-value fields are marked with
[] behind the attribute name. Some attributes can only be
set if certain options are set for the object. This is performed for
the individual attributes by entering the option name:
users/user variables:
General:
username (*) Username
[...]
Contact:
e-mail (person,[]) E-Mail Address
Here, username (*) signifies that this attribute must
always be set when creating user objects. If the person
option is set for the user account (this is the standard case), one or
more e-mail addresses can be added to the contact information.
A range of standard parameters are defined for every module:
The parameter --dn is used to specify the LDAP
position of the object during modifications or deletion. The
complete DN must be entered, e.g.,
univention-directory-manager users/user remove \
--dn "uid=ldapadmin,cn=users,dc=company,dc=example"
The --position parameter is used to specify at
which LDAP position an object should be created. If no
--position is entered, the object is created below the
LDAP base! In the move operation, this parameter specifies
to which position an object should be moved, e.g:
univention-directory-manager computers/managedclient move \
--dn "cn=desk01,cn=management,cn=computers,dc=company,dc=com" \
--position "cn=finance,cn=computers,dc=company,dc=example"
The --set parameter specifies that the given
value should be assigned to the following attribute. The parameter
must be used per attribute value pair, e.g:
univention-directory-manager users/user create \
--position "cn=users,dc=compaby,dc=example" \
--set username="jsmith" \
--set firstname="John" \
--set lastname="Smith" \
--set password="12345678"
--option defines the LDAP object classes of an
object. If, for example, only posix and person
are provided as options for a user object, it is not possible to
specify a mailPrimaryAddress for this user as this
attribute is part of the mail option:
univention-directory-manager users/user modify \
--option "posix" --option "mail" --option "kerberos"--superordinate is used to specify dependent,
superordinate modules. A DHCP object, for example, requires a DHCP
service object under which it can be stored. This is transferred
with the --superordinate option.
The --policy-reference parameter allows the
assignment of policies to objects (and similarly their deletion with
--policy-dereference). If a policy is linked to an
object, the settings from the policy are used for the object, e.g.:
univention-directory-managercategory/modulenameOperation\ --policy-reference "cn=sales,cn=pwhistory,"\ "cn=users,cn=policies,dc=company,dc=example"
--ignore_exists parameters skips existing
objects. If it is not possible to create an object, as it already
exists, the error code 0 (no error) is still returned.
--append and --remove are used to
add/remove a value from a multi-value field, e.g.:
univention-directory-manager groups/group modify \
--dn "cn=staff,cn=groups,dc=company,dc=example" \
--append users="uid=smith,cn=users,dc=company,dc=example" \
--remove users="uid=miller,cn=users,dc=company,dc=example"The following examples for the command line front end of Univention Directory Manager can be used as templates for your own scripts:
Creating a user in the standard user container:
univention-directory-manager users/user create \
--position "cn=users,dc=example,dc=com" \
--set username="user01" \
--set firstname="Random" \
--set lastname="User" \
--set organisation="Example company LLC" \
--set mailPrimaryAddress="mail@example.com" \
--set password="secretpassword"Subsequent addition of the postal address for an existing user:
univention-directory-manager users/user modify \
--dn "uid=user01,cn=users,dc=example,dc=com" \
--set street="Exemplary Road 42" \
--set postcode="28239" \
--set city="Bremen"This command can be used to display all the users whose user name begins with user:
univention-directory-manager users/user list \
--filter uid=user*
Searching for objects with the --filter can also be limited to a
position in the LDAP directory; in this case, to all users in the container
cn=bremen,cn=users,dc=example,dc=com:
univention-directory-manager users/user list \
--filter uid="user*" \
--position "cn=bremen,cn=users,dc=example,dc=com"
This call removes the user user04:
univention-directory-manager users/user remove \
--dn "uid=user04,cn=users,dc=example,dc=com"A company has two sites with containers created for each. The following command can be used to transfer a user from the container for the site "Hamburg" to the container for the site "Bremen":
univention-directory-manager users/user move \
--dn "uid=user03,cn=hamburg,cn=users,dc=example,dc=com" \
--position "cn=bremen,cn=users,dc=example,dc=com"
Creating a group Example Users and adding the user
user01 to this group:
univention-directory-manager groups/group create \
--position "cn=groups,dc=example,dc=com" \
--set name="Example Users" \
--set users="uid=user01,cn=users,dc=example,dc=com"
Subsequent addition of the user user02 to the existing group:
univention-directory-manager groups/group modify \
--dn "cn=Example Users,cn=groups,dc=example,dc=com" \
--append users="uid=user02,cn=users,dc=example,dc=com"
A --set on the attribute users overwrites the
list of group members in contrast to --append.
Subsequent removal of the user >user01 from the group:
univention-directory-manager groups/group modify \
--dn "cn=Example Users,cn=groups,dc=example,dc=com" \
--remove users="uid=user01,cn=users,dc=example,dc=com"
This call creates a container cn=Bremen beneath the standard
container cn=computers for the computers at the "Bremen" site. The
additional option computerPath also registers this container directly
as the standard container for computer objects (see Section 4.7):
univention-directory-manager container/cn create \
--position "cn=computers,dc=example,dc=com" \
--set name="bremen" \
--set computerPath=1This command creates a mail quota policy with the name Default quota, in which a 1 GB quota is defined:
univention-directory-manager policies/mailquota create \
--position "cn=policies,dc=example,dc=com" \
--set name="Default quota" \
--set MailQuota=1024
This policy is now linked to the user container cn=users:
univention-directory-manager container/cn modify \
--dn "cn=users,dc=example,dc=com" \
--policy-reference "cn=Default quota,cn=policies,dc=example,dc=com"Creating a Univention Configuration Registry policy with which the storage time for log files can be set to one year. One space is used to separate the name and value of the variable:
univention-directory-manager policies/registry create \
--position "cn=config-registry,cn=policies,dc=example,dc=com" \
--set name="default UCR settings" \
--set registry="logrotate/rotate/count 52"This command can be used to attach an additional value to the created policy:
univention-directory-manager policies/registry modify \
--dn "cn=default UCR settings,cn=config-registry,"\
"cn=policies,dc=example,dc=com" \
--append registry='"logrotate/compress" "no"'In the following example, a Windows client is created. If this client joins the Samba domain at a later point in time (see Section 3.2.2), this computer account is then automatically used:
univention-directory-manager computers/windows create \
--position "cn=computers,dc=example,dc=com" \
--set name=WinClient01 \
--set mac=aa:bb:cc:aa:bb:cc \
--set ip=192.168.0.10
The following command creates a share Documentation on the server
>fileserver.example.com. As long as
/var/shares/documentation/ does not yet exist on the server, it is
also created automatically:
univention-directory-manager shares/share create \
--position "cn=shares,dc=example,dc=com" \
--set name="Documentation" \
--set host="fileserver.example.com" \
--set path="/var/shares/documentation"
Creating a printer share LaserPrinter01 on the print server
printserver.example.com. The properties of the printer are specified
in the PPD file, the name of which is given relative to the directory
/usr/share/ppd/. The connected printer is network-compatible and is
connected via the IPP protocol.
univention-directory-manager shares/printer create \
--position "cn=printers,dc=example,dc=com" \
--set name="LaserPrinter01" \
--set spoolHost="printserver.example.com" \
--set uri="ipp:// 192.168.0.100" \
--set model="foomatic-rip/HP-Color_LaserJet_9500-Postscript.ppd" \
--set location="Head office" \
--set producer="producer: "\
"cn=HP,cn=cups,cn=univention,dc=example,dc=com"
There must be a blank space between the print protocol and the URL target path in the
parameter uri. A list of the print protocols can be found in Section 12.4
Printers can be grouped in a printer group for simpler administration. Further information on printer groups can be found in Section 12.5.
univention-directory-manager shares/printergroup create \
--set name=LaserPrinters \
--set spoolHost="printserver.example.com" \
--append groupMember=LaserPrinter01 \
--append groupMember=LaserPrinter02To configure an IP assignment via DHCP, a DHCP computer entry must be registered for the MAC address. Further information on DHCP can be found in Section 10.3.
univention-directory-manager dhcp/host create \
--superordinate "cn=example.com,cn=dhcp,dc=example,dc=com" \
--set host="Client222" \
--set fixedaddress="192.168.0.110" \
--set hwaddress="ethernet 00:11:22:33:44:55"If it should be possible for a computer name to be resolved via DNS, the following commands can be used to configure a forward (host record) and reverse resolution (PTR record).
univention-directory-manager dns/host_record create \
--superordinate "zoneName=example.com,cn=dns,dc=example,dc=com" \
--set name="Client222" \
--set a="192.168.0.110"
univention-directory-manager dns/ptr_record create \
--superordinate "zoneName=0.168.192.in-addr.arpa,cn=dns,"\
"dc=example,dc=com" \
--set address="110" \
--set ptr_record="Client222.example.com."Further information on DNS can be found in Section 10.2.
Extended attributes can be used to expand the functional scope of Univention Management Console,
see Section 4.6. In the following example, a new attribute is
added, where the car license number of the company car can be saved for each user. The
values are managed in the object class univentionFreeAttributes created specially for this purpose:
univention-directory-manager settings/extended_attribute create \
--position "cn=custom attributes,cn=univention,dc=example,dc=com" \
--set name="CarLicense" \
--set module="users/user" \
--set ldapMapping="univentionFreeAttribute1" \
--set objectClass="univentionFreeAttributes" \
--set longDescription="License plate number of the company car" \
--set tabName="Company car" \
--set multivalue=0 \
--set syntax="string" \
--set shortDescription="Car license"Univention Directory Reports offers the possibility of creating predefined reports for any objects to be managed in the directory service.
The structure of the reports is defined using templates. The specification language developed for this purpose allows the use of wildcards, which can be replaced with values from the LDAP directory. Any number of report templates can be created. This allows users to select very detailed reports or just create simple address lists, for example.
The creation of the reports is directly integrated in the web
interface of Univention Management Console. Alternatively, the command line program
univention-directory-reports can be used.
Six report templates are already provided with the delivered Univention Directory Reports, which can be used for users, groups and computers. Three templates create PDF documents and three CSV files, which can be used as an import source for other programs. Further templates can be created and registered.
Reports can be created via a command line program or via Univention Management Console.
To create a report, you need to switch to the UMC module for users, groups or hosts. Then all the objects covered by the report must be selected (you can select all objects by clicking the button on the left of ). Clicking on allows to choose between the in PDF format and the in CSV format.
The reports created via Univention Management Console are stored for 12 hours and then deleted by a cron job. The settings for when the cron job should run and how long the reports should be stored for can be defined via two Univention Configuration Registry variables:
directory/reports/cleanup/cron Defines when the cron job should be run.
directory/reports/cleanup/ageDefines the maximum age of a report document
in seconds before it is deleted.
Reports can also be created via the command line with the
univention-directory-reports program. Information on the
use of the program can be viewed using the --help option.
The following command can be used to list the report templates available to users, for example:
univention-directory-reports -m users/user -l
Existing reports can be created directly with the presettings. Some
presettings can be adapted using Univention Configuration Registry. For example, it is
possible to replace the logo that appears in the header of each page
of a PDF report. To do so, the value of the
Univention Configuration Registry variable directory/reports/logo can include the name of an image
file. The usual image formats such as JPEG, PNG and GIF can be
used. The image is automatically adapted to a fixed width of 5.0 cm.
In addition to the logo, the contents of the report can also be adapted by defining new report templates.
The software deployment integrated in UCS offers extensive possibilities for the rollout and updating of UCS installations. Security and version updates can be installed via Univention Management Console, a command line tool and policy-based. This is described in the Section 5.4. The UCS software deployment does not support the updating of Microsoft Windows systems. An additional Windows software distribution is required for this.
For larger installations, there is the possibility of establishing a local repository server from which all further updates can be performed (see Section 5.5). This repository server either procures its packages from the Univention online repository or, in environments without Internet access, also from offline updates in the form of ISO images.
The UCS software deployment is based on the underlying Debian package management tools, which are expanded through UCS-specific tools. The different tools for the installation of software are introduced in Section 5.6. The installation of version and errata updates can be automated via policies, see Section 5.7
The software monitor provides a tool with which all package installations statuses can be centrally stored in a database, see Section 5.8.
The initial installation of UCS systems is not covered in this chapter, but is documented in Chapter 2 instead.
Four types of UCS updates are differentiated:
Every released UCS version has an unambiguous version number; it is composed of a figure (the major version), a full stop, a second figure (the minor version), a hyphen and a third figure (the patch level version). The version UCS 4.2-1 thus refers to the first patch level update for the second minor update for the major release UCS 4.
The pre-update script preup.sh is run before every release update.
It checks for example whether any problems exist, in which case the update is cancelled in a controlled manner.
The post-update script postup.sh is run at the end of the update to perform additional cleanups, if necessary.
Errata updates always refer to certain minor releases, e.g., for UCS 4.1. Errata updates can generally be installed for all patch level versions of a minor release.
If new release or errata updates are available, a corresponding notification is given when a user logs on to Univention Management Console. The availability of new updates is also notified via e-mail; the corresponding newsletters - separated into release and error updates - can be subscribed on the Univention website. A changelog document is published for every release update listing the updated packages, information on error corrections and new functions and references to the Univention Bugzilla.
The Univention App Center allows simple integration of software components in a UCS domain. The applications are provided both by third parties and by Univention itself (e.g., UCS@school). The maintenance and support for the applications are provided by the respective manufacturer.
The Univention App Center can be opened via the UMC module App Center. It shows by default all installed as well as available software components. can be used to filter the list of displayed applications. The applications can also be sorted using the .
If you click on one of the displayed applications, further details on it are shown (e.g., description, manufacturer, contact information and a screenshot). The field displays whether the manufacturer of the software component is notified when it is installed/uninstalled. Some applications provide a button in the bottom toolbar with a link to licensing information. For all other applications, the manufacturer of the application must be contacted using the e-mail address shown under .
Some applications may not be compatible with other software packages from UCS. For instance, most groupware packages require the UCS mailstack to be uninstalled. Every application checks whether incompatible versions are installed and then prompts which exist and how they can be resolved. The installation of these packages is then prevented until the conflicts have been resolved.
Some components integrate packages that need to be installed on the master domain controller (usually LDAP schema extensions or new modules for the UCS management system). These packages are automatically installed on the master domain controller. If this is not possible, the installation is aborted. In addition, the packages are set up on all accessible backup domain controller systems. If several UCS systems are available in the domain, it can be selected on which system the application is to be installed.
After its installation, one or several new options are shown when clicking on the icon of an application: removes an application. refers you to a website or a UMC module with which you can further configure or use the installed application. For example, if you install the Horde application, this link takes you to the login window. This option is not displayed for applications which do not have a web interface or a UMC module.
Updates for applications are published independently of the Univention Corporate Server release cycles. If a new version of an application is available, the menu item is shown, which starts the installation of the new version. If updates are available, a corresponding message is also shown in the UMC module . An overview of the installed applications in the domain can be opened under on the UMC start page.
Installations and the removal of packages are documented in the
/var/log/univention/management-console-module-appcenter.log log file.
There are two ways to update UCS systems; either on individual systems (via Univention Management Console or command line) or via a Univention Management Console computer policy for larger groups of UCS systems.
In environments with more than one UCS system, the update order of the UCS systems must be borne in mind:
The authoritative version of the LDAP directory service is maintained on the master domain controller and replicated on all the remaining LDAP servers of the UCS domain. As changes to the LDAP schemes (see Section 3.4.1) can occur during release updates, the master domain controller must always be the first system to be updated during a release update.
It is generally advisable to update all UCS systems in one maintenance window whenever possible. If this is not possible, all not-updated UCS systems should only be one release version older compared with the master domain controller.
The module allows the installation of release updates and errata updates.
Figure Figure 5.3 shows the overview page of the module. The currently installed version is displayed under in the upper part of the dialogue box.
If a newer UCS version is available, a select list is displayed. After clicking on and confirmation all updates up to the respective version are installed. Before the installation process is started, a message will be displayed informing the user of possible restrictions of the server services during the update. Any intermediate versions are also installed automatically.
Clicking on installs all the available errata updates for the current release and all installed components.
activates an update of the package sources currently entered. This can be used, for example, if an updated version is provided for a component.
The messages created during the update are written to the file
/var/log/univention/updater.log
The following steps must be performed with root rights.
An individual UCS system can be updated using the
univention-upgrade command in the command line. A check is
performed to establish whether new updates are available and these are then
installed if a prompt is confirmed. In addition, package updates are also
performed (e.g., in the scope of an errata update).
In the basic setting, the packages to be updated are loaded from a repository
via the network. If a local repository is used (see Section 5.5.4),
release updates can alternatively also be installed via update DVD
images, which are either imported as ISO files or from a drive.
This is done by running univention-upgrade with the
parameters --iso= or
ISOIMAGEFILE--cdrom=.
DRIVE
Remote updating over SSH is not advisable as this may result in the update
procedure being aborted. If updates should occur over a network connection
nevertheless, it must be verified that the update continues despite
disconnection from the network. This can be done, for example, using the tools
screen and at, which are installed on all
system roles.
The messages created during the update are written to the file
/var/log/univention/updater.log
An update for more than one computer can be configured with an policy in the UMC modules for computer and domain management (see Section 4.5).
A release update is only run when the selection field is activated.
The input field includes the version number up to which the system should be updated, e.g., 4.2-1. If no entry is made, the system continues updating to the highest available version number.
The point at which the update should be performed is configured via a policy (see Section 5.7).
The messages created during the update are written to the file
/var/log/univention/updater.log.
Once a release update has been performed successfully, a check should be made for whether new or updated join scripts need to be run.
Either the Domain join UMC module or the command
line program univention-run-join-scripts is used for
checking and starting the join scripts (see Section 3.2.1).
The messages generated during updates are written to the
/var/log/univention/updater.log file, which can be used for more
in-depth error analysis.
The status of the Univention Configuration Registry variables before the release update is saved in the
/var/univention-backup/update-to-TARGETRELEASEVERSION/
directory. This can then be used to check whether and which variables have been changed
during the update.
Package installations and updates can either be performed from the Univention update server or from a locally maintained repository. A local repository is practical if there are a lot of UCS systems to update as the updates only need to be downloaded once in this case. As repositories can also be updated offline, a local repository also allows the updating of UCS environments without Internet access.
Using the registered settings, APT package sources are automatically generated
in the /etc/apt/sources.list.d/ directory for release and
errata updates as well as addon components. If further repositories are required on a
system, these can be entered in the /etc/apt/sources.list
file.
In the default setting, the Univention repository
updates.software-univention.de is used for a new installation.
The Univention repository and repository components differentiate between two component parts:
repository/online/unmaintained to
yes.
A local repository can require a lot of disk space - particularly if the unmaintained branch is activated.
The and the use of the maintained and unmaintained sections can be specified in the UMC module .
The repository server to be used can be entered in the Univention Configuration Registry variable
repository/online/server and is preset to
updates.software-univention.de for a new installation.
The unmaintained repository can be integrated by setting the Univention Configuration Registry variable
repository/online/unmaintained to yes.
The repository server to be used can also be specified using the policy in the computer management of the Univention Management Console. Only UCS server systems for which a DNS entry has been configured are shown in the selection field (see Section 4.5).
Package installations and updates can either be performed from the Univention update server or from a locally maintained repository. A local repository is practical if there are a lot of UCS systems to update as the updates only need to be downloaded once in this case. As repositories can also be updated offline, a local repository also allows the updating of UCS environments without Internet access.
There is also the possibility of synchronising local repositories, which means, for example, a main repository is maintained at the company headquarters and then synchronised to local repositories at the individual locations.
To set up a repository, the univention-repository-create command
must be run as the root user. The initial package inventory is
imported from an installation DVD. The parameter --iso allows
importing from an ISO image. UCS is only available as a 64-bit DVD. The
repository is created by univention-repository-create with the
architecture of the specified installation medium. If an environment is operated in
which both 32-bit and 64-bit packages are needed, the following commands must be
executed on the repository server:
ucr set repository/online/architectures="i386 amd64" univention-repository-update net
Access to the Univention online repository is cryptographically secured via the
use of Secure APT employing signatures. This feature is not currently available
for local repositories and so a message appears when creating a repository
explaining how Secure APT can be deactivated using the Univention Configuration Registry variable
update/secure_apt. This setting must be set on all UCS systems
that access the repository.
The packages in the repository can be updated using the
univention-repository-update tool. It supports two modes:
univention-repository-update cdromHere the
repository is updated with an update DVD or an ISO image.
univention-repository-update net Here the
repository is synchronised with another specified repository server. This is
defined in the Univention Configuration Registry variable repository/mirror/server and typically
points to updates.software-univention.de.
An overview of the possible options is displayed with the following command:
univention-repository-update -h
The repository is stored in the
/var/lib/univention-repository/mirror/ directory.
The local repository can be activated/deactivated using the Univention Configuration Registry variable
local/repository.
The initial selection of the software components of a UCS system is performed within the scope of the installation. The software components are selected relative to the functions, whereby e.g. the Proxy server component is selected, which then procures the actual software packages via a meta package. The administrator does not need to know the actual package names. However, individual packages can also be specifically installed and removed for further tasks. When installing a package, it is sometimes necessary to install additional packages, which are required for the proper functioning of the package. These are called packages dependencies. All software components are loaded from a repository (see Section 5.5).
Software which is not available in the Debian package format should be
installed into the /opt/ or /usr/local/
directories. These directories are not used for installing UCS packages, thus a
clean separation between UCS packages and other software is ensured.
There are several possibilities for installing further packages subsequently on an installed system:
All software components offered in the Univention Installer can also be installed and removed at a later point in time via the Univention App Center. This is done by selecting the package category. Further information on the Univention App Center can be found in Section 5.3.
The UMC module can be used to install and uninstall individual software packages.
A search mask is displayed on the start page in which the user can select the package category or a search filter (name or description). The results are displayed in a table with the following columns:
Clicking an entry in the result list opens a detailed information page with a comprehensive description of the package.
In addition, one or more buttons will be displayed: is displayed if the software package is not installed yet; is displayed if the software package is installed and is displayed if the software package is installed but not updated. can be used for returning to the previous search request.
The following steps must be performed with root rights.
Individual packages are installed using the command
univention-install PACKAGENAME
Packages can be removed with the following command:
univention-remove PACKAGENAME
If the name of a package is unknown, the command apt-cache
search can be used to search for the package. Parts of the name or
words which appear in the description of the package are listed, e.g.:
apt-cache search fax
Package lists can be used to install and remove software using policies. This allows central software deployment for a large number of computer systems.
Each system role has its own package policy type.
Package policies are managed in the UMC module Policies with the .
Table 5.1. 'General' tab
| Attribute | Description |
|---|---|
| Name | An unambiguous name for this package list, e.g., mail server. |
| Package installation list | A list of packages to be installed. |
| Package removal list | A list of packages to be removed. |
The software packages defined in a package list are installed/uninstalled at the time defined in the policy (for the configuration see Section 5.7).
The software assignable in the package policies are also registered in the LDAP.
A policy (see Section 4.5) in the UMC modules for computer and domain management can be used to specify a point at which the following steps should be performed:
Alternatively, the updates can also be performed when the system is booting or shut down.
Table 5.2. 'General' tab
| Attribute | Description |
|---|---|
| Perform maintenance after system startup | If this option is activated, the update steps are performed when the computer is started up. |
| Perform maintenance before system shutdown | If this option is activated, the update steps are performed when the computer is shut down. |
| Use Cron settings | If this flag is activated, the fields Month, Day of week, Day, Hour and Minute can be used to specify an exact time when the update steps should be performed. |
| Reboot after maintenance | This option allows you to perform an automatic system restart after release updates either directly or after a specified time period of hours. |
The software monitor is a database in which information is stored concerning the software packages installed across all UCS systems. This database offers an administrator an overview of which release and package versions are installed in the domain and offers information for the step-by-step updating of a UCS domain and for use in identifying problems.
The software monitor can be installed from the Univention App Center with the application Software installation monitor. Alternatively, the software package univention-pkgdb can be installed. Additional information can be found in Section 5.6.
UCS systems update their entries automatically when software is installed,
uninstalled or updated. The system on which the software monitor is operated is
located by the DNS service record _pkgdb._tcp.
The software monitor's web-based interface integrates in Univention Management Console and can be accessed via the module. The following functions are available:
Packages allows to search in the installation data tracked by the package status database. Besides searching for a Package name there are various search possibilities available for the installation status of packages:
Install is used to select a
package for installation. If a package is configured to
Hold it will be excluded from further updates. There are
two possibilities for uninstalling a package: A package removed with
DeInstall keeps locally created configuration data, whilst
a package removed with Purge is
completely deleted.
Ok, which leads to a package being updated when a newer
version exists. If a package is configured to Hold it will
be excluded from the update.
Installed for
installed packages and ConfigFiles for removed
packages. All other statuses appear when the package's installation was
cancelled in different phases.
If you do not wish UCS systems to store installation processes in the software
monitor (e.g., when there is no network connection to the database), this can
be arranged by setting the Univention Configuration Registry variable pkgdb/scan to
no.
Should storing be reactivated at a later date, the command
univention-pkgdb-scan must be executed to ensure that
package versions installed in the meanwhile are also adopted in the database.
The following command can be used to remove a system's program inventory from the database again:
univention-pkgdb-scan --remove-system RECHNERNAME
UCS integrates central identity management according to the same user, same password principle. All user information are managed centrally in UCS via Univention Management Console and stored in the LDAP directory service.
All the services integrated in the domain access the central account information, i.e., the same username and password are used for the user login to a Windows client as for the login on the IMAP server.
The domain-wide management of user data reduces the administrative efforts as changes do not need to be subsequently configured on different individual systems. Moreover, this also avoids subsequent errors arising from inconsistencies between the individual datasets.
Users are managed in the UMC module Users (see Section 4.2).
In the default setting, a simplified wizard for creating a user is shown, which only
requests the most important settings. All attributes can be shown by clicking on
. The simplified wizard can be deactivated by setting the
Univention Configuration Registry variable directory/manager/web/modules/users/user/wizard/disabled to
true.
Table 6.1. 'General' tab
| Attribute | Description |
|---|---|
| User name |
This is the name, by which the user logs into the system. The name has to begin with a letter which has to be followed by: letters a-z in lower case, numerals 0-9, dots, hyphens, or underlines. User names may not contain blank spaces. In order to ensure compatibility to non-UCS systems the creation of users which are only distinguished from each other by upper and lower case letters is prevented. Thus, if the user name smith already exists, then the user name Smith cannot be created.
In the default setting, it is not possible to create a user with the same name as an
existing group. If the Univention Configuration Registry variable |
| Description | Arbitrary descriptions for the user can be entered here. |
| Password | The user's password has to be entered here. |
| Password (retype) | In order to avoid spelling errors, the user's password has to be entered for a second time. |
| Override password history | By checking this box, the password history is overridden for this user and for this password change. This means, with this change the user can be assigned a password which is already in use. Further details on user password management can be found in Section 6.2. |
| Override password check | By checking this box, the requirements for the length of the password and for password quality checks are overridden for this user and for this password change. This means, the user can e.g. be assigned a shorter password than would be possible according to the defined minimum length. Further details on the password policies for users can be found in Section 6.2. |
| Primary e-mail address | The e-mail address of the user is declared here, see Section 13.3.2. |
| Title | The title of the user is to be entered here. |
| First name | The first name of the user is to be entered here. |
| Last name | The last name of the user is to be entered here. |
| Display name | The display name is automatically composed of the first and surnames. It generally does not need to be changed. The screen name is used for the synchronisation with Active Directory and Samba 4 among other things. |
| Organisation | The organisation is to be entered here. |
| Birthday | This field is used to save a user's birthday. |
| Picture of the user (JPEG format) | This mask can be used to save a picture of the user in LDAP in JPEG format. In the default settings the file size is limited to 512 kilobytes. |
| Employee number | Numbers for staff members can be entered in this field. |
| Employee type | The category of the staff member can be entered here. |
| Superior | The superior of the user can be selected here. |
Table 6.2. 'Groups' tab
| Attribute | Description |
|---|---|
| Primary group |
This select list can be used for specifying the user's primary
group. All the groups registered in the domain are open for selection. By
default, the group Domain Users is preset.
|
| Groups | Here it is possible to set further group memberships for the user in addition to the primary group. |
Table 6.3. 'Account' tab
| Attribute | Description |
|---|---|
| Account deactivation |
The selection field can be used to deactivate the user account for one or more login methods. As long as the respective account type is deactivated, the user cannot log into the system. This is typically used when a user leaves the company. In a heterogeneous environment, an account deactivation might also be caused by external tools; in that case the selection field reflects the account status. Normally users should always be deactivated for all account types. The following deactivation states can be realised:
The following interconnections between the different login methods are derived from the UCS PAM configuration:
|
| Locked login methods |
This selection field can be used to block individual login methods. This can happen automatically for security reasons, for example, if a user has entered his password incorrectly too often, see Section 6.5. Normally users should always be blocked for all login methods. In contrast to , the account is not blocked, but the login is denied. The following login methods can be restricted: |
| Account expiry date |
A date is specified in this input field on which the account will automatically be locked. This is practical for user accounts that only need to be active for a certain period of time, e.g., for interns. If the date is deleted or replaced by a different, future date, the user will regain the right to log in. |
| Password expiry date |
If the password is subject to an expiry date, then this date is displayed in this entry field. This entry field cannot be edited directly, see Section 6.2. If a password expiry interval is defined, the password expiry date is automatically adjusted when passwords are changed. If no is declared, the old expiry date will be deleted and no new date will be set. |
| Change password on next login | If this checkbox is ticked, then the user has to change his password during the next login procedure. |
| Windows home drive |
If the Windows home directory for this user is to show up on a different
Windows drive than that specified by the Samba configuration, then the
corresponding drive letter can be entered here, e.g. M:.
|
| Windows home path |
The path of the directory which is to be the user's Windows home directory, is
to be entered here, e.g. \\ucs-file-server\smith
|
| Windows logon script |
The user-specific logon script relative to the NETLOGON share is entered here, e.g.
user.bat.
|
| Windows profile directory |
The profile directory for the user can be entered here, e.g.
\\ucs-file-server\user\profile.
|
| Relative ID | The relative ID (RID) is the local part of the SID. If a user is to be assigned a certain RID, the ID in question can be entered in this field. If no RID is assigned, the next available RID will automatically be used. The RID cannot be subsequently changed. Integers from 1000 upwards are permitted. RIDs below 1000 are reserved to standard groups and other special objects. |
| Samba privileges | This selection mask can be used to assign a user selected Windows systems rights, for example the permission to join a system to the domain. |
| Permitted times for Windows logins |
This input field contains time periods for which this user can log on to Windows computers. If no entry is made in this field, the user can log in at any time of day. |
| Allow the authentication only on these Microsoft Windows hosts | This setting specifies the clients where the user may log in. If no settings are made, the user can log into any client. |
| UNIX home directory | The path of the user's home directory. |
| Login shell |
The user's login shell is to be entered in this field. This program is started
if the user performs a text-based login. By default, /bin/bash is preset.
|
| User ID |
If the user is to be assigned a certain user ID, the ID in question can be entered in this field. If no value is specified, a free user ID is assigned automatically. The user ID can only be declared when adding the user. When the user data are subsequently edited, the user ID will be represented in grey and barred from change. |
| Group ID of the primary group | The group ID of the user's primary group is shown here. The primary group can be changed in the tab. |
| Home share | If a share is selected here, the home directory is stored on the specified server. If no selection is made, the user data are saved on the respective login system. |
| Home share path | The path of the home directory relative to the is declared here. The username is already preset as a default value when creating a user. |
Table 6.4. 'Contact' tab
| Attribute | Description |
|---|---|
| E-mail address(es) |
Additional e-mail addresses can be saved here. These are not evaluated by the mail server. The values of this attribute are stored in the LDAP attribute mail. Most address books applications using an LDAP search function will search for an e-mail address by this attribute. |
| Telephone number(s) | This field contains the user's business phone number. |
| Room number | The room number of the user. |
| Department number | The department number of the user can be entered here. |
| Street | The street and house number of the user's business address can be entered here. |
| Postal code | This field contains the post code of the user's business address. |
| City | This field contains the city of the user's business address. |
| Private telephone number(s) | The private fixed network phone number can be entered here. |
| Mobile telephone number(s) | The user's mobile numbers can be entered here. |
| Pager telephone number(s) | Pager numbers can be entered here. |
| Private postal address | One or more of the user's private postal addresses can be entered in this field. |
Table 6.5. 'Mail' tab
|
This tab is displayed in the advanced settings. The settings are described in Section 13.3.2. |
The following tab configures settings for working on Windows terminal servers.
Table 6.6. 'Windows terminal server' tab (advanced settings)
| Attribute | Description |
|---|---|
| Home directory for Windows terminal services |
The directory path which is to be the user's Windows home directory on
the terminal server can be entered here, e.g.
\\ucs-file-server\ts\user.
|
| Home drive for Windows terminal services |
If the Windows home directory for this user is to appear on a different Windows
drive than specified in the Samba configuration, the respective letter of
the drive can be entered here followed by a colon, e.g. M:.
|
| Startup command | Path to a program which should be run when a terminal session is started. |
| Working directory for startup command | The program's working directory, which is entered under . |
| Use client configuration for startup command | Both configuration settings and can be overwritten by the client application. If this checkbox is activated, the client configuration is used. |
| Connect client drives at login | The drives of the connecting client computer can be made available during a terminal server session when this checkbox is activated. |
| Connect client printers at login | The client printers are connected during log-in to the terminal server and are thus available during the terminal server session. |
| Make client default printer the default printer for Windows terminal services | If this checkbox is activated the client standard printer will be declared the standard printer for this terminal server session. |
| Allow Windows terminal server login | If this checkbox is activated the user can log on to a terminal server. |
| CTX Mirroring | This selection list specifies whether a user session can be mirrored. If is selected the session cannot be mirrored. |
| Terminated or timed-out sessions | In this selection list one can select whether ended or expired connections should be or . |
| Reconnect session | Here you can select whether the ended connection to each client or just the previous client can be rebuilt. |
| CTX RAS Dialin |
This option configures the callback function of a remote access server. If enabled, the dialin line of the user is disconnected after authentication and the user is called back. If an entry with the option is selected, the user who initiated the mirroring will be given the permission to perform keyboard inputs and mouse action in the mirrored session. If an entry with the option is selected, a message is shown on the client stating that a request has been made to mirror the session. |
| Profile directory for Windows terminal services | The path to the Windows profile which is to be used in the terminal server session should be entered here. If no value is entered, the standard profile path is used. |
| Keyboard layout | The keyboard layout for the terminal server session. |
Table 6.7. '(Options)' tab
| Attribute | Description |
|---|---|
| Mail account |
If this checkbox is not ticked, the user will not be assigned the object class
univentionMail.
|
| Kerberos principal |
If this checkbox is not ticked, the user will not be assigned the object
classes krb5Principal and krb5KDCEntry.
|
| Samba account |
If this checkbox is not ticked, the user will not be assigned the object class
sambaSamAccount.
|
| POSIX account |
If this checkbox is not ticked, the user will not be assigned the object
classes posixAccount and shadowAccount.
|
| Personal information |
If this checkbox is not ticked, the user will not be assigned the object
classes organizationalPerson and inetOrgPerson.
|
| Public key infrastructure account |
If this checkbox is not ticked, the user will not be assigned the object class
pkiUser.
|
| Simple authentication account |
This option can be used for creating user objects which have only a username
and a password. With these users, authentication is possible against the
LDAP directory service exclusively; logging into UCS or Windows systems is not
possible. If this option is activated, the object classes uidObject and
simpleSecurityObject will be used.
|
Passwords which are difficult to guess and regular password changes are an essential element of the system security of a UCS domain. The following properties can be configured for users using a password policy. If Samba is used, the settings of the Samba domain object (see Section 6.3) apply for logins to Window clients. The settings of the Samba domain object and the policy should be set identically, otherwise different password requirements will apply for logins to Windows and UCS systems.
The password is saved in different attributes for every user saved in the management system:
/etc/shadow).Password changes are always initiated via Kerberos in the UCS PAM configuration.
The history length saves the last password hashes. These passwords can then not be used by the user as a new password when setting a new password. With a password history length of five, for example, five new passwords must be set before a password can be reused. If no password history check should be performed, the value must be set to 0.
The passwords are not stored retroactively. Example: If ten passwords were stored, and the value is reduced to three, the oldest seven passwords will be deleted during the next password change. If then the value is increased again, the number of stored passwords initially remains at three, and is only increased by each password change.
If the option Password quality check is activated, additional checks - including dictionary checks - are performed for password changes in Samba, Univention Management Console and Kerberos.
The configuration is done via Univention Configuration Registry and should occur on all login servers. The following checks can be enforced:
password/quality/credit/digits).
password/quality/credit/upper).
password/quality/credit/lower).
password/quality/credit/other).
password/quality/forbidden/chars).
password/quality/required/chars).
With the Samba domain object, one can set the password requirements for logins to Windows clients in a Samba domain.
The Samba domain object is managed via the
UMC module LDAP directory. It can
be found in the samba container below
the LDAP base and carries the domain's NetBIOS name.
The settings of the Samba domain object and the policy (see Section 6.2) should be set identically, otherwise different password requirements will apply for logins to Windows and UCS systems.
Table 6.8. 'General' tab
| Attribute | Description |
|---|---|
| Password length | The minimum number of characters for a user password. |
| Password history | The latest password changes are saved in the form of hashes. These passwords can then not be used by the user as a new password when setting a new password. With a password history of five, for example, five new passwords must be set before a password can be reused. |
| Minimum password age | The period of time set for this must have at least expired since the last password change before a user can reset his password again. |
| Maximum password age | Once the saved period of time has elapsed, the password must be changed again by the user the next time he logs in. If the value is left blank, the password is infinitely valid. |
In Univention Management Console, every user can reset his password via the module. The module can also be opened by selecting the entry in the top right user menu. To change the password, the current password must be entered first. The change is performed directly via the PAM stack (see Section 8.4.4) and is then available centrally for all services.
As standard, a user can enter his password incorrectly any number of times. To
hinder brute force attacks on passwords, an automatic lockout for user accounts
can be activated after a configured number of failed log-in attempts. The lockout
is activated locally per computer system as standard. In other words, if a
user enters his password incorrectly too many times on one system, he can
still login on another system. Setting the Univention Configuration Registry variable auth/faillog/lock_global
will make the lock effective globally and register it in the LDAP. The global
lock can only be set on domain controller master/backup systems as other
system roles do not possess the requisite permissions in the LDAP
directory. On these system roles, the user is, however, locally locked or
unlocked again via the listener module.
This setting can also be misused, for example when a user has locked his screen and another user enters the password incorrectly several times in his absence. In this case, the user must contact the administrator to have his account unlocked.
The automatic lockout of users following failed logins can be activated by
setting the Univention Configuration Registry variable auth/faillog to yes. The upper limit of failed log-in
attempts at which an account lockout is activated is configured
in the Univention Configuration Registry variable auth/faillog/limit. The counter is reset each time the password
is entered correctly.
As standard, the root user is excluded from the password lock, but can also be
subjected to it by setting the Univention Configuration Registry variable auth/faillog/root to yes.
As standard, the lockout is not subject to time limitations and must be reset by
the administrator. However, it can also be reset automatically after a certain
interval has elapsed. This is done by specifying a time period in seconds
in Univention Configuration Registry variable auth/faillog/unlock_time. If the value is set to 0, the lock is
reset immediately.
If accounts are locked locally, the administrator can unlock a user by
entering the command faillog -r USERNAME. If the lock occurs
globally in the LDAP, the user can be reset in
the tab of a user in Univention Directory Manager.
A user template can be used to preset settings when creating a user. If at least one user template is defined, it can be selected when creating a user.
User templates are administrated in the UMC module .
There one needs to switch to the
univention container and then to the templates
subcontainer. A new user template can be created here via the
with the object type
.
In a user template, either a fixed value can be specified (e.g., for the address) or an attribute of the user management referenced. Attributes are then referenced in chevrons.
A list of possible attributes can be displayed with the command:
univention-director-manager users/user
in the section users/user variables of the output.
If a user template is used for adding a user, this template will overwrite all the fields with the preset values of the template. In doing so, an empty field is set to "".
It is also possible to only use partial values of attributes or convert values in uppercase/lowercase.
For example, the UNIX home directory can be stored under
/home/<title>.<lastname> or the primary e-mail address
can be predefined with
<firstname>.<lastname>@company.com. Substitutions are
generally possibly for any value, but there is no syntax or semantics check. So, if no
first name is specified when creating a user, the above e-mail address would begin with a
dot and would thus be invalid according to the e-mail standard. Similar sources of error
can also occur when handling file paths etc. Non-resolvable attributes (for instance due
to typing errors in the template) are deleted.
If only a single character of an attribute is required instead of the complete attribute
value, the index of the required character can be entered in the user template in square
brackets after the name of the attribute. The count of characters of the attribute begins
with 0, so that index 1 corresponds to the second character of the attribute
value. Accordingly, <firstname>[0].<lastname>@company.com
means an e-mail address will consist of the first letter of the first name plus the lastname.
A substring of the attribute value can be defined by entering a range in square
brackets. In doing so, the index of the first required character and the index of the last
required character plus one are to be entered. For example, the input
<firstname>[2:5] returns the third to fifth character of the
first name.
Adding :lower or :upper to the
attribute name converts the attribute value to lowercase or uppercase, e.g.,
<firstname:lower>. If a modifier like
:lower is appended to the entire field, the complete value is
transformed, e.g. <lastname>@company.com<:lower>.
The option :umlauts can be used to convert special characters
such as è, ä or ß into the corresponding ASCII characters.
It is also possible to combine options, e.g: :umlauts,upper.
Permissions in UCS are predominantly differentiated between on the basis of groups. Groups are stored in the LDAP and are thus identical on all systems. Groups can contain not only user accounts, but can also optionally accept computer accounts.
In addition, there are also local user groups on each system, which
are predominantly used for hardware access. These are not managed
through the UCS management system, but saved in the /etc/group file.
The assignment of users to groups is performed in two ways:
Groups are managed in the UMC module Groups (see Section 4.2).
Table 7.1. 'General' tab
| Attribute | Description |
|---|---|
| Name (*) |
The name of the group has to begin and end with a letter or a numeral. The rest of the characters which form the group name may include letters, numerals, spaces, hyphens, or dots.
In the default setting, it is not possible to create a group with the same name as an existing user.
If the Univention Configuration Registry variable |
| Description | A description of the group can be entered here. |
| Users | This input field can be used for adding users as members to the group. |
| Groups | On this input field, other groups can be added as members of the current group (groups in groups). |
Table 7.2. 'Advanced settings' tab
| Attribute | Description |
|---|---|
| These options define a mail group and are documented in the Section 13.3.4. | |
| Host members | This field can be used for accepting computers as members of the group. |
| Nested groups | The current group can be added as a member to other groups here (groups in groups). |
| Group ID |
If a group is to be assigned a certain group ID, the ID in question can be entered in this field. Otherwise, Univention Management Console will automatically assign the next available group ID when adding the group. The group ID cannot be subsequently changed. When editing the group, the group ID will be represented in grey. The group ID may consist of integers between 1000 and 59999 and between 65536 and 100000. |
| Windows -> Relative ID |
The relative ID (RID) is the local part of the Security ID (SID) and is used in Windows and Samba domains. If a group is to be assigned a certain RID, the ID in question can be entered in this field. Otherwise, Univention Management Console will automatically assign the next available group ID when adding the group. The RID cannot be subsequently changed. When editing the group, the group ID will be represented in grey. The RIDs below 1000 are reserved for standard groups and other special objects. When Samba 4 is used, the RID is generated by Samba and cannot be specified. |
| Windows -> NT group type |
This group type is evaluated when the user logs on to a Samba 3-based domain
(which offers NT domain services). Three types of NT groups can be
distinguished:
|
| Windows -> AD group type | This group type is only evaluated when the user logs on to a Samba 4-based domain (which offers Active Directory domain services). These groups are described in Section 7.4. |
| Windows -> Samba privileges | This input mask can be used to assign Windows system rights to a group, e.g., the right to join a Windows client in the domain. This function is documented in Section 6.1. |
Table 7.3. 'Options' tab
| This tab is only available when adding groups, not when editing groups. Certain LDAP object classes for the group can be de-selected here. The entry fields for the attributes of these classes can then no longer be filled in. | |
|---|---|
| Attribute | Description |
| Samba group |
This checkbox indicates whether the group contains the object class
sambaGroupMapping.
|
| POSIX group |
This checkbox indicates whether the group contains the object class
posixGroup.
|
UCS supports group nesting (also known as "groups in groups"). This
simplifies the management of the groups. For example, if two locations
are managed in one domain, two groups can be formed IT staff location A
and IT staff location B), to which the user
accounts of the location's IT staff can be assigned respectively.
To create a cross-location group, it is then sufficient to
define the groups IT staff location A and IT staff location B
as members.
Cyclic dependencies of nested groups are automatically detected and
refused. This check can be disabled with the
Univention Configuration Registry variable directory/manager/web/modules/groups/group/checks/circular_dependency.
Cyclic memberships must also be avoided in direct group changes
without the UCS management system.
The resolution of nested group memberships is performed during the generation of the group cache (see Section 7.3) and is thus transparent for applications.
The user and computer information retrieved from the LDAP is cached by the Name Server Cache Daemon, see Section 8.4.9.
Since UCS 3.1, the groups are no longer cached via the NSCD for performance and
stability reasons; instead they are now cached by the NSS module
libnss-extrausers. The group information is automatically exported to
the /var/lib/extrausers/group file by the
/usr/lib/univention-pam/ldap-group-to-file.py script and read
from there by the NSS module.
In the basic setting, the export is performed every 15 minutes by a cron job and is
additionally started if the Univention Directory Listener has been inactive for 15
seconds. The interval for the cron update is configured in Cron syntax (see Section 8.4.8.2) by the Univention Configuration Registry variable
nss/group/cachefile/invalidate_interval. This listener module can be
activated/deactivated via the Univention Configuration Registry variable
nss/group/invalidate_cache_on_changes (true/false).
When the group cache file is being generated, the script verifies whether the group
members are still present in the LDAP directory. If only Univention Management Console is used for user
management, this additional check is not necessary and can be
disabled by setting the Univention Configuration Registry variable nss/group/cachefile/check_member to
false.
If Samba 4 is used, the group memberships are synchronised between the Samba 4 directory service and the OpenLDAP directory service by the Univention S4 connector, i.e., each group on the UCS side is associated with a group in Active Directory. General information on the Univention S4 connector can be found in Section 9.2.2.4.
Some exceptions are formed by the pseudo groups (sometimes also called
system groups). These are only managed internally by Active Directory/Samba 4, e.g., the
Authenticated Users group includes a list of all the users currently
logged on to the system. Pseudo groups are stored in the UCS directory service, but they are
not synchronised by the Univention S4 connector and should usually not be edited. This
applies to the following groups:
Anonymous Logon, Authenticated Users, Batch, Creator GroupCreator Owner, Dialup, Digest AuthenticationEnterprise Domain Controllers, Everyone, IUSR, InteractiveLocal Service, NTLM Authentication, Network Service, NetworkNobody, Null Authority, Other Organization, Owner RightsProxy, Remote Interactive Logon, Restricted, SChannel AuthenticationSelf, Service, System, Terminal Server User, This OrganizationWorld Authority
In Samba 4 / Active Directory, a distinction is made between the following four AD group types. These group types can be applied to two types of groups; security groups configure permissions (corresponding to the UCS groups), whilst distribution groups are used for mailing lists:
In the UCS directory service, group membership properties are only saved in the group objects and not in the respective user objects. However, some applications expect group membership properties at the user objects (e.g., in the attribute memberOf). An optional overlay module in the LDAP server makes it possible to present these attributes automatically based on the group information. The additional attributes are not written to the LDAP, but displayed on the fly by the overlay module if a user object is queried.
To this end, the univention-ldap-overlay-memberof package must be installed on all LDAP servers.
In the default setting, the user attribute memberOf is shown. The
Univention Configuration Registry variable ldap/overlay/memberof/memberof can be used to configure
a different attribute.
All UCS, Linux and Windows systems within a UCS domain each have a computer domain account (also referred to as the host account) with which the systems can authenticate themselves among each other and with which they can access the LDAP directory.
The computer account is generally created automatically when the system joins the UCS domain (see Section 3.2); however, the computer account can also be added prior to the domain join.
The password for the computer account is generated automatically during the domain join and
saved in the /etc/machine.secret file. In the default setting, the
password consists of 20 characters (can be configured via the Univention Configuration Registry variable
machine/password/length). The password is regenerated
automatically at fixed intervals (default setting: 21 days; can be configured using the
Univention Configuration Registry variable server/password/interval). Password rotation can also be disabled
using the variable server/password/change.
There is an different computer object type for every system role. Further information on the individual system roles can be found in Section 3.3.
Computer accounts are managed in the UMC module .
In the default setting, a simplified wizard for creating a computer is shown, which only requests the most important settings. All attributes can be shown by clicking on . If there is a DNS forward zone and/or a DNS reverse zone (see Section 10.2) assigned to the selected network object (see Section 10.1), a host record and/or pointer record is automatically created for the host. If there is a DHCP service configured for the network object and a MAC address is configured, a DHCP host entry is created (see Section 10.3).
The simplified wizard can be disabled for all system roles by setting the Univention Configuration Registry variable
directory/manager/web/modules/computers/computer/wizard/disabled to
true.
Table 8.1. 'General' tab
| Attribute | Description |
|---|---|
| Name |
The name for the host should be entered in this input field. To guarantee compatibility with different operating systems and services, computer names should only contain the lowercase letters a to z, numbers, hyphens and underscores. Umlauts and special characters are not permitted. The full stop is used as a separating mark between the individual components of a fully qualified domain name and must therefore not appear as part of the computer name. Computer names must begin with a letter. Microsoft Windows accepts computer names with a maximum of 13 characters, so as a rule computer names should be limited to 13 characters if there is any chance that Microsoft Windows will be used. After creation, the computer name can only be changed for the system roles Windows Workstation/Server, Mac OS X Client and IP managed client. |
| Description | Any description can be entered for the host in this input field. |
| Inventory number | Inventory numbers for hosts can be stored here. |
| Network | The host can be assigned to a existing network object. Information on the IP configuration can be found in Section 10.1. |
| MAC address |
The MAC address of the computer can be entered here e.g.,
2e:44:56:3f:12:32. If the computer is to receive a DHCP
entry, the entry of the MAC address is essential.
|
| IP address |
Fixed IP addresses for the host can be given here. Further information on the IP configuration can be found in Section 10.1. If a network was selected on the tab, the IP address assigned to the host from the network will be shown here automatically. An IP address entered here (i.e. in the LDAP directory) can only be transferred to the host via DHCP. If no DHCP is being used, the IP address must be configured locally, see Section 8.2.4. If the IP addresses entered for a host are changed without the DNS zones being changed, they are automatically changed in the computer object and - where they exist - in the DNS entries of the forward and reverse lookup zones. If the IP address of the host was entered at other places as well, these entries must be changed manually! For example, if the IP address was given in a DHCP boot policy instead of the name of the boot server, this IP address will need to be changed manually by editing the policy. |
| Forward zone for DNS entry | The DNS forward zone in which the computer is entered. The zone is used for the resolution of the computer name in the assigned IP address. Further information on the IP configuration can be found in Section 10.1. |
| Reverse zone for DNS entry | The DNS reverse zone in which the computer is entered. The zone is used to resolve the computer's IP address in a computer name. Further information on the IP configuration can be found in Section 10.1. |
| DHCP service |
If a computer is supposed to procure its IP address via DHCP, a DHCP service must be assigned here. Information on the IP configuration can be found in Section 10.1. During assignment, it must be ensured that the DHCP servers of the DHCP service object are responsible for the physical network. If a network is selected on the tab an appropriate entry for the network will be added automatically. It can be adapted subsequently. |
Table 8.2. 'Account' tab' (advanced settings)
| Attribute | Description |
|---|---|
| Password |
The password for the computer account is usually automatically created and rotated. For special cases such as the integration of external systems it can also be explicitly configured in this field.
The same password must then also be entered locally on the
computer in the |
| Primary group |
The primary group of the host can be selected in this selection
field. This is only necessary when they deviate from the automatically created
default values. The default value for a DC master or DC backup is DC
Backup Hosts, for a DC slave DC Slave Hosts and
for member servers Computers.
|
Table 8.3. 'Unix account' tab (advanced settings)
| Attribute | Description |
|---|---|
| Unix home directory (*) |
A different input field for the host account can be entered
here. The automatically created default value for the home directory is
/dev/null
|
| Login shell |
If a different login shell from the default value is to be used for
the computer account, the login shell can be adapted manually in this input
field. The automatically set default value assumes a login shell of
/bin/sh.
|
Table 8.4. 'Services' tab (advanced settings)
| Attribute | Description |
|---|---|
| Service | By means of a service object, applications or services can determine whether a service is available on a computer or generally in the domain. |
The tab 'Services' is only displayed on UCS server system roles.
Table 8.5. 'Deployment' tab (advanced settings)
| This tab is used for the Univention Net Installer, see [ext-doc-inst]. |
Table 8.6. 'DNS-Alias' tab (advanced settings)
| Attribute | Description |
|---|---|
| Zone for DNS Alias | If a zone entry for forward mapping has been set up for the host in the field, the additional alias entries via which the host can be reached can be configured here. |
Table 8.7. 'Groups' tab (advanced settings)
| The computer can be added into different groups in this tab. |
Table 8.8. 'Nagios services' tab (advanced settings)
| This tab is used to specify which Nagios tests should be performed for this computer, see Section 14.3.3. |
Table 8.9. 'Nagios notification' tab (advanced settings)
| This tab is used to specify which users should be informed if Nagios tests should fail, see Section 14.3.3. |
Table 8.10. 'UVMM' tab (advanced settings)
| This tab is used to specify which virtualization servers can be managed by UVMM. Further information can be found in Chapter 15. |
Table 8.11. '(Options)' tab
| Attribute | Description |
|---|---|
| This tab allows to disable LDAP object classes for host objects. The entry fields for attributes of disables object classes are no longer shown. Not all object classes can be modified subsequently. | |
| Kerberos principal |
If this checkbox is not selected the host does not receive the
krb5Principal and krb5KDCEntry object
classes.
|
| POSIX account |
If this checkbox is not selected the host does not receive the
posixAccount object class.
|
| Nagios support | If this checkbox is selected Nagios checks can be activated for this host. |
| Samba account |
If this checkbox is not selected the host does not receive the
sambaSamAccount object class.
|
Ubuntu clients can be managed in Univention Management Console with their own system role. The network properties for DNS/DHCP can also be managed via Univention Management Console.
The use of policies is not supported.
Some configuration adjustments need to be performed on Ubuntu systems; these are documented in the extended documentation [ext-doc-domain].
The standard kernel in UCS 4.0 is based on the Linux kernel 3.16. In principle, there are three different types of kernel packages:
Normally, the operation of a UCS system only requires the installation of one kernel image package.
The default kernel in UCS for i386-based systems is the so-called bigmem kernel for processors with PAE support, which supports 64 GB RAM. For older i386-based systems a second kernel without PAE support is provided, which only supports up to 4 GB RAM. The standard kernel for amd64 systems has no such limits.
Several kernel versions can be installed in parallel. This makes sure that there is always an older version available to which can be reverted in case of an error. So-called meta packages are available which always refer to the kernel version currently recommended for UCS. In case of an update, the new kernel version will be installed, making it possible to keep the system up to date at any time.
The following meta packages are available under i386 / 32 bit:
The following meta packages are available under amd64 / 64 bit:
The boot process occurs in two steps using an initial ramdisk ('initrd' for short). This is composed of an archive with further drivers and programs.
The GRUB boot manager (see Section 8.2.3) loads the kernel and the initrd into the system memory, where the initrd archive is extracted and mounted as a temporary root file system. The real root file system is then mounted from this, before the temporary archive is removed and the system start implemented.
The drivers to be used are recognised automatically during system start and
loaded via the udev device manager. At this point, the necessary device links
are also created under /dev/. If drivers are not
recognised (which can occur if no respective hardware IDs are registered or
hardware is employed which cannot be recognised automatically, e.g., ISA
boards), kernel modules to be loaded can be added via Univention Configuration Registry variable
kernel/modules. If more than one kernel module is to be loaded,
these must be separated by a semicolon. The Univention Configuration Registry variable kernel/blacklist
can be used to configure a list of one or more kernel modules for which automatic
loading should be prevented. Multiple entries must also be separated by a semicolon.
Unlike other operating systems, the Linux kernel (with very few exceptions) provides all drivers for hardware components from one source. For this reason, it is not normally necessary to install drivers from external sources subsequently.
However, if external drivers / kernel modules are required, they can be integrated via the DKMS framework (Dynamic Kernel Module Support). This provides a standardised interface for kernel sources, which are then built automatically for every installed kernel (insofar as the source package is compatible with the respective kernel). For this to happen, the kernel header package univention-kernel-headers must be installed in addition to the dkms package. Please note that not all the external kernel modules are compatible with all kernels.
In Univention Corporate Server GNU GRUB 2 is used as the boot manager. GRUB provides a menu which allows the selection of a Linux kernel or another operating system to be booted. GRUB can also access file systems directly and can thus, for example, load another kernel in case of an error.
GRUB gets loaded in a two-step procedure; in the Master Boot Record of the hard drive, the Stage 1 loader is written which refers to the data of Stage 2, which in turn manages the rest of the boot procedure.
The selection of kernels to be started in the boot menu is stored in the
file /boot/grub/grub.cfg. This file is generated
automatically; all installed kernel packages are available for selection. The
memory test program Memtest86+ can be started by selecting the option
and performs a consistency check for the main
memory.
There is a five second waiting period during which the kernel to be
booted can be selected. This delay can be changed via the Univention Configuration Registry variable
grub/timeout.
By default a screen of 800x600 pixels size and 16 Bit colour depth is
pre-set. A different value can be set via the Univention Configuration Registry variable
grub/gfxmode. Only resolutions are supported which can be set
via VESA BIOS extensions. A list of available modes can be found at
https://en.wikipedia.org/wiki/VESA_BIOS_Extensions. The input must
be specified in the format
HORIZONTALxVERTICAL@COLOURDEPTHBIT1024x768@16.
Kernel options for the started Linux kernel can be passed with the
Univention Configuration Registry variable grub/append. Univention Configuration Registry variable grub/xenhopt can
be used to pass options to the Xen hypervisor.
The graphic representation of the boot procedure - the so-called splash
screen - can be deactivated by setting Univention Configuration Registry variable grub/bootsplash
to nosplash.
Older Xen environments might use a version of PyGrub, which still
requires the GRUB 1 configuration file /goot/grub/menu.lst
to boot paravirtualized Xen systems. This file is generated automatically if
it does not yet exist. This behaviour can be deactivated by setting the
Univention Configuration Registry variable grub/generate-menu-lst to no.
The configuration of network interfaces can be adjusted in Univention Management Console via the module .
The configuration is saved in Univention Configuration Registry variables, which can also be set directly. These variables are listed in brackets in the individual sections.
All the network cards available in the system are listed under
and (only network interfaces in the ethX
scheme are shown).
Network interfaces can be configured for IPv4 and/or IPv6. IPv4
addresses have a 32-bit length and are generally written in four blocks in
decimal form (e.g., 192.168.0.10), whereas IPv6 addresses are four times as
long and typically written in hexadecimal form (e.g.,
2222:0DFE:FE29:DE27:0000:0000:0000:0000).
If the option was not chosen, the IP address to be bound to the network card must be entered. In addition to the the must also be entered. is used to request an address from a DHCP server. Unless the option is activated, the values received from the DHCP request are configured statically.
Server systems can also be configured via DHCP. This is necessary for
some cloud providers, for example. If the assignment of an IP address for a
server fails, a random link local address (169.254.) is configured as a
replacement.
x.y
For UCS server systems the address received via DHCP is also written to the LDAP directory.
Not all services (e.g., DNS servers) are suitable for use on a DHCP-based server.
(UCR variables: interfaces/ethX/address,
interfaces/ethX/netmask, interfaces/ethX/type)
Besides the physical interfaces, additional virtual interfaces can
also be defined in the form interfaces/ethX_Y/setting.
The IPv6 address can be configured in two ways: Stateless address autoconfiguration (SLAAC) is employed in the configuration. In this, the IP address is assigned from the routers of the local network segment. Alternatively, the address can also be configured statically by entering the and . In contrast to DHCP, in SLAAC there is no assignment of additional data such as the DNS server to be used. There is an additional protocol for this (DHCPv6), which, however, is not employed in the dynamic assignment. One network card can be used for different IPv6 addresses. The is a unique name for individual addresses. The main address always uses the identifier default; functional identifiers such as Interface mail server can be assigned for all other addresses.
(UCR variables: interfaces/ethX/ipv6/address,
interfaces/ethX/ipv6/prefix,
interfaces/eth0/ipv6/acceptRA activates SLAAC).
Further network settings can be performed under .
The IP addresses for the standard gateways in the subnetwork can be entered under and . It is not obligatory to enter a gateway for IPv6, but recommended. A gateway configured here has preference over router advertisements, which might otherwise be able to change the route.
(UCR variables: gateway, ipv6/gateway)
There are two types of DNS servers:
univention.de. This is typically a name server operated by
the Internet provider.
A local DNS server is set up on the master domain controller, backup domain controller and slave domain controller system roles. Here, you can configure which server should be primarily used for the name resolution by entering the .
(UCR variables: nameserver1 to
nameserver3, dns/forwarder1 to
dns/forwarder3,
UCS supports advanced network configurations using bridging, bonding and virtual networks (VLAN):
When the application KVM virtualization server is installed, the network configuration is changed:
A bridge with the name br0 is configured, and the network device eth0 is added.
Additional network cards are not adapted accordingly.
When updating from UCS 3.2, the configuration prevents using the advanced network settings. It can be disabled by setting the following UCR variables:
# for KVM: ucr set uvmm/kvm/bridge/autostart=no # After that re-enable the support in the UMC basic settings dialogue ucr unset umc/modules/setup/network/disabled/by
After that the server must be rebooted. Existing virtual machines must be re-configured for the new interfaces names, which is described in Section 15.5.4. Updating UVMM profiles for new virtual machines is recommended and described in Section 15.6.1.
The most common application scenario for bridging is the shared use of a physical network card by one or more virtual machines. Instead of one network card for each virtual machine and the virtualization server itself, all systems are connected via a shared uplink. A bridge can be compared with a switch implemented in software which is used to connect the individual hosts together. The hardware network adapter used is called a bridge port.
In order to configure a bridge, Bridge must be selected as the under . The can be selected at will. Then click on .
The physical network card intended to act as the uplink can be selected under . In the typical scenario of connecting virtual machines via just one network card, there is no risk of a network loop. If the bridge is used to connect two Ethernet networks, the spanning tree protocol (STP) is employed to avoid network loops [1]. The setting configures the waiting time in seconds during which information is collected about the network topology when a connection is being made via STP. If the bridge is used for connecting virtual machines to one physical network card, STP should be disabled by setting the value to 0. Otherwise problems may occur when using DHCP, as the packets sent during the waiting time are not forwarded.
The input field can be used to configure arbitrary bridge parameters. This is only necessary in exceptional cases; an overview of the possible settings can be found on the manual page bridge-utils-interfaces(5).
Clicking on offers the possibility of optionally assigning the bridge an IP address. This interface can then also be used as a network interface for the virtualization host. The options are the same as described in Section 8.2.4.1.1 and Section 8.2.4.1.2.
Bonding can be used to bundle two (or more) physical network cards in order to increase the performance or improve redundancy in failover scenarios.
In order to configure a bonding, Bonding must be selected as the under . The can be selected at will. Then click on .
The network cards which form part of the bonding interface are selected under . The network cards which should be given preference in failover scenarios (see below) can be selected via .
The configures the distribution of the network cards within the bonding:
In addition, there are also a number of other bonding methods. These are generally only relevant for special cases and are described under [bonding].
The Media Independent Interface (MII) of the network cards is used to detect failed network adapters. The setting specifies the testing interval in milliseconds.
All other bonding parameters can be configured under . This is only necessary in exceptional cases; an overview of the possible settings can be found under [bonding].
Clicking on allows to optionally assign the bonding interface an IP address. If one of the existing network cards which form part of the bonding interface has already been assigned an IP address, this configuration will be removed. The options are the same as described in Section 8.2.4.1.1 and Section 8.2.4.1.2.
VLANs can be used to separate the network traffic in a physical network logically over one or more virtual subnetworks. Each of these virtual networks is an independent broadcast domain. This makes it e.g. possible to differentiate between a network for the employees and a guest network for visitors in a company network although they use the same physical cables. The individual end devices can be assigned to the VLANs via the configuration of the switches. The network switches must support 802.1q VLANs.
A distinction is made between two types of connections between network cards:
A connection only transports packets from a specific VLAN. In this case, untagged data packets are transmitted.
This is typically the case if only one individual end device is connected via this network connection.
A connection transports packets from several VLANs. This is also referred to as a trunk link. In this case, each packet is assigned to a VLAN using a VLAN ID. During transmission between trunk links and specific VLANs, the network switch takes over the task of filtering the packets by means of the VLAN IDs as well as adding and removing the VLAN IDs.
This type of connection is primarily used between switches/servers.
Some switches also allow the sending of packets with and without VLAN tags over a shared connection, but this is not described in more detail here.
When configuring a VLAN in Univention Management Console it is possible to configure for a computer which VLANs it wants to participate in. An example here would be an internal company web server, which should be available both to the employees and any users of the guest network.
In order to configure a VLAN, Virtual LAN must be selected as the under . The network interface for which the VLAN is configured is specified with . The is the unique identifier of the VLAN. Valid values are from 1 to 4095. Then must be clicked.
Clicking on allows to optionally assign the VLAN interface an IP address. The options are the same as described in Section 8.2.4.1.1 and Section 8.2.4.1.2. When assigning an IP address, ensure that the address matches the assigned VLAN address range.
The majority of the command line tools which access web servers (e.g.,
wget, elinks or curl)
check whether the environment variable http_proxy is set. If
this is the case, the proxy server set in this variable is used automatically.
The Univention Configuration Registry variable proxy/http can also be used to activate the
setting of this environment variable via an entry in
/etc/profile.
The proxy URL must be specified for this, e.g.,
http://192.168.1.100. The proxy port can be specified in the proxy
URL using a colon, e.g., http://192.168.1.100:3128. If the proxy
requires authentication for the accessing user, this can be provided in the
form http://username:password@192.168.1.100.
The environment variable is not adopted for sessions currently opened. A relogin is required for the change to be activated.
The Univention tools for software updates also support operation via a proxy and query the Univention Configuration Registry variable.
Individual domains can be excluded from use by the proxy by including them
separated by commas in the Univention Configuration Registry variable proxy/no_proxy. Subdomains
are taken into account; e.g. an exception for software-univention.de also
applies for updates.software-univention.de.
The configuration of the graphic resolutions and monitor parameters is performed via automatic detection of the graphics card and the monitor in the default setting. When this is done, the best available driver for the graphics card is selected automatically and the monitor resolution set to the highest value supported by the monitor.
The settings can be set with a Univention Configuration Registry policy. Manual configuration is also necessary if dual monitor operation is to be used. The following provides a selection of the important settings and the corresponding UCR variables in brackets:
xorg/device/driver).
1024x768 (xorg/resolution).
xorg/resolution/secondary).
xorg/display/relative-position).
xorg/screen/DefaultDepth).
The policy of the UMC computer management can be used to configure NFS shares, which are mounted on the system. There is a for selection, which is mounted in the file path specified under .
Univention maintains a list of the hardware [hardwarelist] which is compatible with UCS and in use by customers. The information processed for this are gathered by the UMC module .
All files are forwarded to Univention anonymously and only transferred once permission has been received from the user.
The start dialogue contains the entry fields and , which must be completed with the values determined from the DMI information of the hardware. The fields can also be adapted and an additional added.
If the system information is transferred as part of a support request, the option should be activated. A ticket number can be entered in the next field; this facilitates assignment and allows quicker processing.
Clicking on offers an overview of the transferred system information. In addition, a compressed .tar archive is created, which contains a list of the hardware components used in the system and can be downloaded via .
Clicking on again allows you to select the way the data are transferred to Univention. transmits the data via HTTPS, opens a dialogue, which lists the needed steps to send the archive via e-mail.
Univention Configuration Registry is the central tool for managing the local system configuration of a UCS-based system. Direct editing of the configuration files is usually not necessary.
Settings are specified in a consistent format in a registry mechanism, the so-called Univention Configuration Registry variables. These variables are used to generate the configuration files used effectively by the services/programs from the configuration templates (the so-called Univention Configuration Registry templates).
This procedure offers a range of advantages:
Univention Configuration Registry variables can be configured in the command line using the
univention-config-registry command (short form:
ucr or via Univention Management Console.
As the majority of packages perform their configuration via Univention Configuration Registry and the corresponding basic settings need to be set up during the installation, hundreds of Univention Configuration Registry variables are already set after the installation of a UCS system.
UCR variables can also be used efficiently in shell scripts for accessing current system settings.
The variables are named according to a tree structure with a forward slash
being used to separate components of the name. For example, Univention Configuration Registry variables
beginning with ldap are settings which apply to the local
directory service.
A description is given for the majority of variables explaining their use.
If a configuration file is administrated by a UCR template and the required setting has not already been covered by an existing variable, the UCR template should be edited instead of the configuration file. If the configuration were directly adapted, the next time the file is regenerated - e.g., when a registered UCR variable is set - the local modification will be overwritten again. Adaptation of UCR templates is described in Section 8.3.5.
Part of the settings configured in Univention Configuration Registry are system-specific (e.g., the computer name); many settings can, however, be used on more then one computer. The Univention Configuration Registry policy in the domain administration of Univention Management Console can be used to compile variables and apply them on more than one computer.
The evaluation of the Univention Configuration Registry variables on a UCS system comprises four stages:
--schedule option is used to set local
variables which are only intended to apply for a certain period of time. This
level of the Univention Configuration Registry is reserved for local settings which are automated by
time-controlled mechanisms in Univention Corporate Server.
When the --force option is used in setting a
local variable, settings adopted from the directory service and variables from
the schedule level are overruled and the given value for the local system fixed
instead. An example:
univention-config-registry set --force mail/messagesizelimit=1000000
If a variable is set which is overwritten by a superordinate policy, a warning message is given.
The use of the Univention Configuration Registry policy is documented in the Section 8.3.4.
The UMC module can be used to display and adjust the variables of a system. There is also the possibility of setting new variables using .
A search mask is displayed on the start page. All variables are classified using a , for example all LDAP-specific settings.
The can be entered as a filter in the search mask, which can refer to the variable name, value or description.
Following a successful search, the variables found are displayed in a table with the variable name and the value. A detailed description of the variable is displayed when moving the mouse cursor over the variable name.
Clicking on the icon with the stylised pen edits the setting of a variable. The icon with the stylised minus sign allows the deletion of a variable.
The command line interface of Univention Configuration Registry is run using the
univention-config-registry command. Alternatively, the short
form ucr can be used.
A single Univention Configuration Registry variable can be queried with the parameter
get:
univention-config-registry get ldap/server/ip
The parameter dump can also be used to display all
currently set variables:
univention-config-registry dump
The parameter set is used to set a variable. The variable
can be given any name consisting exclusively of letters, full stops, figures,
hyphens and forward slashes.
univention-config-registry set VARIABLENAME=VALUE
If the variable already exists, the content is updated; otherwise, a new entry is created.
The syntax is not checked when a Univention Configuration Registry variable is set. The change to a variable results in all configuration files for which the variable is registered being rewritten immediately. The files in question are output on the console:
In doing so it must be noted that although the configuration of a service is updated, the service in question is not restarted automatically! The restart must be performed manually.
It is also possible to perform simultaneous changes to several variables in one command line. If these refer to the same configuration file, the file is only rewritten once.
univention-config-registry set \
dns/forwarder1=192.168.0.2 \
sshd/xforwarding="no" \
sshd/port=2222A conditional setting is also possible. For example, if a value should only be saved in a Univention Configuration Registry variable when the variable does not yet exist, this can be done by entering a question mark instead of the equals sign when assigning values.
univention-config-registry set dns/forwarder1?192.168.0.2
The search parameter can be used to search for a
variable. This command searches for variable names which contain
nscd and displays these with their current assignments:
univention-config-registry search nscd
Alternatively, searches can also be performed for set variable values. This
request searches for all variables set to
master.example.com:
univention-config-registry search --value master.example.com
Search templates in the form of regular expressions can also be used in the search. The complete format is documented at https://docs.python.org/2/library/re.html.
The parameter unset is used to delete a variable. The
following example deletes the variable dns/forwarder2. It
is also possible here to specify several variables to be deleted:
univention-config-registry unset dns/forwarder2
The commit parameter is used to regenerate a configuration
file from its template. The name of the configuration file is entered as a
parameter, e.g.:
univention-config-registry commit /etc/samba/smb.conf
As UCR templates are generally regenerated automatically when UCR variables are edited, this is primarily used for tests.
If no file name is given when running ucr commit, all of the
files managed by Univention Configuration Registry will be regenerated from the templates. It is,
however, not generally necessary to regenerate all the configuration files.
The parameter shell is used to display Univention Configuration Registry
variables and their current assignments in a format that can be used in shell
scripts.
univention-config-registry shell ldap/server/name
Different conversions are involved in this: forward slashes in variable names are replaced with underscores and characters in the values which have a particular significance in shell scripts are included in quotation marks to ensure they are not altered.
The Univention Configuration Registry output must be executed via the command
eval for Univention Configuration Registry variables to be able to be read in a
shell script as environment variables:
# eval "$(univention-config-registry shell ldap/server/name)" # echo "$ldap_server_name" master.firma.de
Part of the settings configured in Univention Configuration Registry are system-specific (e.g., the computer name); many settings can, however, be used on more then one computer. The policy managed in the UMC module can be used to compile variables and apply them on more than one computer.
Firstly, a must be set for the policy which is to be created, under which the variables will later be assigned to the individual computer objects.
In addition, at least one must be configured and a assigned.
This policy can then be assigned to a computer object or a container/OU (see
Section 4.5.2). Note that the evaluation of
configured values differs from other policies: the values are not forwarded
directly to the computer, but rather written on the assigned computer by
Univention Directory Policy. The time interval used for this is configured by
the Univention Configuration Registry variable ldap/policy/cron and is set to hourly as standard.
In the simplest case, a Univention Configuration Registry template is a copy of the original configuration file in which the points at which the value of a variable are to be used contain a reference to the variable name.
Inline Python code can also be integrated for more complicated scenarios, which then also allows more complicated constructions such as conditional assignments.
Univention Configuration Registry templates are included in the corresponding software packages as
configuration files. When packages are updated, a check is performed for
whether any changes have been made to the configuration files. If configuration
files are no longer there in the form in which they were delivered, they will
not be overwritten. Instead a new version will be created in the same directory
with the ending .debian.dpkg-new. If changes are to be
made on the Univention Configuration Registry templates, these templates are also not overwritten during
the update and are instead re-saved in the same directory with the ending
.dpkg-new or
.dpkg-dist. Corresponding notes are written in the
/var/log/univention/actualise.log log file. This only
occurs if UCR templates have been locally modified.
The UCR templates are stored in the
/etc/univention/templates/files/ directory. The path to the
templates is the absolute path to the configuration file with the prefixed path
to the template directory. For example, the template for the
/etc/issue configuration file can be found under
/etc/univention/templates/files/etc/issue.
For the configuration files to be processed correctly by Univention Configuration Registry they must be in UNIX format. If configuration files are edited in DOS or Windows, for example, control characters are inserted to indicate line breaks, which can disrupt the way Univention Configuration Registry uses the file.
In the simplest case, a UCR variable can be directly referenced in the
template. The variable name framed by the string @%@
represents the wildcard. As an example the option for the activation of X11
forwarding in the configuration file /etc/ssh/sshd_config
of the OpenSSH server:
X11Forwarding @%@sshd/xforwarding@%@
Newly added references to UCR variables are automatically evaluated by templates; additional registration is only required with the use of inline Python code (see Section 8.3.5.2).
Any type of Python code can be embedded in UCR templates by entering a code
block framed by the string @!@. For example, these blocks
can be used to realise conditional requests so that when a parameter is changed
via a variable, further dependent settings are automatically adopted in the
configuration file. The following code sequence configures for example network
settings using the Univention Configuration Registry settings:
@!@
if configRegistry.get('apache2/ssl/certificate'):
print 'SSLCertificateFile %s' % \
configRegistry['apache2/ssl/certificate']
@!@
All the data output with the print function are written in the generated
configuration file. The data saved in Univention Configuration Registry can be requested via the
ConfigRegistry object, e.g.:
@!@
if configRegistry.get('version/version') and \
configRegistry.get('version/patchlevel'):
print 'UCS %(version/version)s-%(version/patchlevel)s' % \
configRegistry
@!@In contrast to directly referenced UCR variables (see Section 8.3.5.1), variables accessed in inline Python code must be explicitly registered.
The Univention Configuration Registry variables used in the configuration files are registered in
info files in the
/etc/univention/templates/info/ directory which are usually
named after the package name with the file ending
.info. If new Python code is entered into the templates or
the existing code changed in such a way that it requires additional or
different variables, one of the existing .info files will
need to be modified or a new one added.
Following the changing of .info files, the
ucr update command must be run.
This chapter describes basic system services of a UCS Installation such as the configuration of the PAM authentication framework, system logs and the NSCD.
There is a root account on every UCS system for complete
administrative access. The password is set during installation of the
system. The root user is not stored in the LDAP directory, but instead in the
local user accounts.
The password for the root user can be changed via the command line
by using the passwd command.
It must be pointed out that this process does not include any checks regarding
either the length of the password or the passwords used in the past.
In Linux, localisation properties for software are defined in so-called locales. Configuration includes, among other things, settings for date and currency format, the set of characters in use and the language used for internationalised programs. The installed locales can be changed in Univention Management Console under The standard locale is set under .
The in the menu entry is applied during local logins to the system.
The UMC module can be used to check the current status of a system service and to start or stop it as required.
In this list of all the services installed on the system, the current running runtime status and a are displayed under . The service can be started, stopped or restarted under .
In the default setting, every service is started automatically when the system is started. In some situations, it can be useful not to have the service start directly, but instead only after further configuration. The action is used so that the service is not started automatically when the system is started, but can still be started subsequently. The action also prevents subsequent service starts.
Authentication services in Univention Corporate Server are realised via Pluggable Authentication Modules (PAM). To this end different log-in procedures are displayed on a common interface so that a new log-in method does not require adaptation for existing applications.
In the default setting, only the root user and members of
the Domain Admins group can login remotely via SSH and
locally on a tty.
This restriction can be configured with the Univention Configuration Registry variable
auth/SERVICE/restrict. Access to this service can be authorised
by setting the variables auth/SERVICE/user/USERNAME and
auth/SERVICE/group/GROUPNAME to yes.
Login restrictions are supported for
SSH (sshd),
FTP (ftp),
the login manager KDM (kdm),
login on a tty (login),
rlogin (rlogin),
PPP (ppp)
and other services (other).
An example for SSH:
auth/sshd/group/Administrators: yes auth/sshd/group/Computers: yes auth/sshd/group/DC Backup Hosts: yes auth/sshd/group/DC Slave Hosts: yes auth/sshd/group/Domain Admins: yes auth/sshd/restrict: yes
Several LDAP servers can be operated in a UCS domain. The primary one used is
specified with the Univention Configuration Registry variable ldap/server/name, further servers
can be specified via the Univention Configuration Registry variable ldap/server/addition.
Alternatively, the LDAP servers can also be specified via a policy in the UMC computer management. The order of the servers determines the order of the computer's requests to the server if a LDAP server cannot be reached.
In the default setting, only ldap/server/name is set following the
installation or the domain join. If there is more than one LDAP server available, it is advisable to
assign at least two LDAP servers using the policy in order
to improve redundancy. In cases of an environment distributed over several
locations, preference should be given to LDAP servers from the local network.
The print server to be used can be specified with the Univention Configuration Registry variable
cups/server.
Alternatively, the server can also be specified via the policy in the UMC computer management.
All UCS-specific log files (e.g., for the listener/notifier replication) are
stored in the /var/log/univention/ directory. Services log
in their own standard log files: for example, Apache to the file
/var/log/apache2/error.log.
The log files are managed by logrotate. It ensures that log files are named in
series in intervals (can be configured in weeks using the Univention Configuration Registry variable
log/rotate/weeks, with the default setting being 12) and older
log files are then deleted. For example, the current log file for the
Univention Directory Listener is found in the listener.log
file; the one for the previous week in listener.log.1,
etc.
Alternatively, log files can also be rotated only once
they have reached a certain size. For example, if they
are only to be rotated once they reach a size of 50 MB,
the Univention Configuration Registry variable logrotate/rotates can be
set to size 50M.
The Univention Configuration Registry variable logrotate/compress is used to configure whether
the older log files are additionally zipped with gzip.
univention-system-stats can be used to document the current
system status in the /var/log/univention/system-stats.log
file. The following values are logged:
df -lhT)
ps auxf)
top lists of the current processes and system
load (top -b -n2)
free)
uptime)
sensors)
smbstatus)
The runtimes in which the system status should be logged can be defined in Cron
syntax via the Univention Configuration Registry variable system/stats/cron, e.g., 0,30
* * * * for logging every half and full hour. The logging is
activated by setting the Univention Configuration Registry variable system/stats to
yes. This is the default since UCS 3.0.
The UMC module displays the utilisation of system resources. For this purpose, a graph is displayed for different periods:
The following system information is documented:
The UMC module displays a table of the current processes on the system. The processes can be sorted based on the following properties by clicking on the corresponding table header:
The menu item can be used to terminate processes. Two different types of termination are possible:
SIGTERM
signal; this is the standard method for the controlled termination of programs.
SIGKILL and force the process to terminate.
As a general rule, terminating the program with SIGTERM is preferable
as many programs then stop the program in a controlled manner and, for example,
save open files.
The UMC module offers a corresponding user interface to analyse a UCS system for a range of known problems.
The module evaluates a range of problem scenarios known to it and suggests solutions if it is able to resolve the identified solutions automatically. This function is displayed via ancillary buttons. In addition, links are shown to further articles and corresponding UMC modules.
Regularly recurring actions (e.g., the processing of log files) can be started at a defined time with the Cron service. Such an action is known as a cron job.
Four directories are predefined on every UCS system,
/etc/cron.hourly/, /etc/cron.daily/,
/etc/cron.weekly/ and
/etc/cron.monthly/. Shell scripts which are placed in
these directories and marked as executable are run automatically every hour,
day, week or month.
/etc/cron.d/A cron job is defined in a line, which is composed of a total of seven columns:
The time specifications can be set in different ways. One can specify a specific minute/hour/etc. or run an action every minute/hour/etc. with an *. Intervals can also be defined, for example */2 as a minute specification runs an action every two minutes.
Some examples:
30 * * * * root /usr/sbin/jitter 600 /usr/share/univention-samba/slave-sync */5 * * * * www-data /usr/bin/php -q /usr/share/horde/reminders.php
Cron jobs can also be defined in Univention Configuration Registry. This is particularly useful if they are set via a Univention Directory Manager policy and are thus used on more than one computer.
Each cron job is composed of at least two Univention Configuration Registry variables. JOBNAME is a
general description.
cron/JOBNAME/command specifies the command to be
run (required)
cron/JOBNAME/time specifies the execution time
(see Section 8.4.8.2) (required)
root. cron/JOBNAME/user can be used to
specify a different user.
cron/JOBNAME/mailto, the output of the cron job is sent
there per e-mail.
cron/JOBNAME/description can be used to provide a
description.
Data of the NSS service is cached by the Name Server Cache Daemon (NSCD) in order to speed up frequently recurring requests for unchanged data. Thus, if a repeat request occurs, instead of a complete LDAP request to be processed, the data are simply drawn directly from the cache.
Since UCS 3.1, the groups are no longer cached via the NSCD for performance and stability reasons; instead they are now cached by a local group cache, see Section 7.3.
The central configuration file of the (/etc/nscd.conf) is
managed by Univention Configuration Registry.
The access to the cache is handled via a hash table. The size of the hash table can be specified in Univention Configuration Registry, and should be higher than the number of simultaneously used users/hosts. For technical reasons, a prime number should be used for the size of the table. The following table shows the standard values of the variables:
Table 8.12. Default size of the hash table
| Variable | Default size of the hash table |
|---|---|
nscd/hosts/size
| 6007 |
nscd/passwd/size
| 6007 |
With very big caches it may be necessary to increase the size of the cache
database in the system memory. This can be configured through the Univention Configuration Registry
variables nscd/hosts/maxdbsize,
nscd/group/maxdbsize and nscd/passwd/maxdbsize.
As standard, five threads are started by NSCD. In environments with many
accesses it may prove necessary to increase the number via the Univention Configuration Registry variable
nscd/threads.
In the basic setting, a resolved group or host name is kept in cache for one
hour, a user name for ten minutes. With the Univention Configuration Registry variables
nscd/group/positive_time_to_live and
nscd/passwd/positive_time_to_live these periods can be extended
or diminished (in seconds).
From time to time it might be necessary to manually invalidate the cache of the NSCD. This can be done individually for each cache table with the following commands:
nscd -i passwd nscd -i hosts
The verbosity of the log messages can be configured through the Univention Configuration Registry variable
nscd/debug/level.
When installing a UCS system, an SSH server is also installed per preselection. SSH is used for realising encrypted connections to other hosts, wherein the identity of a host can be assured via a check sum. Essential aspects of the SSH server's configuration can be adjusted in Univention Configuration Registry.
By default the login of the privileged root user is
permitted by SSH (e.g. for configuring a newly installed system where no users
have been created yet, from a remote location).
sshd/permitroot is set to
without-password, then no interactive password request
will be performed for the root user, but only a login
based on a public key. By this means brute force attacks to passwords can be
avoided.
auth/sshd/user/root to no.
The Univention Configuration Registry variable sshd/xforwarding can be used to configure whether
an X11 output should be passed on via SSH. This is necessary, for example, for
allowing a user to start a program with graphic output on a remote computer by
logging in with ssh -X TARGETHOST. Valid settings are
yes and no.
The standard port for SSH connections is port 22 via TCP. If a different port
is to be used, this can be arranged via the Univention Configuration Registry variable sshd/port.
The time zone in which a system is located can be changed in Univention Management Console under .
Asynchronous system times between individual hosts of a domain can be the source of a large number of errors: the reliability of log files is impaired; Kerberos operation is disrupted; the correct evaluation of the validity periods of passwords can be disturbed; etc.
Usually the master domain controller functions as the time server of a
domain. With the Univention Configuration Registry variables timeserver,
timeserver2 and timeserver3 external NTP servers
can be included as time sources.
Manual time synchronisation can be started by the command
ntpdate.
Windows clients joined in a Samba 4 domain only accept signed NTP time
requests. If the Univention Configuration Registry variable ntp/signed is set to
yes, the NTP replies are signed by Samba 4.
UCS can offer Active Directory (AD) services, be a member of an Active Directory domain or synchronise objects between Active Directory domains and a UCS domain. #or function as an NT domain controller.
For the purposes of Windows systems, UCS can assume the tasks of Windows server systems:
In UCS all these services are provided by Samba.
UCS supports the mostly automatic migration of an existing Active Directory domain to UCS. All users, groups, computer objects and group policies are migrated without the need to rejoin the Windows clients. This is documented in Section 9.4.
The migration from an NT-based Samba domain to an AD-based domain is documented in the Univention Wiki [wiki-samba-update].
Microsoft Active Directory domain controllers cannot join the Samba domain. This functionality is planned at a later point in time.
Samba can not join an Active Directory Forest yet at this point.
Trust relationships to other domains are currently not possible.
The usage of UCS as a Windows NT-compatible domain controller is deprecated since UCS 4. Further information can be found in [ext-doc-windows-nt].
Samba as an AD domain controller can be installed on all UCS domain controllers from the
Univention App Center with the application Active Directory-compatible domain
controller. Alternatively, the software package
univention-samba4 can be installed. On the system roles master domain controller and
backup domain controller the univention-s4-connector package must also be installed
(univention-run-join-scripts command must be run after
installation). Additional information can be found in Section 5.6.
A Samba member server can be installed on UCS member servers from the Univention App Center
with the application Windows-compatible Fileserver. Alternatively, the
software package univention-samba can be
installed (univention-run-join-scripts command must be run after
installation). Additional information can be found in Section 5.6.
Samba supports the operation as a read-only domain controller. The setup is documented in [ext-doc-win].
User logins can only be performed on Microsoft Windows systems joined in the Samba domain. Domain joins are documented in Section 3.2.2.
Users who log on to a Windows system are supplied with a Kerberos ticket when they log on. The ticket is then used for the further authentication. This ticket allows access to the domain's resources.
Common sources of error in failed logins are:
w32tm /resync.
A file server provides files over the network and allows concentrating the storage of user data on a central server.
The file services integrated in UCS support the provision of shares using the CIFS
protocol (see Chapter 11). Insofar as the underlying file system
supports Access Control Lists (ACLs) (can be used with ext3, ext4 and XFS), the ACLs can
also be used by Windows clients.
Samba Active Directory domain controllers can also provide file services. As a general rule, it is recommended to separate domain controllers and file/print services in Samba environments - the same as the Microsoft recommendations for Active Directory - that means using domain controllers for logins/authentication and member services for file/print services. This ensures that a high system load on a file server does not result in disruptions to the authentication service. For smaller environments in which it is not possible to run two servers, file and print services can also be run on a domain controller.
Samba supports the CIFS protocol and the successor SMB2 to provide file services. Using a client
which supports SMB2 (as of Windows Vista, i.e., Windows 7/8 too) improves the performance
and scalability.
The protocol can be configured using the Univention Configuration Registry variable
samba/max/protocol. It must be set on all Samba servers and then all Samba
server(s) restarted.
NT1 configures CIFS (supported by all Windows versions)
SMB2 configures SMB2 (supported as of Windows Vista/Windows 7)
SMB3 configures SMB3 (supported as of Windows 8) (currently not covered by Univention support)
Samba offers the possibility of sharing printers set up under Linux as network printers for Windows clients. The management of the printer shares and the provision of the printer drivers is described in Chapter 12.
Samba AD domain controllers can also provide print services. In this case, the restrictions described in Section 9.2.2.2 must be taken into consideration.
When using Samba as an Active Directory domain controller, Samba provides a separate LDAP directory service. The synchronisation between the UCS LDAP and the Samba LDAP occurs via an internal system service, the Univention S4 connector. The connector is enabled on the master domain controller by default and typically requires no further configuration.
Further information on the status of the synchronisation can be found in the log file
/var/log/univention/connector-s4.log. Additional information on analysing
connector replication problems can be found in SDB 1235.
The univention-s4search command can be used to search in the Samba
directory service. If it is run as the root user, the
required credentials of the machine account are used automatically:
root@master:~# univention-s4search sAMAccountName=Administrator # record 1 dn: CN=Administrator,CN=Users,DC=example,DC=com objectClass: top objectClass: person objectClass: organizationalPerson objectClass: user cn: Administrator instanceType: 4 (..)
Samba AD domains use the Directory Replication System (DRS) to replicate the directory data. DRS allows multi-master replication, i.e., the write changes from multiple domain controllers are synchronised at protocol level. Consequently, the use of snapshots in virtualization solutions should be avoided when using Samba 4 and Samba 4 should be operated on a server which is never switched off.
The complexity of the multi-master replication increases with each additional Samba AD domain controller. Consequently, it must be checked whether additional Samba AD domain controllers are necessary or if a member server would not be a better choice for new servers.
Additional information on troubleshooting replication problems can be found in SDB 1235.
Samba NT domains access the data in the OpenLDAP directory data, which are distributed via listener-notifier replication (see Section 3.5).
The SYSVOL share is a share which provides group policies and logon scripts in Active
Directory / Samba 4. It is synchronised among all domain controllers and stored in the
/var/lib/samba/sysvol/ directory.
In Microsoft Active Directory, the SYSVOL share is synchronised by the File Replication
Service (introduced with Windows 2000) or the Distributed File System (as of Windows 2008
R2). These replication methods are not yet fully implemented in Samba 4. The
synchronisation between the Samba 4 domain controllers is performed in UCS via a Cron job
(every five minutes as standard - can be configured using the Univention Configuration Registry variable
samba4/sysvol/sync/cron).
Group policies are an Active Directory feature which allows the central configuration of settings for computers and users. Group policies are also supported by Samba AD domains. The policies only apply to Windows clients; Linux or Mac OS systems cannot evaluate the policies.
Group policies are often referred to as GPOs (group policy objects). Put more precisely, a GPO can contain a series of policies. Despite their name, group policy objects cannot be assigned directly to certain user groups, but instead are linked with certain AD administration units (domains, sites or organisational units) in the Samba directory service (Samba DS/AD) and thus refer to subordinate objects. A group-specific or user-specific evaluation is only indirectly possible via the Security Filtering of a group policy object, in which the Apply group policy Allow/Deny privilege can be directly restricted to certain groups, users or computers.
As a basic rule, a distinction must be made between group policies (GPOs) and the similarly named group policy preferences (GPPs):
For these reasons, GPOs are preferable to GPPs in the majority of cases. This remainder of this section deals exclusively with GPOs.
In contrast to UCS policies (see Section 4.5), group policies are not configured in Univention Management Console, but instead are configured in a separate editor, the Group Policy Management editor, which is a component of the Remote Server Administration Tools (RSAT). The installation is described in Section 9.2.3.1.2.
There are two types of policies:
Computer policies are evaluated for the first time the computer starts up; user policies during login. The policies are also continually evaluated for logged in users / running systems and updated (every 90-120 minutes in the default setting. The period varies at random to avoid peak loads.)
The command gpupdate /force can also be run specifically to start the
evaluation of group policies.
Some policies - e.g., for the installation of software or for login scripts - are only evaluated during login (user policies) or system startup (computer policies).
The majority of group policies only set one value in the Windows registry, which is then evaluated by Windows or an application. As standard users cannot modify any settings in the corresponding section of the Windows registry, it is also possible to configure restricted user desktops in which, for example, users cannot open the Windows Task Manager.
The group policies are stored in the SYSVOL share, see Section 9.2.2.6. They are linked with user and host accounts in the Samba directory service.
Group Policy Management can be installed as a component of the Remote Server Administration Tools on Windows clients. They can be found at [2] for Windows 7 or at Remote Server Administration Tools (RSAT) for Windows 8 [3] for Windows 8.
Following the installation, Group Policy Management must still be enabled in the Windows Control Panel. This is done by enabling the option under .
Following the enabling, Group Policy Management can be run under .
Group policies can only be configured by users who are members of the Domain
Admins group (e.g., the Administrator). When logging in,
attention must be paid to logging in with the domain Administrator account and not the
local Administrator account. Group Policy Management can be run on any system in the
domain.
If more than one Samba domain controller is in use, consideration must be given to the replication of the GPO data, see Section 9.2.3.1.4.
There are two basic possibilities for creating GPOs:
A policy can have one of three statuses: enabled, disabled or unset. The effect is always based on the formulation of the policy. For example, if it says , the policy must be enabled to switch off the feature. Some policies have additional options, for example the policy could include an additional option for managing the storage space.
Two standard policy objects are predefined:
AD domains can be structured in sites. All the sites are listed in the main menu of Global Policy Management. There is also a list of the domains there. The current Samba versions do not support forest domains, so there is only ever one domain displayed here.
One domain can be structured in different organisational units (OUs). This can, for example, be used to store the employees from accounting and the users in the administration department in different LDAP positions.
Group policies can mutually overlap. In this case, the inheritance principle applies,
e.g., the superordinate policies overwrite the subordinate ones. The applicable policies
for a user can be displayed on the Windows client either with the modelling wizard in
Group Policy Management or by entering the command gpresult /user USERNAME
/v in the Windows command line.
The policies are evaluated in the following order:
Policies linked to an OU overwrite policies from the default domain policy. If the OUs are nested further, in the case of conflict, the "most subordinate" policies in each case, in other words the one most closely linked to the target object, apply. The following evaluation order applies:
Example: A company blocks access to the Windows Task Manager in general. This is done by enabling the policy in the Default Domain Policy object. However, the Task Manager should still be available to some staff with the requisite technical expertise. These users are saved in the IT staff OU. An additional group policy object is now created in which the policy is set to disabled. The new GPO is linked with the IT staff OU.
A group policy is technically composed of two parts: On the one hand there is a directory in the domain controllers' file system which contains the actual policy files which are to be implemented on the Window system (saved in the SYSVOL share (see Section 9.2.2.6)). On the other hand there is an object with the same name in the LDAP tree of the Samba directory service (Samba DS/AD), which is usually saved below an LDAP container named Group Policy Objects.
Although the LDAP replication between the domain controllers is performed in just a few seconds, the files in the SYSVOL share are only replicated every five minutes in the default setting. It must be noted that the application of newly configured group policies in this period may fail if a client happens to consult a domain controller which has not yet replicated the current files.
The policies displayed in Group Policy Management can be expanded with so-called administrative templates. This type of template defines the name under which the policy should appear in Group Policy Management and which value should be set in the Windows registry. Administrative templates are saved in so-called ADMX files (previously ADM files) [admx-reference]. Among other things, ADMX files offer the advantage that they can be provided centrally across several domain controllers so that Group Policy Management on all Windows clients displays the same configuration possibilities [admx-central].
The following example of an ADM file defines a computer policy in which a registry key
is configured for the (fictitious) Univention RDP client. ADM files can also be
converted to the newer ADMX format using third-party tools. Further information on the
format of ADM files can be found under [microsoft-adm-templates]
and [adm-templates-howto]. The administrative template must have
the file suffix .adm:
CLASS MACHINE CATEGORY "Univention" POLICY "RDP client" KEYNAME "Univention\RDP\StorageRedirect" EXPLAIN "If this opion it activated, sound output is enabled in the RDP client" VALUENAME "Sound redirection" VALUEON "Activated" VALUEOFF "Deactivated" END POLICY END CATEGORY
The ADM file can then be converted to the ADMX format or imported directly via Group Policy Management. This is done by running the option in the context menu. can be used to import an ADM file. The administrative templates are also saved in the SYSVOL share and replicated, which allows Group Policy Management to access them from the Windows clients.
It is also possible to configure policies based on system properties. These properties are provided via the Windows Management Instrumentation interface. The mechanism which builds on this is known as WMI filtering. This makes it possible, for example, to apply a policy only to PCS with a 64-bit processor architecture or with at least 8 GB of RAM. If a system property changes (e.g., if more memory is installed), the respective filter is automatically re-evaluated by the client.
The WMI filters are displayed in the domain structure in the container. can be used to define an additional filter. The filter rules are defined under . The rules are defined in a syntax similar to SQL. Examples rules can be found in [microsoft-wmi-filter] and [add-wmi-filters].
The NETLOGON share serves the purpose of providing logon scripts in Windows domains. The
logon scripts are executed following after the user login and allow the adaptation of the
user's working environment. Scripts have to be saved in a format which can be executed by
Windows, such as bat.
The logon scripts are stored in
/var/lib/samba/sysvol/ and provided under
the share name NETLOGON.
Domainname/scripts/
The NETLOGON share is replicated within the scope of the SYSVOL replication.
The logon script can be assigned for each user, see Section 6.1.
The home directory can be defined user-specifically in Univention Management Console, see Section 6.1. This is performed with the setting , e.g., \\ucs-file-server\smith.
The multi edit mode of Univention Management Console can be used to assign the home directory to multiple users at one time, see Section 4.2.3.3.
Samba supports roaming profiles, i.e., user settings are saved on a central server. This directory is also used for storing the files which the user saves in the My Documents folder. Initially, these files are stored locally on the Windows computer and then synchronised onto the Samba server when the user logs off.
If the profile path is changed in Univention Management Console, then a new profile directory will be created. The data in the old profile directory will be kept. These data can be manually copied or moved to the new profile directory. Finally, the old profile directory can be deleted.
No roaming profiles are used in the default setting in Samba 4.
Roaming profiles can be configured via a group policy found under .
As standard, the Administrator accesses shares with root rights. If as a result the
profile directory is created with the root user, it should be manually assigned to the
Administrator with the command chown.
Univention Corporate Server can be operated together with an existing Active Directory domain (AD domain) in two different ways. Both modes can be set up using the Active Directory Connection application from the Univention App Center (see Section 5.6). This is available on a master domain controller and backup domain controller.
The two modes are:
In both modes, the Active Directory Connection service is used in UCS (UCS AD Connector for short), which can synchronise the directory service objects between a Windows 2003/2008/2012 server with Active Directory (AD) and the OpenLDAP directory of Univention Corporate Server.
In the first case, the configuration of a UCS server system as a member of an AD domain, the AD functions as the primary directory service and the respective UCS system joins the trust context of the AD domain. The domain membership gives the UCS system restricted access to the account data of the Active Directory domain. The set-up of this operating mode is described in detail in Section 9.3.2.
The second mode, which can be configured via the Active Directory Connection app, is used to run the UCS domain parallel to an existing AD domain. In this mode, each domain user is assigned a user account with the same name in both the UCS and the AD domain. Thanks to the use of the name identity and the synchronisation of the encrypted password data, this mode allows transparent access between the two domains. In this mode, the authentication of a user in the UCS domain occurs directly within the UCS domain and as such is not directly dependent on the AD domain. The set-up of this operating mode is described in detail in Section 9.3.3.
In the configuration of a UCS server system as a member of an AD domain (AD member mode), the AD functions as the primary directory service and the respective UCS system joins the trust context of the AD domain. The domain membership gives the UCS system restricted access to the account data of the Active Directory domain, which it exports from the AD by means of the UCS AD Connector and writes locally in its own OpenLDAP-based directory service. In this configuration, the UCS AD Connector does not write any changes in the AD.
The AD member mode is ideal for expanding an AD domain with applications that are available on the UCS platform. Apps installed on the UCS platform can then be used by the users of the AD domain. The authentication is still performed against native Microsoft AD domain controllers.
The set-up wizard can be started directly from the UCS installation by selecting Join into an existing Active Directory domain. Subsequently, the set-up wizard can be installed with the app Active Directory Connection from the Univention App Center. Alternatively, the software package univention-ad-connector can be installed. Further information can be found in Section 5.6.
In the first dialogue window of the set-up wizard, the point Configure UCS as part of an AD domain is preselected and can be confirmed with .
The next dialogue window requests the address of an AD domain controller as well as the name of the standard administrator account of the AD domain and its password. The standard AD administrator account should be used here. The specified AD domain controller should also provide DNS services for the domain. Pressing the button starts the domain join.
If the system time of the UCS system is more than 5 minutes ahead of the system time of the AD domain controller, manual adjustment of the system times is required. This is necessary because the AD Kerberos infrastructure is used for the authentication. System times should not, however, be turned back, in order to avoid inconsistencies.
The domain join is performed automatically. The subsequent dialogue window should be confirmed with . Then the UMC server should be restarted by clicking .
Once the AD member mode has been set up, the authentication is performed against the AD domain controller.
Consequently, the password from the AD domain now applies for the administrator.
If an AD domain with a non-English language convention has been joined, the administrator account from UCS is automatically changed to the spelling of the AD during the domain join.
The same applies for all user and group objects with Well Known SID (e.g., Domain Admins).
If additional UCS systems were already part of the UCS domain in addition to the master domain controller, they must also join the domain anew. At the same time they recognise that the master domain controller is in AD member mode and also join the authentication structure of the AD domain and can then also provide Samba file shares, for example.
As the AD Kerberos infrastructure is used for the authentication of users in this mode, it is essential that the system times of UCS and the AD domain controller are synchronised (with a tolerance of 5 minutes). For this purpose, the AD domain controller is configured as the NTP time server in UCS. In the case of authentication problems, the system time should always be the first thing to be checked.
Following this set-up, the Active Directory Connection UMC module can be used for further administration, e.g., for checking whether the service is running and to restart it if necessary (see Section 9.3.3.4).
To use an encrypted connection between Active Directory and the master domain controller not only for the authentication, but also for data exchange itself, the root certificate of the certification authority can be exported from the AD domain controller and uploaded via the UMC module. Further information on this topic is available in Section 9.3.3.2.
In the default setting, the Active Directory connection set up in this way does not transfer any password data from AD to the UCS directory service. Some apps from the Univention App Center require encrypted password data. If an app needs it, a note is shown in the App Center. For this purpose, the password service can be installed on the AD server (see Section 9.3.3.3).
In AD member mode, in the default setting, the UCS AD Connector exports object data from the AD with the authorisations of the master domain controller's machine account.
These authorisations are not sufficient for exporting encrypted password data.
As such, the LDAP DN of a privileged replication user can also be manually entered in the Univention Configuration Registry variable connector/ad/ldap/binddn for the setting up of the password service.
This must be a member of the Domain Admins group in the AD.
The corresponding password must be saved in a file on the master domain controller and the file name entered in the Univention Configuration Registry variable connector/ad/ldap/bindpw.
If the access password is changed at a later point in time, the new password must be entered in this file.
The access rights for the file should be restricted so that only the root owner has access.
The following commands demonstrate the steps in an example:
ucr set connector/ad/ldap/binddn=Administrator ucr set connector/ad/ldap/bindpw=/etc/univention/connector/password touch /etc/univention/connector/password chmod 600 /etc/univention/connector/password echo -n "Administrator password" > /etc/univention/connector/password
If desired, the AD domain controller can also be replaced by the master domain controller at a later point in time. This is possible via the Active Directory Takeover application (see Section 9.4).
As an alternative to membership in an AD domain, as described in the previous section, the Active Directory Connection can be used to synchronise user and group objects between a UCS domain and an AD domain. In addition to unidirectional synchronisation, this operating mode also allows bidirectional synchronisation. In this operating mode, both domains exist in parallel and their authentication systems function independently. The prerequisite for this is the synchronisation of the encrypted password data. This requires the installation of a special password service on the AD domain controller.
In the default setting, containers, organisational units, users and groups are synchronised. Users have an exceptional position since the password cannot be queried via the LDAP protocol in Active Directory. A special service is installed on the Windows server for this purpose, which enables password synchronisation (see Section 9.3.3.3).
Information on the attributes configured in the basic setting and particularities to take into account can be found in Section 9.3.5.
The computer accounts are not synchronised, as Windows computers can only be mounted in one domain.
The identical user settings in both domains allow users to access services in both environments transparently. After logging on to a UCS domain, subsequent connection to a file share or to an Exchange server with Active Directory is possible without a renewed password request. Users and administrators will find users and groups of the same name on the resources of the other domain and can thus work with their familiar permission structures.
The initialisation is performed after the first start of the connector. All the entries are read out of the UCS, converted to AD objects according to the mapping set and added (or modified if already present) on the AD side. All the objects are then exported from the AD and converted to UCS objects and added/modified accordingly on the UCS side. As long as there are changes, the directory service servers continue to be requested. The UCS AD connector can also be operated in a unidirectional mode.
Following the initial sync, additional changes are requested at a set interval. This value is set to five seconds and can be adjusted manually using the Univention Configuration Registry variable connector/s4/poll/sleep.
If an object cannot be synchronised, it is firstly reset (“rejected”). Following a configurable number of cycles – the interval can be adjusted using the Univention Configuration Registry variable connector/s4/retryrejected – another attempt is made to import the changes. The standard value is ten cycles. In addition, when the UCS AD Connector is restarted, an attempt is also made to synchronise the previously rejected changes again.
The UCS AD connector can only be installed on a master domain controller or backup domain controller system.
The UCS AD Connector is configured using the UMC wizard .
The wizard can be installed from the Univention App Center with the application Active Directory Connection. Alternatively, the software package univention-ad-connector can be installed. Additional information can be found in Section 5.6.
All AD and UCS servers in a connector environment must use the same time zone.
Despite intensive tests it is not possible to rule out that the results of the synchronisation may affect the operation of a productive domain. The connector should therefore be tested for the respective requirements in a separate environment in advance.
It is convenient to perform the following steps with a web browser from the AD domain controller, as the files need to be downloaded from the AD domain controller and uploaded into Univention Management Console.
Internet Explorer 6 - which is preinstalled on Windows 2003 systems - is not supported by Univention Management Console. The browser must be updated before continuing.
In the first dialogue window of the set-up wizard, the point Synchronisation of content data between an AD and this UCS domain must be selected and confirmed with .
The address of an AD domain controller is requested in the next dialogue window. Here you can specify the IP address of a fully qualified DNS name. If the UCS system is not be able to resolve the computer name of the AD system, the AD DNS server can either be configured as the DNS forwarder under UCS or a DNS host record can be created for the AD system in the UMC DNS management (see Section 10.2.2.3).
Alternatively, a static entry can also be adopted in /etc/hosts via
Univention Configuration Registry, e.g.
ucr set hosts/static/192.168.0.100=w2k8-32.ad.example.com
In the field, the user is configured which is used for the access on the AD. The setting is saved in the Univention Configuration Registry variable connector/ad/ldap/binddn. The replication user must be a member of the Domain Admins group in the AD. If the connector performs read only synchronisation from AD to UCS, a standard user account can also be specified.
The password used for the access must be entered in the field. On the UCS system it is only saved locally in a file which only the root user can read.
Section 9.3.3.6 describes the steps required if these access data need to be adjusted at a later point in time.
Clicking on prompts the set-up wizard to check the connection to the AD domain controller. If it is not possible to create an SSL/TLS-encrypted connection, a warning is emitted in which you are advised to install a certification authority on the AD domain controller. It is recommended to follow this advice. Following this step, the set-up can be continued by clicking again. If it is still not possible to create an SSL/TLS-encrypted connection, a security query appears asking whether to set up the synchronisation without SSL encryption. If this is desired, the set-up can be continued by clicking . In this case, the synchronisation of the directory data is performed unencrypted.
If the AD domain controller supports SSL/TLS-encrypted connections, the set-up wizard offers in the next step. This certificate must be exported from the AD certification authority in advance (see Section 9.3.3.2). In contrast, if this step is skipped, the certificate can also be uploaded via the UMC module at a later point in time and the SSL/TLS encryption enabled (until that point all directory data will, however, be synchronised unencrypted).
The connector can be operated in different modes, which can be selected in the next dialogue window . In addition to bidirectional synchronisation, replication can also be performed in one direction from AD to UCS or from UCS to AD. Once the mode has been selected, needs to be clicked.
In the last dialogue window, all the files required for the are offered for download to the Windows server. Further information on this topic can be found in Section 9.3.3.3.
Once is clicked, the configuration is taken over and the UCS AD Connector started. The subsequent dialogue window needs to be closed by clicking on .
Following this set-up, the Active Directory Connection UMC module can be used for further administration of the Active Directory Connection, e.g., for checking whether the service is running and restart it if necessary (see Section 9.3.3.4).
The connector can also synchronise several AD domains within one UCS domain; this is documented in [ext-doc-win].
An SSL certificate must be created on the Active Directory system and the root certificate exported to allow encrypted communication. The certificate is created by the Active Directory's certificate service. The necessary steps depend on the Windows versions used. Three versions are shown below as examples.
The encrypted communication between the UCS system and Active Directory
can also be deactivated by setting the Univention Configuration Registry variable connector/ad/ldap/ssl
to no. This setting does not concern the communication with the
password service (see Section 9.3.3.3);
this is always encrypted.
The certificate service can be installed subsequently if necessary: .
The AD server should be rebooted after the installation.
This certificate must now be exported and copied onto the UCS system: .
If the certificate service is not installed, it must be installed before proceeding.
.
The following dialogue contains a warning that the name and domain setting cannot be changed again once the certificate authority is installed. This must be confirmed with .
The AD server must then be restarted.
This certificate must now be exported and copied onto the UCS system: . A computer list is shown there and the elements , , , and displayed under every system. Here, one must right click on the computer name - not on one of the elements - and then select . The root certificate is usually called . Then select .
If the certificate service is not installed, it must be installed before proceeding.
The server manager must be opened. There, select the role in the menu. When selecting the role services, it is sufficient simply to select . A yellow warning triangle is then shown in the top bar in the server manager. Here, the option must be selected. is selected as the role service to be configured. The type of installation is Now, click on and confirm the suggested encryption settings and the suggested name of the certification authority. Any period of validity can be set. The standard paths can be used for the database location.
The AD server must then be restarted.
This certificate must now be exported and copied onto the UCS system: Then right click on the server and select . There, right click on the name of the generated certificate and .
A computer list is shown there and the elements , , , and displayed under every system. Here, one must right click on the computer name - not on one of the elements - and then select . The root certificate is usually called . Then select .
The SSL AD certificate should now be imported into the UCS system using the UMC wizard.
This is done by clicking on in the sub menu .
This opens a window in which a file can be selected, which is being uploaded and integrated into the UCS AD Connector.
Active Directory prohibits the request of passwords via the LDAP protocol, which requires the installation of a package on the Windows server.
The installation packages are also provided via the setup wizard Univention Management Console.
ucs-ad-connector.msi (for 32bit Windows)ucs-ad-connector-64bit.msi (for 64bit Windows)Microsoft Visual C++ 2010 Redistributable Package (x86)private.keycert.pemOn 64-bit Windows versions, the Microsoft Visual C++ 2010 Redistributable Package (x86) must be installed before the installation of the AD connector.
The MSI files are the installation files for the
password service and can be started by double clicking on it.
The package is installed in the C:\Windows\UCS-AD-Connector\ directory automatically.
Additionally, the
password service is integrated into the Windows environment as a
system service, which means the service can be started automatically
or manually. After the installation the password service is configured
for automatic startup.
The private.key and cert.pem files contain the SSL
certificates created in UCS for secure communication with the password service. They must also
be copied into the installation directory of the password service.
The password service must then be restarted.
During a standard installation in Windows 2008 the Windows firewall blocks the access to the UCS AD Connector. This must either be deactivated in or Port 6670/TCP authorised.
The connector can be started using and stopped using
. Alternatively, the
starting/stopping can also be performed with the
/etc/init.d/univention-ad-connector init-script.
The correct basic configuration of the connector can be checked by
searching in Active Directory from the UCS system. Here one can search e.g.
for the administrator account in Active Directory
with univention-adsearch cn=Administrator.
As univention-adsearch accesses the configuration saved
in Univention Configuration Registry, this allows you to check the reachability/configuration
of the Active Directory access.
The access data required by the UCS AD Connector for Active Directory are configured via the Univention Configuration Registry variable connector/ad/ldap/binddn and connector/ad/ldap/bindpw.
If the password has changed or you wish to use another user account, these variables must be adapted manually.
The Univention Configuration Registry variable connector/ad/ldap/binddn is used to configure the LDAP DN of a privileged replication user.
This must be a member of the Domain Admins group in the AD.
The corresponding password must be saved locally in a file on the UCS system, the name of which must be entered in the Univention Configuration Registry variable connector/ad/ldap/bindpw.
The access rights for the file should be restricted so that only the root owner has access.
The following commands show this as an example:
eval "$(ucr shell)"
echo "Updating ${connector_ad_ldap_bindpw?}"
echo "for AD sync user ${connector_ad_ldap_binddn?}"
touch "${connector_ad_ldap_bindpw?}"
chmod 600 "${connector_ad_ldap_bindpw?}"
echo -n "Current AD Syncuser password" > "${connector_ad_ldap_bindpw?}"The UCS AD Connector provides the following tools and log files for diagnosis:
univention-adsearchThis tool facilitates a simple LDAP search in Active Directory. Objects deleted in AD are always shown (they are still kept in an LDAP subtree in AD). As the first parameter the script awaits an LDAP filter; the second parameter can be a list of LDAP attributes to be displayed.
Example:
univention-adsearch cn=administrator cn givenName
univention-connector-list-rejectedThis tool lists the DNs of non-synchronised objects. In addition, in so far as temporarily stored, the corresponding DN in the respective other LDAP directory will be displayed. In conclusion lastUSN shows the ID of the last change synchronised by AD.
This script may display an error message or an incomplete output if the AD connector is in operation.
For troubleshooting when experiencing synchronisation problems, corresponding messages can be found in the following files on the UCS system:
/var/log/univention/connector.log /var/log/univention/connector-status.log
The status notifications of the password service on the AD side are
logged in the C:\\Windows\\UCS-AD-Connector\\UCS-AD-Connector.log file.
All containers which are ignored due to corresponding filters are
exempted from synchronisation as standard. This can be found in the
/etc/univention/connector/ad/mapping configuration file
under the global_ignore_subtree setting.
Containers and organisational units are synchronised together with their
description. In addition, the cn=mail and cn=kerberos
containers are ignored on both sides. Some particularities must be
noted for containers on the AD side. In the Active Directory offers no possibility to create
containers, but displays them only in the advanced mode
().
Containers or organisational units deleted in AD are deleted recursively in UCS, which means that any non-synchronised subordinate objects, which are not visible in AD, are also deleted.
Groups are synchronised using the group name, whereby a user's primary group is taken into account (which is only stored for the user in LDAP in AD).
Group members with no opposite in the other system, e.g., due to ignore filters, are ignored (thus remain members of the group).
The description of the group is also synchronised.
The Pre-Windows 2000 name (LDAP attribute samAccountName) is used in AD, which means that a group in Active Directory can appear under a different name from in UCS.
The connector ignores groups, which have been configured as a Well-Known Group under in Univention Directory Manager. There is no synchronisation of the SID or the RID.
Groups which were configured as Local Group under in Univention Directory Manager are synchronised as a global group in the Active Directory by the connector.
Newly created or moved groups are always saved in the same subcontainer on the opposite side. If several groups with the same name are present in different containers during initialisation, the members are synchronised, but not the position in LDAP. If one of these groups is migrated on one side, the target container on the other side is identical, so that the DNs of the groups can no longer be differentiated from this point onward.
Certain group names are converted using a mapping table so that,
for example in a German language setup, the UCS group Domain
Users is synchronised with the AD group
Domänen-Benutzer. When used in anglophone AD domains, this
mapping can result in germanophone groups' being created and
should thus be deactivated in this case. This can be done using the
Univention Configuration Registry variable connector/ad/mapping/group/language
The complete table is:
| UCS group | AD group |
|---|---|
Domain Users | Domänen-Benutzer |
Domain Admins | Domänen-Admins |
Windows Hosts | Domänencomputer |
Nested groups are represented differently in AD and UCS. In UCS, if groups are members of groups, these objects can not always be synchronised on the AD side and appear in the list of rejected objects. Due to the existing limitations in Active Directory, nested groups should only be assigned there.
If a global group A is accepted as a member of another global
group B in Univention Directory Manager, this membership does not appear in Active
Directory because of the internal AD limitations in Windows 2000/2003.
If group A's name is then changed, the group membership to group B will be lost.
Since Windows 2008 this limitation no longer exists and thus global groups can also be nested in Active Directory.
Users are synchronised like groups using the user name or using the AD pre-Windows 2000 name. The First name, Last name, Primary group (in so far as present on the other side), Organisation, Description, Street, City, Postal code, Windows home path, Windows login script, Disabled and Account expiry date attributes are transferred. Indirectly Password, Password expiry date and Change password on next login are also synchronised. Primary e-mail address and Telephone number are prepared but commented out due to differing syntax in the mapping configuration.
The root and Administrator users are exempted.
Users are also identified using the name, so that for users created before the first synchronisation on both sides, the same process applies as for groups as regards the position in LDAP.
The synchronisation of the password expiry date and the Change password on next login user option occurs on the UCS side on the Samba level alone. If a password change is initiated by Univention Directory Manager, but the password changed in Active Directory, the expiration details for the Kerberos and POSIX passwords are not changed, so that the user must change his password again if he, for example, logs on to a thin client.
In some cases, a user to be created under AD, for which the password has been rejected, is deleted from AD immediately after creation. The reasoning behind this is that AD created this user firstly and then deletes it immediately once the password is rejected. If these operations are transmitted to UCS, they are transmitted back to AD. If the user is re-entered on the AD side before the operation is transmitted back, it is deleted after the transmission. The occurrence of this process is dependent on the polling interval set for the connector.
AD and UCS create new users in a specific primary group (usually
Domain Users or Domänen-Benutzer) depending on the
presetting. During the first synchronisation from UCS to AD the
users are therefore always a member in this group.
UCS supports the takeover of user, group and computer objects as well as Group Policy Objects (GPOs) from a Microsoft Active Directory (AD) domain. Windows clients do not need to rejoin the domain. The takeover is an interactive process consisting of three distinct phases:
The following requirements must be met for the takeover:
The Active Directory Takeover application must be installed from the Univention App Center for the migration. It must be installed on the system where the Univention S4 Connector is running (see Section 9.2.2.4, usually the master domain controller).
The following steps are strongly recommended before attempting the takeover:
Administrator
account on the AD server as the corresponding account in the UCS domain. In case different
passwords are used, the password that was set last, will be the one that is finally valid
after the takeover process (timestamps are compared for this).
Administrator account of the AD server
is deactivated. It should be activated in the local user management module.
The activation of the Administrator account on the AD server is
recommended because this account has all the required privileges to copy the GPO SYSVOL
files. The activation can be achieved by means of the module or by running the following two commands:
net user administrator /active:yes net user administrator PASSWORD
The takeover must be initiated on the UCS domain controller that runs the Univention S4 Connector (by default the master domain controller). During the takeover process Samba must only run on this UCS system. If other Samba domain controllers have been added to the UCS domain, they need to be stopped! This is important to avoid data corruption by mixing directory data taken over from Active Directory with Samba 4 directory data replicated from other UCS domain controllers.
Other Samba systems can be stopped by logging into each of the other UCS domain controllers as the
rootuser and running
/etc/init.d/samba4 stop
After ensuring that only the Univention S4 Connector host runs Samba 4, the takeover process can be started. If the UCS domain was installed initially with a UCS version before UCS 3.2, the following Univention Configuration Registry variable needs to be set first:
ucr set connector/s4/mapping/group/grouptype=false
The takeover is performed with the Univention Management Console
module. The IP address of the AD system must be specified under . An account from the AD domain must be specified under
which is a member of the AD group
Domain Admins (e.g., the Administrator) and the
corresponding password entered under .
The module checks whether the AD domain controller can be accessed and displays the domain data to be migrated.
When is clicked, the following steps are performed automatically.
Additional information is logged to /var/log/univention/ad-takeover.log
as well as to /var/log/univention/management-console-module-adtakeover.log.
Domain Admins has a different name in the AD,
then the Univention Configuration Registry variable groups/default/domainadmins is set to that
specific name (likewise for uses, e.g. users/default/administrator).
The UCS domain controller now contains all users, groups and computers of the Active Directory domain. In the next step, the SYSVOL share is copied, in which among other things the group policies are stored.
This phase requires to log onto the Active Directory domain controller as the
Administrator (or the equivalent non-English name).
There a command needs to be started to copy the group
policy files from the Active Directory SYSVOL share to the UCS SYSVOL share.
The command to be run in shown in the UMC module. If it has been successfully run, it must be confirmed with .
It may be necessary to install the required robocopy tool, which is part of the Windows Server
2003 Resource Kit Tools. Starting with Windows 2008 the tool is already installed.
Note: The /mir option of robocopy mirrors the specified source
directory to the destination directory. Please be aware that if you delete data in the
source directory and execute this command a second time, this data will also be deleted in
the destination directory.
After successful completion of this step, it is now necessary to shutdown all domain controllers of the Active Directory domain. Then must be clicked in the UMC module.
The following steps are now automatically performed:
Finally the following steps are required:
The domain function level of the migrated Active Directory domain needs to be checked by running the following command:
samba-tool domain level show
In case this command returns the message the following commands should be run to fix this:
samba-tool domain level raise --forest-level=2003 --domain-level=2003
samba-tool dbcheck --fix --yes
Domain Admins and running the tool
.
It is recommended to perform thorough tests with Windows client systems, e.g.
This chapter describes how IP addresses for computer systems in a UCS domain can be centrally managed via Univention Management Console and and assigned via DHCP.
Network objects (Section 10.1) bundle available IP address segments of a network. The DNS resolution as well as the assignment of IP addresses via DHCP are integrated in UCS, as detailed in Section 10.2 and Section 10.3.
Incoming and outgoing network traffic can be restricted via the
Univention Firewall based on iptable
(Section 10.4).
The integration of the proxy server Squid allows the caching of web contents and the enforcement of content policies for web access (Section 10.5).
Network objects can be used to compile available IP addresses; the next available address is then automatically specified during assignment to a computer.
For example, it is possible to define a network object Workstation network
which encompasses the IP addresses from
192.168.2.0 to 192.168.2.254. If a Windows computer object is now
created and only the network object selected, an internal check is
performed for which IP addresses are already assigned and the next
free one selected. This saves the administrator having to compile the
available addresses manually. If a computer object is removed, the
address is automatically reassigned.
Network objects are managed in the UMC module Networks (see Section 4.2)
Table 10.1. 'General' tab
| Attribute | Description |
|---|---|
| Name |
The name of the network is entered in this input field. This is the name under which the network also appears in the computer management. |
| Networks |
The network address is entered in dot-decimal form in this input
field, e.g., |
| Netmask |
The network mask can be entered in this input field in network prefix or dot-decimal form. If the network mask is entered in dot-decimal form it will be subsequently be converted into the corresponding network prefix and later also shown so. |
| IP address range |
One or more IP ranges can be configured here. When a host is assigned to this network at a later point, it will automatically be assigned the next, free IP address from the IP range entered here. When no IP range is entered here, the system automatically uses the range given by the network and the subnet mark entered. Forward lookup zones and reverse lookup zones can be selected in the sub menu . When a host is assigned to this network at a later point, a host record in the forward lookup zone and/or a pointer record in the reverse lookup zone will be created automatically. The zones are also administrated in Univention Management Console, see Section 10.2.2.1. If no zone is selected here, no DNS records are created during assignment to a computer object. However, the DNS entries can still be set manually. |
| DNS forward lookup zone |
The forward lookup zone where hosts from the network should be added must be specified here. The resolution of the computer name to an IP address is performed via the zone. |
| DNS reverse lookup zone |
The reverse lookup zone where hosts from the network should be added must be specified here. The reverse resolution of the IP address back to a computer name is performed via the zone. A DHCP service can be assigned to the network in the sub menu . When a host is assigned to this network at a later point, a DHCP computer entry with a fixed IP address will be created automatically in the selected DHCP service. The DHCP service settings are also administrated in Univention Management Console, see Section 10.3.2. If no DHCP service is selected, no DHCP host record is created during assignment to a computer object. However, such an entry can also still be assigned manually. |
UCS integrates BIND for the name resolution via the domain name system (DNS). The majority of DNS functions are used for DNS resolution in the local domain; however, the UCS BIND integration can also be used for a public name server in principle.
BIND is always available on all domain controller system roles; installation on other system roles is not supported.
The configuration of the name servers to be used by a UCS system is documented in Section 8.2.4.
The following DNS data are differentiated:
A forward lookup zone contains information which is used to resolve DNS names into IP addresses. Each DNS zone has at least one authoritative, primary name server whose information governs the zone. Subordinate servers synchronise themselves with the authoritative server via zone transfers. The entry which defines such a zone is called a SOA record in DNS terminology.
The MX record of a forward lookup zone represents important DNS information necessary for e-mail routing. It points to the computer which accepts e-mails for a domain.
TXT records include human-readable text and can include descriptive information about a forward lookup zone.
A CNAME record (also called an alias record) refers to an existing, canonical DNS name. For example, the actual host name of the mail server can be given an alias entry mailserver, which is then entered in the mail clients. Any number of CNAME records can be mapped to one canonical name.
An A record (under IPv6 AAAA record) assigns an IP address to a DNS name. A records are also known as Host records in UCS.
A SRV record (called a service record in UCS) can be used to save information about available system services in the DNS. In UCS, service records are used amongst other things to make LDAP servers or the master domain controller known domain-wide.
A reverse lookup zone contains information which is used to resolve IP addresses into DNS names. Each DNS zone has at least one authoritative, primary name server whose information governs the zone, subordinate servers synchronise themselves with the authoritative server via zone transfers. The entry which defines such a zone is the SOA record.
A PTR record (pointer record) allows resolution of an IP address into a host name. It thus represents the equivalent in a reverse lookup zone of a host record in a forward lookup zone.
The level of detail of the BIND debug output can be configured via the
dns/debug/level and dns/dlz/debug/level (for the Samba
backend, see Section 10.2.1.2) Univention Configuration Registry
variables. The possible values are between 0 (no debug tasks) to 11. A complete list of
levels can be found at [bind-loglevel].
In a typical BIND installation on a non-UCS system, the configuration is performed by editing zone files. In UCS, BIND is completely configured via Univention Management Console, which saves its data in the LDAP directory.
BIND can use two different backends for its configuration:
The LDAP backend accesses the data in the LDAP directory. This is the standard backend. The DNS service is split into two in this case: The BIND proxy is the primary name server and uses the DNS standard port 53. A second server in the background works on port 7777. If data from the internal DNS zones are edited in the LDAP, the zone file on the second server is updated based on the LDAP information and transmitted to the BIND proxy by means of a zone transfer.
Samba 4 provides an Active Directory domain. Active Directory is closely connected with DNS, for DNS updates of Windows clients or the localisation of NETLOGON shares among other things. If Samba 4 is used, the domain controller in question is switched over to the use of the Samba backend. The DNS database is maintained in Samba's internal LDB database, which Samba updates directly. BIND then accesses the Samba DNS data via the DLZ interface.
When using the Samba backend, a search is performed in the LDAP for every DNS request. With the OpenLDAP backend, a search is only performed in the directory service if the DNS data has changed. The use of the LDAP backend can thus result in a reduction of the system load on Samba 4 systems.
The backend is configured via the Univention Configuration Registry variable dns/backend. The DNS
administration is not changed by the backend used and is performed via
Univention Management Console in both cases.
In the default setting, the UCS name server allows zone transfers of the
DNS data. If the UCS server can be reached from the Internet, a list of all computer names
and IP addresses can be requested. The zone transfer can be deactivated when using the OpenLDAP backend by setting the
Univention Configuration Registry variable dns/allow/transfer to none.
DNS files are stored in the cn=dns, container as
standard. Forward and reverse lookup zones are stored directly in the
container. Additional DNS objects such as pointer records can be stored in
the respective zones.
base DN
The relative or fully qualified domain name (FQDN) should always be used in the input fields for computers and not the computer's IP address. A FQDN should always end in a full stop to avoid the domain name being added anew.
The left column of the UMC module includes a list of all the forward and reverse lookup zones. To add an object to a zone - for example an alias record to a forward zone - the corresponding zone must be selected. is then used to create the object in this zone. To create a new forward or reverse zone, start by selecting . Clicking on then creates a new zone. If an object is created within the zone, the zone is labelled in the UMC dialogues as a superordinate object.
Forward lookup zones contain information which is used to resolve DNS names into IP addresses. They are managed in the UMC module DNS (see Section 4.2). To add another forward lookup zone, select and .
Table 10.2. 'General' tab
| Attribute | Description |
|---|---|
| Zone name |
This is the complete name of the DNS domain for which the zone will be responsible. The domain name must not end in a full stop in zone names! |
| Zone time to live |
The time to live specifies how long these files may be cached by other DNS servers. The value is specified in seconds. |
| Name servers |
The fully qualified domain name with a full stop at the end of the relative domain name of the responsible name server. The first entry in the line is the primary name server for the zone. |
Table 10.3. 'Start of authority' tab
| Attribute | Description |
|---|---|
| Contact person |
The e-mail address of the person responsible for administrating the zone. |
| Serial number |
Other DNS servers use the serial number to recognise whether zone data have changed. The slave name server compares the serial number of its copy with that on the master name server. If the serial number of the slave is lower than that on the master, the slave copies the changed data. There are two commonly used patterns for this serial number:
If the serial number is not changed manually, it will be increased automatically with every change. |
| Refresh interval |
The time span in seconds after which the slave name server checks that its copy of the zone data is up-to-date. |
| Retry interval |
The time span in seconds after which the slave name server tries again to check that its copy of the zone data is up-to-date after a failed attempt to update. This time span is usually set to be less than the update interval, but can also be equal. |
| Expiry interval |
The time span in seconds after which the copy of the zone data on the slave becomes invalid if it could not be checked to be up-to-date. For example, an expiry interval of one week means that the copy of the zone data becomes invalid when all requests to update in one week fail. In this case, it is assumed that the files are too outdated after the expiry interval date to be used further. The slave name server can then no longer answer name resolution requests for this zone. |
| Minimum time to live |
The minimum time to live specifies in seconds how long other servers can cache no-such-domain (NXDOMAIN) answers. This value cannot be set at more than 3 hours, the preset value is 3 hours. |
Table 10.4. 'IP addresses' tab
| Attribute | Description |
|---|---|
| IP addresses |
This input field can be used to specify one or more IP addresses, which are output when the name of the zone is resolved. These IP addresses are queried by Microsoft Windows clients in AD compatible domains. |
Table 10.5. 'MX records' tab
| Attribute | Description |
|---|---|
| Priority |
A numerical value between 0 and 65535. If several mail servers are available for the MX record, an attempt will be made to engage the server with the lowest priority value first. |
| Mail server |
The mail server responsible for this domain as fully qualified domain name with a full stop at the end. Only canonical names and no alias names can be used here. |
Table 10.6. 'TXT records' tab
| Attribute | Description |
|---|---|
| TXT record |
Descriptive text for this zone. Text records must not contain umlauts or other special characters. |
CNAME records / alias records are managed in the UMC module DNS (see Section 4.2). To create another record, the forward lookup zone must be selected in the left column. can be used to create a new record.
Table 10.7. 'General' tab
| Attribute | Description |
|---|---|
| Alias |
The alias name as fully qualified domain name with a full stop at the end or as a relative domain name which should point to the canonical name. |
| Canonical name |
The canonical name of the computer that the alias should point to, entered as a fully qualified domain name with a full stop at the end or a relative domain name. |
Host records are managed in the UMC module DNS (see Section 4.2). To create another record, the forward lookup zone must be selected in the left column. can be used to create a new record.
When adding or editing a computer object a host record can be created automatically or edited.
Table 10.8. 'General' tab
| Attribute | Description |
|---|---|
| Host name |
The FQDN with a full stop at the end or the relative domain name of the name server. |
| IP addresses |
The IPv4 and/or IPv6 addresses to which the host record should refer. |
| Zone time to live |
The time to live specifies in seconds how long these files may be cached by other DNS servers. |
Service records are managed in the UMC module DNS (see Section 4.2). To create another record, the forward lookup zone must be selected in the left column. can be used to create a new record.
A service record must always be assigned to a forward lookup zone and can therefore only be added to a forward lookup zone or a subordinate container.
Table 10.9. 'General' tab
| Attribute | Description |
|---|---|
| Service |
The name under which the service should be reachable. |
| Protocol |
The protocol via which the record can be accessed ( |
| Extension |
This input field can be used to specify additional parameters. |
| Priority |
A whole number between 0 and 65535. If more than one server offer the same service, the client will approach the server with the lowest priority value first. |
| Weighting |
A whole number between 0 and 65535. The weight function is used for load balancing between servers with the same priority. When more than one server offer the same service and have the same priority the load is distributed across the servers in relation to the weight function.
Example: |
| Port |
The port where the service can be reached on the server (valid value from 1 to 65535). |
| Server |
The name of the server on which the service will be made available, as a fully qualified domain name with a full stop at the end or a relative domain name. Several servers can be entered for each service. |
| Zone time to live |
The time to live specifies how long these files may be cached by other DNS servers. |
A reverse lookup zone is used to resolve IP address into host names. They are managed in the UMC module DNS. To add another reverse lookup zone, select and .
Table 10.10. 'General' tab
| Attribute | Description |
|---|---|
| Subnet |
The IP address of the network for which the reverse lookup zone shall
apply. For example, if the network in question consisted of the IP
addresses |
| Zone time to live |
The time to live specifies how long these files may be cached by other DNS servers. |
Each DNS zone has at least one authoritative, primary name server whose information governs the zone. Subordinate servers synchronise themselves with the authoritative server via zone transfers. The entry which defines such a zone is called a SOA record in DNS terminology.
Table 10.11. 'Start of authority' tab
| Attribute | Description |
|---|---|
| Contact person |
The e-mail address of the person responsible for administrating the zone (with a full stop at the end). |
| Name servers |
The fully qualified domain name with a full stop at the end or the relative domain name of the primary master name server. |
| Serial number |
See the documentation on forward lookup zones in Section 10.2.2.1. |
| Refresh interval |
See the documentation on forward lookup zones in Section 10.2.2.1. |
| Retry interval |
See the documentation on forward lookup zones in Section 10.2.2.1. |
| Expiry interval |
See the documentation on forward lookup zones in Section 10.2.2.1. |
| Minimum time to live |
See the documentation on forward lookup zones in Section 10.2.2.1. |
Pointer records are managed in the UMC module DNS (see Section 4.2). To create another record, the reverse lookup zone must be selected in the left column. can be used to create a new record.
Table 10.12. 'General' tab
| Attribute | Description |
|---|---|
| Address |
The last octet of the computer's IP address (depends on network prefix, see example below). |
| Pointer |
The computer's fully qualified domain name with a full stop at the end.
In a network with a 24-bit network prefix (subnet mask Example:
For a network with a 16-bit network prefix (subnet mask |
The Dynamic Host Configuration Protocol (DHCP) assigns computers an IP address, the subnet mask and further settings for the gateway or NetBIOS server as necessary. The IP address can be set fixed or dynamic.
The use of DHCP allows central assignment and control of IP addresses via the LDAP directory without performing manual configuration on the individual computer systems.
The DHCP integration in UCS only supports IPv4.
In a DHCP service, DHCP servers are grouped in a shared LDAP configuration. Global configuration parameters are entered in the DHCP service; specific parameters in the subordinate objects.
A DHCP server can be installed from the Univention App Center with the application DHCP server. Alternatively, the software package univention-dhcp can be installed. Additional information can be found in Section 5.6.
Every DHCP assigns IP addresses via DHCP. In the default setting, only static IP addresses are assigned to computer objects registered in the UCS LDAP.
If only fixed IP addresses are assigned, as many DHCP servers as required may be used in a DHCP service. All the DHCP servers procure identical data from the LDAP and offer the DHCP clients the data multiple times. DHCP clients then accept the first answer and ignore the rest.
If dynamic IP addresses are also assigned, the DHCP failover mechanism must be employed and a maximum of two DHCP servers can be used per subnet.
A DHCP host entry is used to make the DHCP service aware of a computer. A DHCP host object is required for computers attempting to retrieve a fixed IP address over DHCP. DHCP computer objects do not normally need to be created manually, because they are created automatically when a DHCP service is assigned to a computer object with a fixed IP address.
A DHCP subnet entry is required for every subnet, irrespective of whether dynamic IP addresses are to be assigned from this subnet.
Configuration parameters can be assigned to the different IP ranges by creating DHCP pools within subnets. In this way unknown computers can be allowed in one IP range and excluded from another IP range. DHCP pools can only be created below DHCP subnet objects.
If several IP subnets are used in a physical Ethernet network, this should be entered as a DHCP shared subnet below a . objects can only be created below objects.
Values which are set on a DHCP configuration level always apply for this level and all subordinate levels, unless other values are specified there. Similar to policies, the value which is closest to the object always applies.
The left column of the UMC module includes a list of all the DHCP services. To add an object to a DHCP service - for example in an additional subnet - the corresponding service must be selected. is then used to create the object in this service. To create a new DHCP service, start by selecting . Clicking on then creates a new service. If an object is saved within a service, the service is labelled in UMC dialogues as a superordinate object.
DHCP services are managed in the UMC module DHCP (see Section 4.2). To create a new DHCP service, needs to be selected in the left column of the UMC module. Clicking on then creates a new service.
A DHCP server can only serve one DHCP service; to use another DHCP service, a separate DHCP server must be set up (see Section 10.3.2.2).
The following parameters are often set on the DHCP service object which then apply to all the computers which are served by this DHCP service (unless other values are entered in lower levels):
and under
under
A description of this and the other DHCP policies can be found at Section 10.3.3.
Table 10.13. 'General' tab
| Attribute | Description |
|---|---|
| Service name |
An unambiguous name for the DHCP service must be entered in this input
field, e.g., |
Each server which should offer the DHCP service requires a DHCP server entry in the LDAP directory. The entry does not normally need to be created manually, instead it is created by the join script of the univention-dhcp package. However, to create another record manually, a DHCP service must be selected in the left column of the UMC module DHCP. can then be used to register a new server.
Table 10.14. 'General' tab
| Attribute | Description |
|---|---|
| Server name |
The computer name that the DHCP service should offer is entered in
this input field, e.g., A server can only ever provide a single DHCP service and therefore cannot be entered in more than one DHCP service at the same time. |
DHCP subnets are managed in the UMC module DHCP (see Section 4.2). To create another subnet, a DHCP service must be selected in the left column. can be used to create a new subnet.
A DHCP subnet entry is required for every subnet from which dynamic or fixed IP addresses are to be assigned. It is only necessary to enter IP address ranges if IP addresses are to be assigned dynamically.
If DHCP shared subnet objects are to be used, the corresponding subnets should be created below the DHCP shared subnet container created for this purpose (see Section 10.3.2.6).
Table 10.15. 'General' tab
| Attribute | Description |
|---|---|
| Subnet address |
The IP address of the subnet must be entered in dot-decimal form in
this input field, e.g., |
| Net mask |
The network mask can be entered in this input field as the network prefix or in dot-decimal form. If the network mask is entered in dot-decimal form it will be subsequently be converted into the corresponding network prefix and later also shown so. |
| Dynamic address assignment |
Here one can set up individual or multiple IP address ranges for dynamic assignment. The range stretches from the to the in dot-decimal form. CautionDynamic IP ranges for a subnet should always either be specified exclusively in the subnet entry or exclusively in one or more special pool entries. The types of IP range entries within a subnet must not be mixed! If different IP ranges with different configurations are be set up in one subnet, pool entries must be created for this purpose. |
At this level, the gateway for all computers in a subnet is often set using the tab (unless other entries are performed at lower levels).
DHCP pools can only be managed via the UMC module LDAP directory. To do so, one must always be in a DHCP subnet object - a DHCP pool object must always be created below a DHCP subnet object - and a object added with .
If DHCP pools are created in a subnet, no IP address range should be defined in the subnet entry. These should only be specified via the pool entries.
Table 10.16. 'General' tab
| Attribute | Description |
|---|---|
| Name |
An unambiguous name for the DHCP pool must be entered in this input
field, e.g., |
| Dynamic range |
Here you can enter the IP addresses in dot-decimal form that are to be dynamically assigned. |
Table 10.17. 'Advanced settings' tab
| Attribute | Description |
|---|---|
|
Failover peer |
The name of a failover configuration, which must to be configured
manually in file |
|
Allow known clients |
A computer is identified by its MAC address. If this input field is set to or unset, a computer with a matching DHCP host entry (see Section 10.3.2.5) is eligible to receive an IP address from this pool. If set to , the computer doesn't receive an IP address from the pool. |
|
Allow unknown clients |
A computer is identified by its MAC address. If this input field is set to or unset, a computer without a matching DHCP host entry (see Section 10.3.2.5) is eligible to receive an IP address from this pool. If set to , the computer doesn't receive an IP address from the pool. |
|
Allow dynamic BOOTP clients |
BOOTP is the predecessor of the DHCP protocol. It has no mechanism to renew leases and by default assigns leases infinitely, which can deplete the pool. If this options is set to clients can retrieve an IP address from this pool using BOOTP. |
|
All clients |
If this option is set to the pool is disabled globally. This is only useful in exceptional scenarios. |
A DHCP host entry is used to register the respective computer in the DHCP service. Computers can be handled depending on their registration status. Known computers may get fixed and dynamic IP addresses from the DHCP service; unknown computers only get dynamic IP addresses.
DHCP computer entries are usually created automatically when a computer is added via the computer management. Below the DHCP service object you have the possibility of adding DHCP computer entries or editing existing entries manually, irrespective of whether they were created manually or automatically.
DHCP host objects are managed in the UMC module DHCP (see Section 4.2). To register a host in the DHCP manually, a DHCP service must be selected in the left column of the module. can be used to register a host.
Table 10.18. 'General' tab
| Attribute | Description |
|---|---|
| Host name |
A name for the computer is entered in this input field (which usually also has an entry in the computer management). It is recommended to enter the same name and the same MAC address for the computer in both entries to facilitate assignment. |
| Type |
The type of network used can be selected in this select list. almost always needs to be selected here. |
| Address |
The MAC address of the network card needs to be entered here,
e.g., |
| Fixed IP addresses |
One or more fixed IP addresses can be assigned to the computer here. In addition to an IP address, a fully qualified domain names can also be entered, which is resolved into one or more IP addresses by the DHCP server. |
DHCP shared network objects accept subnets which use a common physical network.
DHCP shared network objects are managed in the UMC module DHCP (see Section 4.2). To create a shared network, a DHCP service must be selected in the left column of the module. can be used to register a network.
A shared network must contain at least one shared subnet object. Otherwise the DHCP service will terminate itself and cannot be restarted until the configuration is fixed.
Table 10.19. 'General' tab
| Attribute | Description |
|---|---|
| Shared network name |
A name for the shared network must be entered in this input field. |
Subnets are declared as a DHCP shared subnet when they use the same, common physical network. All subnets which use the same network must be stored below the same shared network container. A separate DHCP shared subnet object must be created for each subnet.
DHCP shared subnet objects can only be managed via the UMC module LDAP directory. To do so, one must always be in a DHCP shared network object - a DHCP shared subnet object must always be created below a DHCP shared network object - and a object added with .
Many of the settings for DHCP are configured via policies. They are also applied to DHCP computer objects if a policy is linked to the LDAP base or one of the other intermediate containers. As the settings for DHCP computer objects have the highest priority, other settings for subnetwork and service objects are ignored.
For this reason, DHCP policies should be linked directly to the DHCP network objects (e.g., the DHCP subnetworks). [4]
When using the command line udm dhcp/host list (see also Section 4.9.2.7), it is possible to use the option --policies 0 to display the effective settings.
The default gateway can be specified via DHCP with a DHCP routing policy, which is managed in the UMC module (see Section 4.5)
Table 10.20. 'General' tab
| Attribute | Description |
|---|---|
| Routers |
The names or IP addresses of the routers are to be entered here. It must be verified that the DHCP server can resolve these names in IP addresses. The routers are contacted by the client in the order in which they stand in the selection list. |
The name servers to be used by a client can be specified via DHCP with a DHCP DNS policy, which is managed in the UMC module (see Section 4.5)
Table 10.21. 'General' tab
| Attribute | Description |
|---|---|
| Domain name |
The name of the domain, which the client automatically appends on computer names that it sends to the DNS server for resolution and which are not FQDNs. Usually this is the name of the domain to which the client belongs. |
| Domain name servers |
Here IP addresses or fully qualified domain names (FQDNs) of DNS servers can be added. When using FQDNs, it must be verified that the DHCP server can resolve the names in IP addresses. The DNS servers are contacted by the clients according to the order specified here. |
The WINS server to be used can be specified via DHCP with a DHCP NetBIOS policy, which is managed in the UMC module (see Section 4.5)
Table 10.22. 'General' tab
| Attribute | Description |
|---|---|
| NetBIOS name servers |
The names or IP addresses of the NetBIOS name servers (also known as WINS servers) should be entered here. It must be verified that the DHCP server can resolve these names in IP addresses. The servers entered are contacted by the client in the order in which they stand in the selection list. |
| NetBIOS scope |
The NetBIOS over TCP/IP scope for the client according to the specification in RFC 1001 and RFC 1002. Attention must be paid to uppercase and lowercase when entering the NetBIOS scope. |
| NetBIOS node type |
This field sets the node type of the client. Possible values are:
|
The validity of an assigned IP address - a so-called DHCP lease - can be specified with a DHCP lease time policy, which is managed in the UMC module (see Section 4.5)
Table 10.23. 'General' tab
| Attribute | Description |
|---|---|
| Default lease time |
If the client does not request a specific lease time, the standard lease time is assigned. If this input field is left empty, the DHCP server's default value is used. |
| Maximum lease time |
The maximum lease time specifies the longest period of time for which a lease can be granted. If this input field is left empty, the DHCP server's default value is used. |
| Minimum lease time |
The minimum lease time specifies the shortest period of time for which a lease can be granted. If this input field is left empty, the DHCP server's default value is used. |
A DHCP Boot policy is used to assign computers configuration parameters for booting via BOOTP/PXE. They are managed in the UMC module (see Section 4.5)
Table 10.24. 'Boot' tab
| Attribute | Description |
|---|---|
| Boot server |
The IP address or the FQDN of the PXE boot server from which the client should load the boot file is entered in the input field. If no value is entered in this input field, the client boots from the DHCP server from which it retrieves its IP address. |
| Boot filename |
The path to the boot file is entered here. The path must be entered
relative to the base directory of the TFTP service
( |
There are some further DHCP policies available, but they are only required in special cases.
DHCP Dynamic DNS allows the configuration of dynamic DNS updates. These cannot yet be performed with a LDAP-based DNS service as provided out-of-the-box by UCS.
DHCP Allow/Deny allows the configuration of different DHCP options, which control what clients are allowed to do. The are only useful in exceptional cases.
DHCP statements allows the configuration of different options, which are only required in exceptional cases.
Univention Firewall integrates a packet filter based on iptables in Univention Corporate Server.
It permits targeted filtering of undesired services and the protection of computers during installations. Furthermore it provides the basis for complex scenarios such as firewalls and application level gateways. Univention Firewall is included in all UCS installations as standard.
In the default setting, all incoming ports are blocked. Every UCS package provides rules, which free up the ports required by the package again.
The configuration is primarily performed via Univention Configuration Registry variables. The definition of this type of packet filter rules is documented in [developer-reference].
In addition, the configuration scripts in the
/etc/security/packetfilter.d/ directory are listed in
alphabetic order. The names of all scripts begin with two digits,
which makes it easy to create a numbered order. The scripts must be
marked as executable.
After changing the packet filter settings, the univention-firewall service has to be restarted.
Univention Firewall can be deactivated by setting the
Univention Configuration Registry variable security/packetfilter/disabled to true
The UCS proxy integration allows the use of a web cache for improving the performance and controlling data traffic. It is based on the tried-and-tested proxy server Squid and supports the protocols HTTP, FTP and HTTPS.
A proxy server receives requests about Internet contents and verifies whether these contents are already available in a local cache. If this is the case, the requested data are provided from the local cache. If the data are not available, these contents are called up from the respective web server and inserted in the local cache. This can be used to reduce the answering times for the users and the transfer volume via the Internet access.
The software DansGuardian can be installed as an additional component with the package univention-dansguardian. This makes it possible to check and filter the Internet contents prior to delivery to the user in order to scan files for viruses or prevent access to undesirable content.
Further documentation on proxy services - such as the cascading of proxy servers, transparent proxies and the integration of a virus scan engine - are documented in [ext-doc-net].
Squid can be installed from the Univention App Center with the application Web proxy / web cache (Squid). Alternatively, the software package univention-squid can be installed. Additional information can be found in Section 5.6.
The service is configured with standard settings sufficient for operation so that it can be used immediately. It is possible to configure the port on which the service is accessible to suit your preferences (see Section 10.5.5.1); port 3128 is set as default.
If changes are made to the configuration, Squid must be restarted. This can be performed either via Univention Management Console or the command line:
/etc/init.d/squid3 restart
In addition to the configuration possibilities via Univention Configuration Registry described
in this document, it is also possible to set additional Squid
configuration options in the /etc/squid3/local.conf.
DansGuardian can be installed via the package univention-dansguardian, see Section 10.5.7.
Squid is a caching proxy, i.e., previously viewed contents can be provided from a cache without being reloaded from the respective web server. This reduces the incoming traffic via the Internet connection and can result in quicker responses of HTTP requests.
However, this caching function is not necessary for some environments
or, in the case of cascaded proxies, it should not be activated for
all of them. For these scenarios, the caching function of the Squid
can be deactivated with the Univention Configuration Registry variable squid/cache by setting this to no.
Squid must then be restarted.
All accesses performed via the proxy server are stored in the
logfile /var/log/squid3/access.log.
It can be used to follow which websites have been accessed by the users.
When DansGuardian is used, all accesses are documented in
/var/log/dansguardian/access.log.
As standard, the proxy server can only be accessed from local
networks. If, for example, a network interface with the address
192.168.1.10 and the network mask 255.255.255.0 is available on the
computer on which Squid is installed, only computers from the network
192.168.1.0/24 can access the proxy server. Additional networks can be
specified via the Univention Configuration Registry variable squid/allowfrom. When doing so, the CIDR
notation must be used; several networks should be separated by blank
spaces.
Example:
univention-config-registry set squid/allowfrom="192.168.2.0/24 192.168.3.0/24"
Once Squid has been restarted, access is now permitted from the networks
192.168.2.0/24 and 192.168.3.0/24. If configured to all, proxy access
in granted from all networks.
If Squid is used together with DansGuardian, i.e., the virus or web content filter is activated, Squid cannot verify the access as the connections are performed via DansGuardian. In this case, the access can be restricted via DansGuardian.
As standard, the web proxy can be accessed via port 3128. If another
port is required, this can be configured via the
Univention Configuration Registry variable squid/httpport. If Univention Firewall is used, the
packet filter configuration must also be adjusted.
When using the content and virus scanner (see Section 10.5.7) DansGuardian is accessible at the configured port instead of Squid. Squid then occupies the next-highest port. This must be borne in mind if there are other applications which are supposed to offer services via this port.
In the standard configuration, Squid only forwards client requests intended for the network ports 80 (HTTP), 443 (HTTPS) or 21 (FTP). The list of permitted ports can be changed via the Univention Configuration Registry variable; several entries should be separated by blank spaces.
Example:
univention-config-registry set squid/webports="80 443"
With this setting, access is only allowed to ports 80 and 443 (HTTP and HTTPS).
It is sometimes necessary to restrict web access to certain users. Squid allows user-specific access regulation via group memberships. To allow verification of group membership, it is necessary for the user to authenticate on the proxy server.
To prevent unauthorised users from opening websites nonetheless, additional measures are required to prevent these users from bypassing the proxy server and accessing the Internet. This can be done, for example, by limiting all HTTP traffic through a firewall.
The proxy authentication (and as a result the possible verification of the group memberships) must firstly be enabled. There are three possible mechanisms for this:
squid/basicauth to yes and restarting Squid.
squid/ntlmauth to
yes and restarting Squid.
squid/krb5auth must be set to yes and Squid
restarted.
If NTLM is used an NTLM authentication is performed for every HTTP query as standard. If for example the
website http://www.univention.de is opened, the subpages and images are loaded in
addition to the actual HTML page. The NTLM authentication can be cached per domain: If the
Univention Configuration Registry variable squid/ntlmauth/keepalive is set to yes, no
further NTLM authentication is performed for subsequent HTML queries in the same
domain.
In the standard setting all users can access the proxy. The Univention Configuration Registry variable
squid/auth/allowed_groups can be used to limit the proxy access to one or
several groups. If several groups are specified, they must be separated by a semicolon.
DansGuardian accepts website requests from the network and checks whether access by the request's sender is permitted. If so, the request is forwarded to the proxy server, Squid. For example, DansGuardian allows the blocking of individual file types and suffixes or access to websites or domains.
It is also possible to scan requested files for viruses. In the default setting, the free virus scanner ClamAV is used. The setup is documented in the extended network management documentation [ext-doc-net].
Direct access to the proxy server Squid is restricted to access from the local host. Users working on the system on which Squid and DansGuardian are installed have the possibility of bypassing the filter functions by accessing Squid directly. The web proxy and DansGuardian should thus only be installed on dedicated systems which users cannot log in to.
Following the installation of univention-dansguardian, the virus scanner and the filter for web contents are activated.
The filtering of web content and the virus scanner can be activated
separately. In order to deactivate the content filter, the
Univention Configuration Registry variable squid/contentscan must be set to no and Squid
restarted. To disable the virus scanner, the
Univention Configuration Registry variable squid/virusscan must be set to no.
If neither of the two variables is set to yes,
DansGuardian is not used. After changes to the variables Squid and - if available - DansGuardian
must be restarted.
Web content can be filtered based on file suffixes, MIME types, websites and individual URLs. It is possible to exempt individual computers or users from the filtering.
The filter function can be configured via the following Univention Configuration Registry variables. Where several
values are to be added, these must each be separated by blank spaces. The filtering is
performed on the basis of group memberships, i.e., different rules can be
defined per group and as such it is possible to realise different rights when accessing the
Internet. Which groups are taken into account by DansGuardian can be defined in the
Univention Configuration Registry variable dansguardian/groups.
It must be noted that the first group in the list plays a special role. All users which cannot be assigned to one of the specified groups are assigned to this one, i.e., the defined filter rules apply. This group is generally assigned the lowest rights.
For group changes to take effect, DansGuardian needs to be restarted. This can be done either in the UMC module or on the commandline using the command
/etc/init.d/dansguardian restart
For changes to filter rules, it is sufficient to reload the configuration using the following command:
dansguardian -g
The Univention Configuration Registry variables for the definition of the filter rules contain the group names
replaced in the following list by group.
Table 10.25. UCR variables for filter rules
| UCR variable | Description |
|---|---|
dansguardian/groups/
|
Files with the specified file suffixes may not be downloaded. The suffix point
must always be specified. If this variable is left blank, standard values are
used. To allow all file suffixes, the variable must be set to ' ' (string with a
blank space). Example: '.doc .xls .exe'.
|
dansguardian/groups/
| Files with the specified MIME types may not be downloaded. The MIME type is specified by the delivering web server (or an application running on it). Normally, the MIME types corresponding to the file suffixes outlined above are specified. If this variable is left blank, standard values are used. To allow all MIME types, the variable must be set to ' ' (string with a blank space). Example: audio/mpeg application/zip |
dansguardian/groups/
|
This can be used to block complete web sites. Example: illegal-example-website.com
|
dansguardian/
| In contrast to the previous parameter, this can be used to block only specific URLs of websites. |
dansguardian/
| The access to the URLs specified here is not filtered by DansGuardian. |
dansguardian/
| The access to the web sites specified here is not filtered by DansGuardian. |
dansguardian/bannedipaddresses
| This variable makes it possible to exclude individual clients (based on the IP address) from accessing the proxy server |
dansguardian/exceptionipaddresses
| This can be used to disable all filter rules for individual computers with the result that all the files can be downloaded from the proxy server from this computer. This can be useful if, for example, an administration computer should be used to download files for other users. |
The definition of an exception rule for content filters using
dansguardian/ also exempts the content from virus scanning!
group/exception/*
[4]
Alternatively, the LDAP class univentionDhcpHost can be added in the advanced settings of the policies under and then .
Such policies are then no longer applied to the DHCP computer objects, with the result that the settings from the DHCP subnetwork and service are used.
UCS supports the central management of directory shares. A share registered in Univention Management Console is created on an arbitrary UCS server system as part of the UCS domain replication.
Provision for accessing clients can occur via CIFS (supported by Windows/Linux clients) and/or NFS (primarily supported by Linux/Unix). The NFS shares managed in Univention Management Console can be mounted by clients both via NFSv3 and via NFSv4.
If a file share is deleted on a server, the shared files in the directory are preserved.
To be able to use access control lists on a share, the underlying Linux file system must support
POSIX ACLs. In UCS the file systems ext3, ext4 and XFS support POSIX ACLs. The Samba
configuration also allows storing DOS file attributes in extended attributes of the Unix file
system. To use extended attributes, the partition must be mounted using the mount option
user_xattr.
Access permissions to files are managed in UCS using users and groups. All the file servers in the UCS domain access identical user and group data via the LDAP directory.
Three access rights are differentiated per file: read, write and execute. Three access rights also apply per directory: read and write are the same; the execute permission here refers to the permission to enter a directory.
Each file/directory is owned by a user and a group. The three permission outlined above can be applied to the user owner, the owner group and all others.
If the setuid option is set for an executable file, it can be run by users with the privileges of the owner of the file.
If the setgid option is set for a directory, files saved there inherit the directory's owner group. If further directories are created, they also inherit the option.
If the sticky bit option is enabled for a directory, files in this directory can only be deleted by the owner of the file or the root user.
Access control lists allow even more complex permission models. The configuration of ACLs is described in SDB 1042.
In the Unix permission model - and thus under UCS - write permission is not sufficient to change the permissions of a file. This is limited to the owner/owner group of a file. In contrast, under Microsoft Windows all users with write permissions also have the permission to change the permissions. This scheme can be adjusted for CIFS shares (see Section 11.2).
Only initial users and access permissions are assigned when a directory share is created. If the directory already exists, the permissions of the existing directory are adjusted.
Changes to the permissions of a shared directory performed directly in the file system are not forwarded to the LDAP directory. If the permissions/owners are edited within Univention Management Console, the changes in the file system are overwritten. Settings to the root directory of a file share should thus only be set and edited with Univention Management Console. Additional adjustment of the access permissions of the subordinate directories are then performed via the accessing clients, e.g., via Windows Explorer, or directly via command line commands on the file server.
The homes share plays a special role within Samba. This share is used for sharing the home directories of the users. This share is automatically converted to the user's home directory. Samba therefore ignores the rights assigned to the share, and uses the rights of the respective home directory instead.
File shares are managed in the UMC module Shares (see Section 4.2).
When adding/editing/deleting a share, it is entered, modified or removed
in the /etc/exports file and/or the Samba configuration.
Table 11.1. 'General' tab
| Attribute | Description |
|---|---|
| Name | The name of the share is to be entered here. The name must be composed of letters, numerals, full stops or blank spaces and must begin and end with a letter or numeral. |
| Host | The server where the share is located. All of the domain controller master/backup/slave computers and member servers entered in the LDAP directory for the domain are available for selection which are entered in a DNS forward lookup zone in the LDAP directory. This setting cannot be subsequently edited. |
| Directory |
The absolute path of the directory to be shared, without quotation marks (this also applies if the name includes special characters such as spaces). If the directory does not exist, it will be created automatically on the selected server.
If the Univention Configuration Registry variable
No shares can be created in and below |
| Directory owner of the share's root directory | The user to whom the root directory of the share should belong, see Section 11.1. |
| Directory owner group of the share's root directory | The group to whom the root directory of the share should belong, see Section 11.1. |
| Permissions for the share's root directory | The read, write and access permissions for the root directory of the share, see Section 11.1. |
Table 11.2. 'NFS' tab
| Attribute | Description |
|---|---|
| NFS write access | Allows NFS write access to this share; otherwise the share can only be used in read-only mode. |
| Subtree checking | If only one subdirectory of a file system is exported, the NFS server has to check whether an accessed file is located on the exported file system and in the exported path, each time access is made. Path information is passed on to the client for this check. Activating this function might cause problems if a file opened by the client, is renamed. |
| Modify user ID for root user (root squashing) |
In the NFS standard procedure, identification of users is achieved via user
IDs. To prevent a local root user from working with root permissions on
other shares, root access can be redirected. If this option is activated,
access operations are executed as user
The local group |
| NFS synchronisation |
The synchronisation mode for the share. The sync setting is
used to write data directly on the underlying storage device. The
opposite setting - async - can improve performance but also
involves the risk of data loss if the server is shut down incorrectly.
|
| Only allow access for these hosts, IP addresses or networks | By default, all hosts are permitted access to a share. In this select list, host names and IP addresses can be included, to which the access to the share is to be restricted. For example, access to a share containing mail data could be restricted to the mail server of the domain. |
Table 11.3. 'Samba' tab
| Attribute | Description |
|---|---|
| Samba name |
The NetBIOS name of the share. This is the name under which the share is displayed on Windows computers in the network environment. When adding a directory share, Univention Management Console adopts the name entered in the field of the tab as the default. |
| Samba write access | Permits write access to this share. |
| Show in Windows network environment | Specifies whether the share in question is to show up on Windows clients within the network environment. |
| Allow anonymous read-only access with a guest user |
Permits access to this share without a password. Every access is carried out
by means of the common guest user nobody.
|
| MSDFS root | This option is documented in Section 11.3. |
| Users with write access may modify permissions | If this option is activated, all users with write permission to a file are allowed to change permissions, ACL entries, and file ownership rights, see Section 11.1. |
| Hide unreadable files/directories | If this option is activated, all files which are nonreadable for the user due to their file permissions, will be hidden. |
| VFS Objects | Virtual File System (VFS) modules are used in Samba for performing actions before an access to the file system of a share is made, e.g., a virus scanner which stores every infected file accessed in the share in quarantine or server-side implementation of recycle bin deletion of files. |
Table 11.4. 'Samba permissions' tab (advanced settings)
| Attribute | Description |
|---|---|
| Force user | This username and its permissions and primary group is used for performing all the file operations of accessing users. The username is only used once the user has established a connection to the Samba share by using his real username and password. A common username is useful for using data in a shared way, yet improper application might cause security problems. |
| Force group |
A group which is to be used by all users connecting with this share, as their primary group. Thereby, the permissions of this group automatically apply as the group permissions of all these users. A group registered here has a higher priority than a group which was assigned as the primary group of a user via the entry field. If a + sign is prefixed to the group name, then the group is assigned as a primary group solely to those users which are already members of this group. All other users retain their primary groups. |
| Valid users or groups |
Names of users or groups which are authorised to access this Samba share. To all other users, access is denied. If the field is empty, all users may access the share - if necessary after entering a password. This option is useful for securing access to a share at file server level beyond the file permissions. The entries are to be separated by spaces. The special characters @, + and & can be used in connection with the group name for assigning certain permissions to the users of the stated group for accessing the Samba share:
|
| Invalid users or groups | The users or groups listed here cannot access the Samba share. The syntax is identical to the one for valid users. If a user or group is included in the list of valid users and unauthorised users, access is denied. |
| Restrict write access to these users/groups | Only the users and groups listed here have write permission for the corresponding share. |
| Allowed hosts/networks |
Names of computers which are authorised to access this Samba share. All other computers are denied
access. In addition to computer names, it is also possible to specify IP or network addresses, e.g.,
192.168.0.0/255.255.255.0.
|
| Denied hosts/networks | The opposite to the authorised computers. If a computer appears in both lists, the computer is permitted to access the Samba share. |
| NT ACL support |
If this option is activated, Samba will try to show POSIX ACLs under Windows, and to adopt changes to the ACLs, which were performed under Windows, for the POSIX ACLs. If this option is not set, existing POSIX ACLs are effective but not shown under Windows, and consequently cannot be changed under Windows. |
| Inherit ACLs | When activating this option, each file created in this share will inherit the ACL (Access Control List) of the directory where the file was created. |
| Create files/directories with the owner of the parent directory | When activating this option, each newly created file will not be assigned of the user who created the file, but to the owner of the superior directory instead. |
| Create files/directories with permissions of the parent directory | When activating this option, for each file or directory created in this share, the UNIX permissions of the superior directory will automatically be adopted. |
If a new file is created on a Samba server from a Windows client, the file permissions will be set in several steps:
Accordingly, a newly created directory will initially be assigned the same permissions as that which are set as UNIX permissions and in at the same time. Then these permissions are completed by those marked under .
In a similar way, the security settings are adopted for existing files and directories the permissions of which are edited under Windows:
Only those permissions can be changed under Windows, which are marked in or in . Once this is done, the permissions marked under of under are set in any case.
Thus, the parameters and , or and are applied during the creation of a file or directory, while the parameters and or and are applied when changing permissions.
The security settings only relate to the access via Samba.
The user on the Windows side does not receive any notification of the fact that the file or directory authorisations might by changed according to the Samba settings on this tab.
Table 11.5. 'Samba extended permissions' tab (advanced settings)
| Attribute | Description |
|---|---|
| File mode | The permissions Samba is to adopt when creating a file, provided they are set under Windows. |
| Directory mode | The permissions Samba is to adopt when creating a directory, provided they are set under Windows. |
| Force file mode | The permissions Samba is to set in any case when creating a file, irrespective of whether they are set under Windows or not. |
| Force directory mode | The permissions Samba is to set in any case when creating a directory, irrespective of whether they are set under Windows or not. |
| Security mode | The file permissions to which Samba is to permit changes made from Windows side. |
| Directory security mode | The directory authorisations to which Samba is to permit changes made from Windows side. |
| Force security mode | The permissions Samba is to set in any case (irrespective of whether they are set under Windows or not), if file permissions are changed from Windows side. |
| Force directory security mode | The permissions Samba is to set in any case if directory permissions are changed from Windows side (irrespective of whether they are set under Windows or not). |
Table 11.6. 'Samba options' tab (advanced settings)
| Attribute | Description |
|---|---|
| Locking |
Locking means preventing concurrent access to a file, making an exclusive access possible. When activating this checkbox, Samba will lock the access to files on the client's request. Deactivating this option can be useful for improving performance, yet it should generally not be set in shares with write access, since without locking, files might be corrupted due to concurrent access. |
| Blocking locks |
Clients can send a lock request with a time limit for a certain area of an open file. In case Samba is unable to comply with a the lock request, and this option is activated, then Samba will - in periodical intervals until the expiry of the time limit - try to lock the requested file area. If the option is deactivated, no further attempt will be made. |
| Strict locking |
If this option is activated, Samba will with each read or write access check if the file is locked, and will deny access if required. On some systems, this procedure can take a long time. If this option is deactivated, Samba will check if the file is locked on the client's request exclusively. Well configured clients ask for a check in all important cases, so that this option is usually unnecessary. |
| Oplocks | If this option is activated, Samba will use so-called opportunistic locks. This can improve the speed of file access considerably. However, the option permits clients local caching of files on a large scale. In unreliable networks it might therefore be necessary to do without Oplocks. |
| Level 2 Oplocks |
When activating this option, Samba will support an extended form of Oplocks, the so-called opportunistic read-only locks or Level 2 Oplocks. Windows clients receiving a read/write Oplock for a file can then scale down this Oplock to a read-only Oplock instead of having to abandon the Oplock completely as soon as a second client opens the file. All clients supporting Level 2 Oplocks, will then cache read access processes to the file exclusively. Should one of the clients write to the file, all the other clients will be asked to abandon their Oplocks, and to empty their caches. It is recommended to activate this option to speed up access to files which are normally not written to (e.g. programs / executable files). NoteIf kernel Oplocks are supported, Level 2 Oplocks will not be allowed, even if the option is activated. Only if the checkbox is also ticked, this option will become valid. |
| Fake Oplocks |
When activating this option, Samba will allow all Oplock requests irrespective of the number of clients having access to a file. This method considerably improves performance, and is useful for shares which can only be accessed for reading (e.g. CD-ROMs), or where it is ensured that there can never occur a situation when several clients make access at the same time. If it cannot be excluded that several clients make reading and writing access to a file at the same time, this option should not be activated, since it may cause data loss. |
| Block size | The block size in bytes in which unoccupied disk space is to be reported to the clients. By default, this size is defined as 1024 bytes. |
| Client-side caching policy | This option specifies in which way the clients are to cache the files of this share offline. The available alternatives are manual, documents, programs, and disable. |
| Hide files |
Files and directories to be accessed under Windows, yet not to be visible. Such files or directories are assigned the DOS attribute hidden. When entering the names of files and directories, upper and lower case letters are to be differentiated. Each entry is to be separated from the next by a slash. Since the slash can thus not be used for structuring path names, the input of path names is not possible. All files and directories of this name within the share will be hidden. The names may include spaces and the wildcards * and ?. As an example, /.*/test/ hides all files and directories the names of which begin with a dot, or which are called test. NoteEntries in this field have an impact on the speed of Samba since every time particular contents of the share are to be displayed, all files and directories have to be checked according to the active filters. |
| Postexec script | A script or command which is to be executed on the server if the connection to this share is finished. |
| Preexec script | A script or command which is to be executed on the server each time a connection to this share is established. |
Table 11.7. 'Samba custom settings' tab (advanced settings)
| Attribute | Description |
|---|---|
| Custom share settings |
Apart from the properties which can, as a standard feature, be
configured in a Samba share, this setting makes it possible to define
further arbitrary Samba settings within the share. A list of available
options can be obtained by the command CautionThe definition of extended Samba settings is only necessary in very special cases. The options should be thoroughly checked since they might have security-relevant effects. |
Table 11.8. 'NFS custom settings' tab (advanced settings)
| Attribute | Description |
|---|---|
| Custom NFS share settings |
Apart from the properties in the tab, this setting makes it
possible to define further arbitrary NFS settings for the share. A list of available
options can be obtained by the command CautionThe definition of extended NFS settings is only necessary in special cases. The options should be thoroughly checked since they might have security-relevant effects. |
Table 11.9. '(Options)' tab
| Attribute | Description |
|---|---|
| Export for Samba clients | This option defines whether the share is to be exported for Samba clients. |
| Export for NFS clients | This option defines whether the share is to be exported for NFS clients. |
The Microsoft Distributed File System (MSDFS) is a distributed file system which makes it possible to access shares spanning several servers and paths as a virtual directory hierarchy. The load can then be distributed across several servers.
Setting the option for a share (see Section 11.2) indicates that the shared directory is a share which can be used for the MSDFS. References to other shares are only displayed in such an MSDFS root, elsewhere they are hidden.
To be able to utilise the functions of a distributed file system, the
Univention Configuration Registry variable samba/enable-msdfs has to be set to yes on a file
server. Afterwards Samba has to be restarted.
For creating a reference named tofb from server sa
within the share fa to share fb on the server
sb, the following command has to be
executed in directory fa:
ln -s msdfs:sb\\fb tofb
This reference will be displayed on every client capable of MSDFS
(e.g. Windows 2000 and Windos XP) as a regular directory.
Only restricted user groups should have write access to root directories. Otherwise, it would be possible for users to redirect references to other shares, and intercept or manipulate files. In addition, paths to the shares, as well as the references are to be spelt entirely in lower case. If changes are made in the references, the concerned clients have to be restarted. Further information on this issue can be found in the Samba documentation [samba3-howto-chapter-20] in the chapter 'Hosting a Microsoft Distributed File System Tree'.
UCS allows the limiting of the storage space available to a user on a partition. These thresholds can be set as either a quantity of storage space (e.g., 500 MB per user) or a maximum number of files without a defined size limit.
Two types of thresholds are differentiated:
The hard limit is the maximum storage space a user can employ. If it is attained, no further files can be saved.
If the soft limit is attained - which must be smaller than the hard limit - and the storage space used is still below the hard limit, the user is given a grace period of seven days to delete unused data. Once seven days have elapsed, it is no longer possible to save or change additional files. A warning is displayed to users who access a file system with an exceeded quota via CIFS (the threshold is based on the soft limit).
If a quota value of 0 has been configured, it is evaluated as an unlimited quota.
Quotas can either be defined via the UMC module or a policy for shares, see Section 11.4.2.
File system quotas can only be applied on partitions with the file systems ext2, ext3, ext4 and
XFS. Before filesystem quotas can be configured, the use of file system quotas needs to be
activated per partition, see Section 11.4.1.
In the UMC module , all the partitions are listed on which quotas can be set up. Only partitions are shown which are currently mounted under a mount point.
The current quota status (activated/deactivated) is shown and can be changed with and .
If quota has been activated on a XFS root-partition, the system has to be rebooted.
Quotas can either be defined via the UMC module or a policy for shares, see Section 11.4.2. The configuration through a policy allows setting a default value for all users, while the UMC module allows easy configuration of user-specific quota values.
The user-specific quota settings can be configured with the UMC module . The permitted storage quantities can be set with the pencil symbol for all enabled partitions. All the settings are set user-specifically. can be used to set the thresholds for soft and hard limits for a user.
The quota settings can also be set with a share policy. The settings apply for all users of a share; it is not possible to establish different quota limits for different users within one policy.
Quota settings that are applied via a quota policy are by default only applied once to the filesystem. If the setting is changed, it will not be applied automatically on the next user login. To inherit changed quota values, the option Reapply settings on every login can be activated at the quota policy.
Quota policies can only be used on partitions for which the quota support is enabled in the UMC module, see Section 11.4.1.
Filesystem quotas always apply to a full partition.
Even if the policies are defined for shares, they are used on complete partitions. If, for
example, three shares are provided on one server which are all saved on the separate
/var/ partition and three different policies are configured and used,
the most restrictive setting applies for the complete partition. If different quotas are used, it
is recommended to distribute the data over individual partitions.
The settings defined in the UCS management system are evaluated and enabled during login to UCS systems by
the tool univention-user-quota run in the PAM stack.
If no quota are needed, the evaluation can be disabled by setting the Univention Configuration Registry variable
quota/userdefault to no.
If the Univention Configuration Registry variable quota/logfile is set to any file name, the activation of the
quotas is logged in the specified file.
A user can view the quota limits defined for a system using the command repquota
-va, e.g.:
*** Report for user quotas on device /dev/vdb1
Block grace time: 7days; Inode grace time: 7days
                        Block limits                File limits
User            used    soft    hard  grace    used  soft  hard  grace
----------------------------------------------------------------------
root      --      20       0       0              2     0     0
Administrator --       0       0  102400              0     0     0
user01    --  234472 2048000 4096000              2     0     0
user02    --       0 2048000 4096000              0     0     0

Statistics:
Total blocks: 8
Data blocks: 1
Entries: 4
Used average: 4.000000
Logged in users can use the quota -v command to view the applicable quota
limits and the current utilisation.
Further information on the commands can be found in the man pages of the commands.
Univention Corporate Server includes a print system, which can also be used to realise complex environments. Printers and printer groups can be created and configured conveniently in Univention Management Console. Extensions for cost calculation and page limitation can be installed subsequently using the print quota system.
The print services are based on CUPS (Common Unix Printing System). CUPS manages print jobs in print queues and converts print jobs into the native formats of the connected printers. The print queues are also administrated in Univention Management Console, see Section 12.6.
All printers set up in CUPS can be directly used by UCS systems and are automatically also provided for Windows computers when Samba is used.
The technical capacities of a printer are specified in so-called PPD files. These files include for example whether a printer can print in colour, whether duplex printing is possible, whether there are several paper trays, which resolutions are supported and which printer control languages are supported (e.g., PCL or PostScript).
Print jobs are transformed by CUPS with the help of filters into a format that the respective printer can interpret, for example into PostScript for a PostScript-compatible printer.
UCS already includes a wide variety of filters and PPD files. Consequently, most printers can be employed without the need to install additional drivers. The setting up of additional PPD files is described in Section 12.9.
A printer can either be connected directly to the print server
locally (e.g., via the USB port or a parallel port) or communicate
with a printer via remote protocols (e.g., TCP/IP-compatible printers,
which are connected via IPP or LPD).
Network printers with their own IP address should be registered in the computer administration of Univention Management Console as an IP managed client (see Section 3.3).
CUPS offers the possibility of defining printer groups. The included printers are used employed alternating, which allows automatic load distribution between neighbouring printers.
The print quota system, which can be installed using the univention-printquota package, can be used to install an expansion for recording incurred printer costs and for limiting the number of pages to be printed. The setting and configuration is documented in the extended documentation [ext-print-doc].
Print shares from Windows systems can also be integrated in the CUPS print server, see Section 12.4.
A printserver can be installed from the Univention App Center with the application
Print server (CUPS). Alternatively, the software package
univention-printserver can be installed
(univention-run-join-scripts must be executed after installation).
Additional information can be found in Section 5.6.
The configuration of the CUPS print server is performed via settings from the LDAP directory
service and Univention Configuration Registry. If the Univention Configuration Registry variable cups/include/local is set to
true, the /etc/cups/cupsd.local.conf file is included,
in which arbitrary options can be defined.
If an error occurs when working through a printer queue (e.g., because the connected printer is
switched off), the further processing of the queue is stopped in the default setting. This must
then be reactivated by the administrator (see Section 12.6). If the
Univention Configuration Registry variable cups/errorpolicy is set to retry-job, CUPS
automatically attempts to process unsuccessful print jobs again every 30 seconds.
Print shares are administrated in the UMC module Printers with the object type (see Section 4.2).
When adding/deleting/editing a printer share, the printer is
automatically configured in CUPS. CUPS does not have an LDAP interface
for printer configuration, instead the printers.conf file is
generated via a listener module. If Samba is used, the printer
shares are also automatically provided for Windows clients.
Table 12.1. 'General' tab
| Attribute | Description |
|---|---|
| Name (*) | This input field contains the name of the printer share, which is used by CUPS. The printer appears under this name in Linux and Windows. The name may contain alphanumeric characters (i.e., uppercase and lowercase letters a to z and numbers 0 to 9) as well as hyphens and underscores. Other characters (including blank spaces) are not permitted. |
| Spool host (*) |
A print server manages the printer queue for the printers to be shared. It converts the data to be printed into a compatible print format when this is necessary. If the printer is not ready, the print server saves the print jobs temporarily and forwards them on to the printer subsequently. If more than one print server is specified, the print job from the client will be sent to the first print server to become available. Only domain controllers and member servers on which the univention-printserver package is installed are displayed in the list. |
| Protocol and Destination (*) |
These two input fields specify how the print server accesses the printer: The following list describes the syntax of the individual protocols for the configuration of printers connected locally to the server:
The following list describes the syntax of the individual protocols for the configuration of network printers:
The
The
The Independent of these settings, the printer share can be mounted by other Windows systems with the corresponding printer drivers. |
| Manufacturer | When the printer manufacturer is selected, the Printer model selection list updates automatically. |
| Printer model (*) | This selection list shows all the printers PPD files available for the selected manufacturer. If the required printer model is not there, a similar model can be selected and a test print used to establish correct function. Section 12.9 explains how to expand the list of printer models. |
| Samba name |
A printer can also be assigned an additional name by which it can be reached from Windows. Unlike the CUPS name (see ), the Samba name may contain blank spaces and umlauts. The printer is then available to Windows under both the CUPS name and the Samba name. Using a Samba name in addition to the CUPS name is practical, for example, if the printer was already in use in Windows under a name which contains blank spaces or umlauts. The printer can then still be reached under this name without the need to reconfigure the Windows computers. |
| Enable quota support |
If quota were activated for this printer, the quota settings on the policy apply. The print quota system needs to be installed for this, see [ext-print-doc]. |
| Price per page |
The user is charged the value given in this input field for every page printed. The incurred costs are summarised in the user's account and used for the accurate calculation of print costs. If no value is specified, print costs will not be calculated. The print quota system needs to be installed for this. |
| Price per print job |
The user is charged the value given in this input field for every print job. The incurred costs are summarised in the user's account and used for the accurate calculation of print costs. If no value is specified, print costs will not be calculated. The print quota system needs to be installed for this. |
| Location | This data is displayed by some applications when selecting the printer. It can be filled with any text. |
| Description | This is displayed by some applications when selecting the printer. It can be filled with any text. |
Table 12.2. 'Access Control' tab
| Attribute | Description |
|---|---|
| Access control |
Access rights for the printer can be specified here. Access can be limited to certain groups or users or generally allowed and certain groups or users blocked specifically. As standard, access is available for all groups and users. These rights are also adopted for the corresponding Samba printer shares, so that the same access rights apply when printing via Samba as when printing directly via CUPS. This access control is useful for the management of printers spread across several locations, so that the users at location A do not see the printers of location B. |
| Allowed/denied users | This lists individual users for whom access should be controlled. |
| Allowed/denied groups | This lists individual groups for whom access should be controlled. |
CUPS offers the possibility to group printers into classes. These are implemented in UCS as printer groups Printer groups appear to clients as normal printers The aim of such a printer group is to create a higher availability of printer services. If the printer group is used to print, the job is sent to the first printer in the printer group to become available. The printers are selected based on the round robin principle so that the degree of utilisation is kept uniform.
A printer group must have at least one printer as a member. Only printers from the same server can be members of the group.
The possibility of grouping printers shares from different printer servers in a printer group makes it possible to select printer groups as members of a printer group. This could result in a printer group adopting itself as a group member. This must not be allowed to happen.
Printer groups are administrated in the UMC module Printers with the object type (see Section 4.2).
Table 12.3. 'General' tab
| Attribute | Description |
|---|---|
| Name (*) |
This input field contains the names of the printer group share, which is used by CUPS. The printer group appears under this name in Linux and Windows. The name may contain alphanumeric characters (i.e., uppercase and lowercase letters a to z and numbers 0 to 9) as well as hyphens and underscores. Other characters (including blank spaces) are not permitted. |
| Spool host (*) | A range of print servers (spoolers) can be specified here to expand the list of printers available for selection. Printers which are assigned to the servers specified here can then be adopted in the list from the selection arranged below them. |
| Samba name |
A printer group can also be assigned an additional name by which it can reached from Windows. Unlike the CUPS name (see Name), the Samba name may contain blank spaces and umlauts. The printer is then available to Windows under both the CUPS name and the Samba name. Using a Samba name in addition to the CUPS name is practical, for example, if the printer group was already in use in Windows under a name which contains blank spaces or umlauts. The printer group can then still be reached under this name without the need to reconfigure the Windows computers. |
| Group members | This list is used to assign printers to the printer group. |
| Enable quota support |
If quota were activated for this printer group, the quota settings on the tab apply. The print quota system needs to be installed for this, see [ext-print-doc]. |
| Price per page | The user is charged the value given in this input field for every page printed. The incurred costs are summarised in the user's account and used for the accurate calculation of print costs. If no value is specified, print costs will not be calculated. |
| Price per print job | The user is charged the value given in this input field for every print job. The incurred costs are summarised in the user's account and used for the accurate calculation of print costs. If no value is specified, print costs will not be calculated. |
The UMC module allows you to check the status of the connected printers, restart paused printers and remove print jobs from the queues on printer servers.
The start page of the module contains a search mask with which the available printers can be selected. The results list displays the server, name, status, print quota properties, location and description of the respective printer. The status of more than one printer can be changed simultaneously by selecting the printers and running either the or function.
The configuration of the print quota settings is documented in the extended documentation [ext-print-doc].
Clicking on the printer name displays details of the selected printer. The information displayed includes a list of the print jobs currently in the printer queue. These print jobs can be deleted from the queue by selecting the jobs and running the function.
Installing the univention-printserver-pdf package expands
the print server with a special printer type,
which converts incoming print jobs into PDF documents and add them in
a specified directory on the printer server where they are readable
for the respective user. After the installation of the
package, univention-run-join-scripts must be run.
The protocol must be selected when creating a PDF printer in Univention Management Console (see Section 12.4); the destination field remains empty.
PDF must be selected as and as .
The target directory for the generated PDF documents is set using
the Univention Configuration Registry variable cups/cups-pdf/directory. As standard it is set
to /var/spool/cups-pdf/%U so that cups-pdf uses a
different directory for each user.
Print jobs coming in anonymously are printed in the directory
specified by the Univention Configuration Registry variable cups/cups-pdf/anonymous (standard setting:
/var/spool/cups-pdf/).
In the default setting, generated PDF documents are kept without any restrictions. If the
Univention Configuration Registry variable cups/cups-pdf/cleanup/enabled is set to true,
old PDF print jobs are deleted via a Cron job. The storage time in days can be configured
using the Univention Configuration Registry variable cups/cups-pdf/cleanup/keep.
The printer shares set up in Univention Management Console can be added as network printers on Windows systems. This is done via the Control Panel under . The printer drivers need to be set up during the first access. If the drivers are stored on the server side (see below), the drivers are assigned automatically.
Printer shares are usually operated using the Windows printer drivers provided. The network printer can alternatively be set up on the Windows side with a standard PostScript printer driver. If a colour printer should be accessed, a driver for a PostScript-compatible colour printer should be used on the Windows side, e.g., HP Color LaserJet 8550.
The printer can only be accessed by a regular user when he has local permissions for driver installation or the respective printer drivers were stored on the printer server. If this is not the case, Windows may issue an error warning that the permissions are insufficient to establish a connection to the printer.
Windows supports a mechanism for providing the printer drivers on the print server (Point 'n' Print). The following guide describes the provision of the printer drivers in Windows 7 for a print share configured in the UMC. Firstly, the printer drivers must be stored on the print server. There are a number of pitfalls in the Windows user wizard, so it is important to follow the individual steps precisely.
INF files are required.
Now you need to start the program. Clicking on in the menu item allows you to add another server. The name of the printer server needs to be entered in the input field.
The newly added printer server should now be listed in the print management program. Clicking on displays the printer shares currently set up on the printer server.
Clicking on lists the saved printer drivers.
Clicking on in the menu item opens the dialogue window for the driver installation.
We recommend downloading the printer drivers directly from the manufacturer and selecting them during the driver installation.
If you are using an environment containing 64-bit versions of Windows, start by performing a check to see if the Univention Configuration Registry variable
samba/spoolss/architecture is set to Windows x64 on the UCS Samba system.
If this is not the case, both the 32-bit and the 64-bit drivers must be uploaded;
if your domain only uses 64-bit Windows systems, the 32-bit driver can be ignored.
The drivers for the different Windows architectures can be uploaded one after the other or together.
If both driver architectures are selected for uploading at the same time, the 64-bit driver should be selected first in the subsequent file selection window.
Once Windows has uploaded these files to the server, it asks for the location of the 32-bit drivers again.
They are then also uploaded to the server.
/var/lib/samba/drivers/ on the print server.
The print share now needs to be linked to the uploaded printer driver. To do so, the list of the printers available on the printer server is opened in the program. The properties can be listed there by double-clicking on the .
If no printer driver is saved, a message is displayed saying that there is no printer driver installed. The prompt to install the driver should be closed with here.
0x0000007a.
This can simply be ignored.
0x00000006, the printer settings must be checked again to see whether there is a manufacturer-specific tab called (or something similar).
If so, it should be opened and then simply confirmed with .
This closes the dialogue window and saves the printer drivers settings (PrinterDriverData)in the Samba registry.
Default DevMode) for the printer in the Samba registry.
The technical capacities of a printer are specified in so-called PPD files. These files include for example whether a printer can print in colour, whether duplex printing is possible, whether there are several paper trays, which resolutions are supported and which printer control languages are supported (e.g., PCL or PostScript).
In addition to the PPD files already included in the standard scope,
additional ones can be added via Univention Management Console. The PPDs are generally
provided by the printer manufacturer and need to be copied into
the /usr/share/ppd/ directory on the print servers.
The printer driver lists are administrated in
the UMC module . There you need
to switch to the univention container and then to
the cups subcontainer. Printer driver lists already exist
for the majority of printer manufacturers. These can be expanded or
new ones can be added.
Table 12.4. 'General' tab
| Attribute | Description |
|---|---|
| Name (*) | The name of the printer driver list. The name under which the list appears in the selection list on the tab for printer shares (see Section 12.4). |
| Driver |
The path to the ppd file or to the /usr/share/ppd/
directory. For example, if the /usr/share/ppd/laserjet.ppd
should be used, laserjet.ppd must be entered here. gzip
compressed files (file ending .gz) can also be entered here.
|
| Description | A description of the printer driver, under which it appears in the selection list on the tab for printer shares. |
Univention Corporate Server provides mail services that users can access both via standard mail clients such as Thunderbird and via the webmail interface Horde.
Postfix is used for sending and receiving mails. In the basic installation, a configuration equipped for local mail delivery is set up on every UCS system. In this configuration, Postfix only accepts mails from the local server and they can also only be delivered to local system users.
The installation of the mail server component implements a complete mail transport via SMTP (see Section 13.2). Postfix is reconfigured during the installation of the component so that a validity test in the form of a search in the LDAP directory is performed for incoming e-mails. That means that e-mails are only accepted for e-mail addresses defined in the LDAP directory or via an alias.
The IMAP service Dovecot is also installed on the system along with the mail
server component. It provides e-mail accounts for the domain users and
offers corresponding interfaces for access via e-mail clients.
Dovecot is preconfigured for the fetching of e-mails via IMAP and POP3.
Access via POP3 can be deactivated by setting the Univention Configuration Registry variable
mail/dovecot/pop3 to no. The same
applies to IMAP and the Univention Configuration Registry variable mail/dovecot/imap.
The further configuration of the mail server is performed via Univention Configuration Registry,
as well (see Section 13.8).
Since Univention Corporate Server version 4.0-2 Dovecot is used as the default IMAP and POP3 server. However, Cyrus is still available for this service. More Information can be found in the Cyrus mail server documentation [ext-doc-cyrus].
The management of the user data of the mail server (e.g., e-mail addresses or mailing list) is performed via Univention Management Console and is documented in Section 13.3 User data are stored in LDAP. The authentication is performed using a user's primary e-mail address, i.e., it must be entered as the user name in mail clients. As soon as a primary e-mail address is assigned to a user in the LDAP directory, a listener module creates an IMAP mailbox on the mail home server. By specifying the mail home server, user e-mail accounts can be distributed over several mail servers, as well (see Section 13.8.6).
Optionally, e-mails received via Postfix can be checked for spam content and viruses before further processing by Dovecot. Spam e-mails are detected by the classification software SpamAssassin (Section 13.4); ClamAV is used for the detection of viruses and other malware (Section 13.5).
In the default setting, e-mails to external domains are delivered directly to the responsible SMTP server of that domain. Its location is performed via the resolution of the MX record in the DNS. Mail sending can also be taken over by the relay host, e.g., on the Internet provider (see Section 13.8.1).
The Horde framework is available for web-based mail access (see Section 13.10). The UCS mail system does not offer any groupware functionality such as shared calendars or invitations to appointments. However, there are groupware systems based on UCS which integrate in the UCS management system such as Kolab, Zarafa and Open-Xchange. Further information can be found in the Univention App Center (see Section 5.3).
A mail server can be installed from the Univention App Center with the application Mail server. Alternatively, the software package univention-mail-server can be installed. Additional information can be found in Section 5.6. A mail server can be installed on all server system roles. The use of a domain controller is recommended because of frequent LDAP accesses.
The runtime data of the Dovecot server are stored in the
/var/spool/dovecot/ directory. If this directory
is on a NFS share, please read Section 13.8.7.
The webmail interface Horde can be installed via the Univention App Center (see Section 5.3).
A mail domain is an common namespace for e-mail addresses, mailing lists and IMAP group folders. Postfix differentiates between the delivery of e-mails between local and external domains. Delivery to mailboxes defined in the LDAP directory is only conducted for e-mail address from local domains. The name of a mail domain may only be composed of lowercase letters, the figures 0-9, full stops and hyphens.
Several mail domains can be managed with UCS. The managed mail domains
do not need to be the DNS domains of the server - they can be
selected at will.
The mail domains registered on a mail server are automatically
saved in the Univention Configuration Registry variable mail/hosteddomains.
To ensure that external senders can also send e-mails to members of the domain, MX records must be created in the configuration of the authoritative name servers, which designate the UCS server as mail server for the domain. These DNS adjustments are generally performed by an Internet provider.
Mail domains are managed in the UMC module Mail with the object type.
E-mail addresses can consist of the following characters: letters a-z, figures 0-9, dots, hyphens and underscores. The address has to begin with a letter and must include an @ character. At least one mail domain must be registered for to be able to assign e-mail addresses (see Section 13.3.1).
A user can be assigned two different types of e-mail addresses:
The primary e-mail address is used for authentication on Postfix and Dovecot. Primary e-mail addresses must always be unique. Only one primary e-mail address can be configured for every user. It also defines the user's IMAP mailbox. If a mail home server is assigned to a user (see Section 13.8.6), the IMAP inbox is automatically created by a Univention directory listener module. The domain part of the e-mail address must be registered in Univention Management Console (see Section 13.3.1).
E-mails to alternative e-mail addresses are also delivered to the user's mailbox. As many addresses can be entered as you wish. The alternative e-mail addresses do not have to be unique: if two users have the same e-mail address, they both receive all the e-mails which are sent to this address. The domain part of the e-mail address must be registered in Univention Management Console (see Section 13.3.1). To receive e-mails to alternative e-mail addresses, a user must have a primary e-mail address.
E-mail addresses are managed in the UMC module Users. The is entered in the tab in the submenu. can be entered under .
Once the user account is properly configured authentication to the mail stack
is possible (IMAP/POP3/SMTP). Please keep in mind that after disabling the account
or changing the password the login to the mail stack is still possible for 5min
due to the authentication cache of the mail stack.
To invalidate the authentication cache run
doveadm auth cache flush
on the mail server. The expiration time of the authentication cache can be
configured on the mail server with the Univention Configuration Registry variable
mail/dovecot/auth/cache_ttl and
mail/dovecot/auth/cache_negative_ttl.
Mailing lists are used to exchange e-mails in closed groups. Each mailing list has its own e-mail address. If an e-mail is sent to this address, it is received by all the members of the mailing list.
Mail domains are managed in the UMC module Mail with the object type. A name of your choice can be entered for the mailing list under ; the entry of a is optional. The e-mail address of the mailing list should be entered as the . The domain part of the address needs to be the same as one of the managed mail domains. As many addresses as necessary can be entered under . In contrast to mail groups (see Section 13.3.4), external e-mail addresses can also be added here. The mailing list is available immediately after its creation.
In the default settings, everyone can write to the mailing list. To
prevent misuse, there is the possibility of restricting the circle of
people who can send mails. To do so,
the Univention Configuration Registry variable mail/postfix/policy/listfilter on the mail server must
be set to yes and Postfix restarted.
and
can be specified under . If a field is set
here, only authorised users/groups are allowed to send mails.
There is the possibility of creating a mail group: This is where an e-mail address is assigned to a group of users. E-mails to this address are delivered to the primary e-mail address of each of the group members.
Mail groups are managed in the UMC module Groups (see Chapter 7).
The e-mail address of the mail group is specified in the input field under . The domain part of the address must be the same as one of the managed mail domains.
In the default settings, everyone can write to the mail group. To
prevent misuse, there is the possibility of restricting the circle of
people who can send mails. To do so,
the Univention Configuration Registry variable mail/postfix/policy/listfilter on the mail server must
be set to yes and Postfix restarted.
and can be specified under . If a field is set here, only authorised users/groups are allowed to send mails.
Shared e-mail access forms the basis for cooperation in many work groups. In UCS, users can easily create folders in their own mailboxes and assign permissions so that other users may read e-mails in these folders or save additional e-mails in them.
Alternatively, individual IMAP folders can be shared for users or user groups. This type of folder is described as a shared IMAP folder. Shared IMAP folders are managed in the UMC module Mail with the object type.
Shared folders cannot be renamed, therefore the Univention Configuration Registry variable
mail/dovecot/mailbox/rename is not taken into account. When a shared
folder is deleted in the UMC module Mail, it is
only deleted from the hard disk, if
mail/dovecot/mailbox/delete is set to yes. The default value is no.
Table 13.1. 'General' tab
| Attribute | Description |
|---|---|
| Name (*) |
The name under which the IMAP folder is available in the e-mail
clients. The name displayed in the IMAP client differs
depending on if an e-mail address is configured (see row
"E-Mail address" below) or not. If no e-mail address is
configured, the IMAP folder will be displayed in the
client as name@domain/INBOX. If an e-mail
address is configured, it will be shared/name@domain.
|
| Mail domain (*) | Every shared IMAP folder is assigned to a mail domain. The management of the domains is documented in the Section 13.3.1. |
| Mail home server (*) | An IMAP folder is assigned to a mail home server. Further information can be found in Section 13.8.6. |
| Quota in MB | This setting can be used to set the maximum total size of all e-mails in this folder. |
| E-Mail address |
An e-mail address can be entered here via which e-mails can be sent directly to the IMAP folder. If no address is set here, it is only possible to write in the folder from e-mail clients. The domain part of the e-mail address must be registered in Univention Management Console (see Section 13.3.1). |
Table 13.2. 'Access rights' tab
| Attribute | Description |
|---|---|
| Name (*) |
Access permissions based on users or groups can be entered here. Users are entered with their user name; the groups saved in Univention Management Console can be used as groups. The access permissions have the following consequences for individual users or members of the specified group:
|
The size of the users' mailboxes can be restricted via the mail quota. When this is attained, no further e-mails can be accepted for the mailbox by the mail server until the user deletes old mails from her account.
The limit is specified in megabytes in the field
under . The default value
is 0 and means that no limit is set.
The multi edit mode of Univention Management Console can be used to assign a quota to multiple
users at one time, see Section 4.2.3.3.
The user can be warned once a specified portion of the mailbox is attained and then receives a message that his available storage space is almost full. The administrator can enter the threshold in percent and the messages subject and text:
The threshold for when the warning message should be issued can
be configured in the Univention Configuration Registry variable
mail/dovecot/quota/warning/text/PERCENT=TEXT.
PERCENT must be a number between 0 and 100 without the percent
sign, TEXT will be the content of the e-mail.
If TEXT contains the string $PERCENT, it will be replaced in
the email with the value of the limit that has been exceeded.
The value of the Univention Configuration Registry variable mail/dovecot/quota/warning/subject
will be used for the subject of the e-mail.
When the mail server package is installed, a subject and two warning messages are automatically configured:
mail/dovecot/quota/warning/subject is set to Quota-Warning
mail/dovecot/quota/warning/text/80 is set to Your mailbox has filled up to over $PERCENT%.
mail/dovecot/quota/warning/text/95 is set to Attention: Your mailbox has already filled up to over $PERCENT%. Please delete some messages or contact the administrator.
Undesirable and unsolicited e-mails are designated as spam. The software SpamAssassin and Postgrey are integrated in UCS for the automatic identification of these e-mails. SpamAssassin attempts to identify whether an e-mail is desirable or not based on heuristics concerning its origin, form and content. Postgrey is a policy server for Postfix, which implements grey listing. Grey listing is a spam detection method which denies the first delivery attempt of external mail servers. Mail servers of spammers most often do not perform a second delivery attempt, while legitimate servers do so. Integration occurs via the packages univention-spamassassin and univention-postgrey, which are automatically set up during the installation of the mail server package.
SpamAssassin operates a point system, which uses an increasing number
of points to express a high probability of the e-mail being
spam. Points are awarded according to different criteria, for example,
keywords within the e-mail or incorrect encodings.
In the standard configuration only mails with a size of up to 300 kilobytes
are scanned, this can be adjusted using
the Univention Configuration Registry variable mail/antispam/bodysizelimit.
E-mails which are classified as spam - because they exceed a certain
number of points - are not delivered to the recipient's inbox by
Dovecot, but rather in the Spam folder below it.
The name of the folder for spam can be configured with the Univention Configuration Registry variable
mail/dovecot/folder/spam.
The filtering is performed by a Sieve script, which is automatically generated when
the user is created.
The threshold in these scripts as of which e-mails are declared to be spam can be
configured with the Univention Configuration Registry variable mail/antispam/requiredhits.
The presetting (5) generally does not need to be adjusted.
However, depending on experience in the local environment, this
value can also be set lower. This will, however, result in more
e-mails being incorrectly designated as spam.
Changes to the threshold do not apply to existing users, but the users
can change the value themselves in the Horde web client (see
Section 13.10.4).
There is also the possibility of evaluating e-mails with a Bayes
classifier. This compares an incoming e-mail with statistical data
already gathered from processed e-mails and uses this to adapt it's
evaluation to the user's e-mail.
The Bayes classification is controlled by the user himself, whereby
e-mails not identified as spam by the system can be placed in the Spam
subfolder by the user and a selection of legitimate e-mails copied into
the Ham (mail/dovecot/folder/ham) subfolder. This folder is evaluated daily and data
which have not yet been collected or were previously classified
incorrectly are collected in a shared database. This evaluation is
activated in the default setting and can be configured with
the Univention Configuration Registry variable mail/antispam/learndaily.
The spam filtering can be deactivated by setting
the Univention Configuration Registry variable mail/antivir/spam to no.
When modifying Univention Configuration Registry variables concerning spam
detection, the AMaViS service and Postfix must be restarted subsequently.
The UCS mail services include virus and malware detection via
the univention-antivir-mail package, which is automatically
set up during the set up of the mail server package. The virus scan
can be deactivated with the Univention Configuration Registry variable mail/antivir.
All incoming and outgoing e-mails are scanned for viruses. If the
scanner recognises a virus, the e-mail is sent to
quarantine. That means that the e-mail is stored on the server where
it is not accessible to the user. The original recipient receives a
message per e-mail stating that this measure has been taken. If
necessary, the administrator can restore or delete this from
the /var/lib/amavis/virusmails/ directory. Automatic deletion
is not performed.
The AMaViSd-new software serves as an interface between the mail server and different virus scanners. The free virus scanner ClamAV is included in the package and enters operation immediately after installation. The signatures required for virus identification are procured and updated automatically and free of charge by the Freshclam service.
Alternatively or in addition, other virus scanners can also be integrated in AMaViS. Postfix and AMaViS need to be restarted following changes to the AMaViS or ClamAV configuration.
Another means of combating spam is to use a DNS-based Blackhole List (DNSBL) or Real-time Blackhole List (RBL). DNSBLs are lists of IP addresses that the operator believes to be (potential) sources of spam. The lists are checked by DNS. If the IP of the sending e-mail server is known to the DNS server, the message is rejected. The IP address is checked quickly and in a comparatively resource-friendly manner. The check is performed before the message is accepted. The extensive checking of the content with SpamAssassin and anti-virus software is only performed once it has been received. Postfix has integrated support for DNSBLs (http://www.postfix.org/postconf.5.html#reject_rbl_client).
DNSBLs from various projects and companies are available on the Internet. Please refer to the corresponding websites for further information on conditions and prices.
The Univention Configuration Registry variable mail/postfix/smtpd/restrictions/recipient/ must be set to be able to use DNSBLs with Postfix.
It can be used to configure recipient restrictions via the Postfix option smtpd_recipient_restrictions (see http://www.postfix.org/postconf.5.html#smtpd_recipient_restrictions).
The sequential number is used to sort multiple rules alphanumerically, which can be used to influences the ordering.
SEQUENCE=RULE
Existing smtpd_recipient_restrictions regulations can be listed as follows:
ucr search --brief mail/postfix/smtpd/restrictions/recipient
In an unmodified Univention Corporate Server Postfix installation, the DNSBL should be added to the end of the smtpd_recipient_restrictions rules. For example:
ucr set mail/postfix/smtpd/restrictions/recipient/80="reject_rbl_client ix.dnsbl.manitu.net"
Usually, the UCS mail service accepts mails for the users of the UCS domain directly via SMTP. UCS also offers optional integration of the software Fetchmail for fetching emails from external POP3 or IMAP mailboxes.
Fetchmail can be installed via the Univention App Center; simply select the application and then click on .
Once the installation is finished, there are additional input fields in the tab of the user administration which can be used to configure the collection of mails from an external server. The mails are delivered to the inboxes of the respective users (the primary e-mail address must be configured for that).
The mail is fetched every twenty minutes once at least one e-mail address is configured for
mail retrieval. After the initial configuration of a user Fetchmail needs to be started in the
UMC module . In that module the fetching can
also be disabled (alternatively by setting the Univention Configuration Registry variable fetchmail/autostart
to false).
Table 13.3. 'Remote mail retrieval' tab'
| Attribute | Description |
|---|---|
| Username | The user name to be provided to the mail server for fetching mail. |
| Password | The password to be used for fetching mail. |
| Protocol | The mail can be fetched via the IMAP or POP3 protocols. |
| Remote mail server | The name of the mail server from which the e-mails are to be fetched. |
| Encrypt connection (SSL/TLS) | If this option is enabled, the mail is fetched in an encrypted form (when this is supported by the mail server). |
| Keep mails on the server | In the default settings, the fetched mails are deleted from the server following the transfer. If this option is enabled, it can be suppressed. |
In the default setting, Postfix creates a direct SMTP connection to the mail server responsible for the domain when an e-mail is sent to a non-local address. This server is determined by querying the MX record in the DNS.
Alternatively, a mail relay server can also be used, i.e., a server
which receives the mails and takes over their further sending. This
type of mail relay server can be provided by a superordinate corporate
headquarters or the Internet provider, for example. To set a relay
host, it must be entered as a fully qualified domain name (FQDN) in
the Univention Configuration Registry variable mail/relayhost.
If authentication is necessary on the relay host for sending,
the Univention Configuration Registry variable mail/relayauth must be set to yes and
the /etc/postfix/smtp_auth file edited. The relay host,
user name and password must be saved in this file in one line.
FQDN-Relayhostusername:password
The command
postmap /etc/postfix/smtp_auth
must then be executed for this file to adopt the changes via Postfix.
The Univention Configuration Registry variable mail/messagesizelimit can be used to set the maximum
size in bytes for incoming and outgoing e-mails. Postfix must be restarted after modifying the setting.
The preset maximum size is 10240000 bytes. If the value is configured to
0 the limit is effectively removed.
Please note that e-mail attachments are enlarged by approximately a third due to the base64
encoding.
If Horde (see Section 13.10) is used, the Univention Configuration Registry variables
php/limit/filesize and php/limit/postsize must also be
adjusted. The maximum size in megabytes must be entered as the value in both variables. Then
the Apache web server has to be restarted.
If the Univention Configuration Registry variable mail/archivefolder is set to an e-mail address,
Postfix sends a blind carbon copy of all incoming and outgoing e-mails to
this address. This results in an archiving of all e-mails. The e-mail
address must already exist. It can be either one already registered in
Univention Corporate Server as the e-mail address of a user, or an e-mail account with
an external e-mail service. As standard the variable is not set.
Postfix must then be restarted.
If a number of error situations (e.g., for non-existent users) the
result may be a mail bounce, i.e., the mail cannot be delivered and is
returned to the sender. When Univention Configuration Registry variable mail/postfix/softbounce is set
to yes e-mails are never returned after a bounce, but instead
are held in the queue. This setting is particularly useful during
configuration work on the mail server.
A user's mailbox is linked to the primary e-mail address and not to
the user name. The Univention Configuration Registry variable mail/dovecot/mailbox/rename can be used to
configure the reaction when the primary e-mail address is changed:
If the variable is set to yes, the name of
the user's IMAP mailbox is changed. This is the standard setting since UCS 3.0.
If the setting is no, it will not be
possible to read previous e-mails any more once the user's primary e-mail
address is changed! If another user is assigned a previously used primary
e-mail address, she receives access to the old IMAP structure of this mailbox.
The Univention Configuration Registry variable mail/dovecot/mailbox/delete can be used to configure, whether
the IMAP mailbox is also deleted. The value yes activates the removal of the corresponding IMAP mailbox if one of the following actions is performed:
With default settings (no) the mailboxes are kept if one of the actions above is performed.
The combination of the two variables creates four possible outcomes when the e-mail address is changed:
Table 13.4. Renaming of e-mail addresses
| mail/dovecot/mailbox/… | Meaning |
|---|---|
rename=yes and delete=no (Default)
| The existing mailbox will be renamed. E-mails will be preserved and will be accessible at the new address. |
rename=yes and delete=yes
| The existing mailbox will be renamed. E-mails will be preserved and will be accessible at the new address. |
rename=no and delete=no
| A new, empty mailbox will be created. The old one will be preserved on disk with the old name and will thus not be accessible to users. |
rename=no and delete=yes
| A new, empty mailbox will be created. The old one will be deleted from the hard disk. |
The UCS mail system offers the possibility of distributing users across several mail servers. To this end, each user is assigned a so-called mail home server on which the user's mail data are stored. When delivering an e-mail, the responsible home server is automatically determined from the LDAP directory.
It must be observed that global IMAP folders (see Section 13.3.5) are assigned to a mail home server.
If the mail home server is changes for a user, the user's mail data is not moved to the server automatically.
Dovecot supports storing e-mails and index files on cluster filesystems and on NFS. Some settings are necessary to prevent data loss in certain situations.
The following settings assume that mailboxes are not accessed simultaneously by multiple servers. This is the case if for each user exactly one mail home server has been configured.
mail/dovecot/process/mmap_disable = yesmail/dovecot/process/dotlock_use_excl = yesmail/dovecot/process/mail_fsync = always
To achieve higher performance, index files can be kept on the local servers
disk, instead of storing them together with the messages on NFS. The index
files can then be found at /var/lib/dovecot/index/.
To activate this option, set Univention Configuration Registry variable
mail/dovecot/location/separate_index = yes.
With the above settings the mail server should work without problems on NFS. There are however a lot of different client and server systems in service. In case you encounter problems, here are some notes that might help:
mail/dovecot/process/dotlock_use_excl = no.mail/dovecot/process/lock_method = dotlock. This does lower the performance, but solves most locking related errors.mail/dovecot/process/mail_nfs_storage = yes, but unfortunately this doesn't work 100%, so you can get random errors. The same holds for flushing NFS caches after writing index files with mail/dovecot/process/mail_nfs_index = yes.
In a default Univention Corporate Server configuration Dovecot allows 400 concurrent IMAP and POP3 connections each. That is enough to serve at least 100 concurrently logged in IMAP users, possibly a lot more. How many IMAP connections are opened by a user depends on the clients they use. Webmail opens just a few short lived connections. Desktop clients keep multiple connections open over a long period of time. Mobile clients keep just a few connections open over a long period of time. But they tend to never close them, unnecessarily wasting resources. The limits exist mainly to resist denial of service attacks that open a lot of connections and create lots of processes.
To list the open connections, run:
doveadm who
To display the total amount of open connections, run:
doveadm who -1 | wc -l
The Univention Configuration Registry variables mail/dovecot/limits/* can be set to modify the limits.
The process of adapting those variables is only semi automatic, because of their complex interaction.
For the meaning of each variable refer to the Dovecot documentation: [dovecot-wiki-services]
Dovecot uses separate processes for login and to access emails.
The limits for these can be configured separately.
The maximum number of concurrent connections to a service and the maximum number of processes for a service is also configured separately.
Setting mail/dovecot/limits/default_client_limit = 3000 changes the limit for the maximum number of concurrent connections to the IMAP and POP3 services but does not change the maximum number of processes allowed to run.
With the Univention Corporate Server default settings Dovecot runs in "High-security mode": each connection is served by a separate process.
The default is to allow only 400 processes, so only 400 connections can be made.
To allow 3000 clients to connect to their emails, another Univention Configuration Registry variable has to be set:
ucr set mail/dovecot/limits/default_client_limit=3000
ucr set mail/dovecot/limits/default_process_limit=3000
doveadm reload
Reading /var/log/dovecot.info reveals a warning:
config: Warning: service auth { client_limit=2000 } is lower than required under max. load (15000)
config: Warning: service anvil { client_limit=1603 } is lower than required under max. load (12003)
The services auth (responsible for login and SSL connections) and anvil (responsible for statistics collection) are set to their default limits.
Although 3000 POP3 and IMAP connections and processes are allowed, the connection limit for the login service is too low.
Leaving it like this will lead to failed logins.
The values are so high, because default_client_limit and default_process_limit do not only lift limits for IMAP and POP3, but also for other services like lmtp and managesieve-login.
Those services can now start more processes that have to be monitored and can theoretically make more authentication requests.
This increases the number of possible concurrent connections to the auth and anvil services.
The values have to be adapted, using the numbers from the log file:
ucr set mail/dovecot/limits/auth/client_limit=15000
ucr set mail/dovecot/limits/anvil/client_limit=12003
doveadm reload
Another warning appears in /var/log/dovecot.info:
master: Warning: fd limit (ulimit -n) is lower than required under max. load (2000 < 15000), because of service auth { client_limit }
The Linux kernel controlled setting ulimit setting (limit on the number of files/connections a process is allowed to open) is changed only when the Dovecot service is restarted:
invoke-rc.d dovecot restart
No more warnings are written to the log file and both IMAP and POP3 servers now accept 3000 client connections each.
Univention Corporate Server configures Dovecot to run in "High-security mode" by default. For installations with 10.000s of users, Dovecot offers the "High-performance mode". The performance guide has further details on how to configure it: [ucs-performance-guide].
The use of IMAP is recommended for using a mail client with the UCS mail server. STARTTLS is used to switch to a TLS-secured connection after an initial negotiation phase when using SMTP (for sending mail) and IMAP (for receiving/synchronising mail). Password (plain text) should be used in combination with STARTTLS as the authentication method. The method may have a different name depending on the mail client. The following screenshot shows the setup of Mozilla Thunderbird as an example.
UCS integrates a number of applications from the Horde framework for web access to e-mails and web-based administration of server-side e-mail filter rules based on Sieve. Horde can be installed via the Univention App Center (see Section 5.3).
The Horde login mask is linked on the system overview page (see Section 4.2.1) under and can
be opened directly at http://SERVERNAME/horde/.
Either the UCS user name or the primary e-mail address can be used as the user name. The webmail interface can be used in a number of display modes. The preferred version can be selected under . We recommend the use of the dynamic interface for standard workstations. The remaining documentation refers to this version. Selecting the has no effect in many web browsers, as the browser's preferred language settings take precedence.
In the top toolbar there are a number or menu points (e.g., and ), which can be used to switch between the individual modules.
The user can personalise Horde by clicking the cog symbol.
Horde offers all the standard functions of an e-mail client such as the sending, forwarding and deletion of e-mails. E-mails can be sorted in folders and are stored in as standard. A Sent folder is created automatically the first time an e-mail is sent.
Horde differentiates between two types of deletion: An e-mail deleted with is initially moved to the Trash folder. From there, it can be moved into any other folder as long as the trash can has not been emptied with .
This module is used to administrate e-mail addresses and additional contact information. The information compiled here are saved in Horde's own SQL database.
Contact information found using the simple or advanced search can then be copied into individual address books and edited there. New contacts can be entered via the menu item. Personal address books can also be created via .
The menu item can be used to display the contents of address books. The lists can be sorted alphabetically by clicking on the preferred column title (surname, first name, etc.). Clicking on the magnifying glass in the header of the respective address book (directly next to the name of the address book) opens a search field that can be used easily to search within the open address book. Individual addresses in a list can be marked with an X for subsequent use, i.e., to export them as a file in a certain file format or to copy them into another address book.
Dovecot supports server-side filter scripts written in an individual script language called Sieve. The filter module allows the generation of these filter scripts. They apply generally and thus also apply for users accessing their inboxes via a standard mail client.
Filters can be edited and expanded
under . The filters are applied to incoming e-mails
in the consecutively numbered order. Their position can be altered either
using the arrows to the right or by entering a number in
the Move column directly. Individual filter rules can be
switched on and off in the Enabled column.
The filter can be used user-specifically to set which spam threshold should apply. The specified is the SpamAssassin threshold. An e-mail which returns this value will be sent to the specified folder.
A filter can be used to specify a period in which incoming e-mails are automatically replied to with an answer e-mail by the mail server. The text and subject of the e-mail can be selected as required.
can be used to create new rules, e.g., for the automatic sorting of incoming mails into topic-specific mail folders.
Clicking on displays the source text of the generated Sieve script.
With the help of the Nagios software, it is possible to verify the correct function of complex IT structures from networks, computers and services continually and automatically.
Nagios has a comprehensive collection of monitoring modules, the so-called Nagios plugins. In addition to polling system indicators (e.g., CPU and memory utilisation, free disk space), they also allow to test the availability and function of different services (e.g., SSH, SMTP, HTTP). Simple program steps such as the delivery of a test e-mail or the resolution of a DNS record are generally performed for the function tests. In addition to the standard plugins included in Nagios, the UCS-specific plugins are also provided, with which the listener/notifier replication can be monitored, for example.
Nagios differentiates between three basic operating statuses for a service:
When the operating status changes, a contact person specified in advance can be informed of the possible malfunction. In addition to the reactive notification in case of error, the current status can also be checked at any time continually in a web-based interface in which the status information is displayed in a compact manner.
Nagios is composed of three main components:
The Nagios configuration is performed in Univention Management Console, the Nagios configuration files are automatically generated from the information stored in the LDAP directory.
A Nagios server can be installed from the Univention App Center with the application
Network monitoring (Nagios). Alternatively, the software package
univention-nagios-server can be installed (subsequently
univention-run-join-scripts must be run). Additional information can be
found in Section 5.6. The Nagios server
can be installed on any system role; the use of a domain controller system is recommended.
The Nagios client is installed by default on all system roles.
In addition to the standard plugins provided with the installation of the univention-nagios-client package, additional plugins can be subsequently installed with the following packages:
Some of the packages are automatically set up during installation of the respective services. For example, if the UCS AD connector is set up, the monitoring plugin is included automatically.
During the installation, basic Nagios tests are set up automatically for UCS systems. The mounting of additional services in documented in the Section 14.3.1.
| Nagios service | Description |
|---|---|
UNIVENTION_PING |
tests the availability of the monitored UCS system
with the command ping.
In the default setting, an error status is attained
if the response time exceeds 50 ms or 100 ms or package
package losses of 20% or 40% occur.
|
UNIVENTION_DISK_ROOT |
monitors how full the / partition
is. An error status is raised if the remaining free space falls
below 25% or 10% in the default setting.
|
UNIVENTION_DNS |
tests the function of the local DNS server and the
accessibility of the public DNS server by querying the hostname
www.univention.de.
If no DNS forwarder is defined for the UCS domain, this request fails.
In this case, www.univention.de can be replaced
with the FQDN of the domain controller master for example,
in order to test the function of the name resolution.
|
UNIVENTION_LDAP | monitors the LDAP server running on UCS domain controller systems. |
UNIVENTION_LOAD | monitors the system load. |
UNIVENTION_NTP | requests the time from the NTP service on the monitored UCS system. If this deviates by more than 60 or 120 seconds, the error status is attained. |
UNIVENTION_SMTP | tests the mail server. |
UNIVENTION_SSL | tests the remaining validity period of the UCS SSL certificates. This plugin is only suitable for master domain controller and backup domain controller systems. |
UNIVENTION_SWAP | monitors the utilisation of the swap partition. An error status is raised if the remaining free space falls below the threshold (40% or 20% in the default setting). |
UNIVENTION_REPLICATION |
monitors the status of the LDAP replication
and recognises the creation of a failed.ldif
file and the standstill of the replication
and warns of large differences between the transaction IDs.
|
UNIVENTION_NSCD | tests the availability of the name server cache daemon. If there is no NSCD process running, a CRITICAL event is triggered; if more than one process is running, a WARNING. |
UNIVENTION_WINBIND | tests the availability of the Winbind service. If no process is running, a CRITICAL event is triggered. |
UNIVENTION_SMBD | tests the availability of the Samba service. If no process is running, a CRITICAL event is triggered. |
UNIVENTION_NMBD | tests the availability of the NMBD service, which is responsible for the NetBIOS service in Samba. If no process is running, a CRITICAL event is triggered. |
UNIVENTION_JOINSTATUS | tests the join status of a system. If a system has yet to join, a CRITICAL event is triggered; if non-run join scripts are available, a WARNING event is returned. |
UNIVENTION_KPASSWD | tests the availability of the Kerberos password service (only available on domain controller master/backup). If fewer or more than one process is running, a CRITICAL event is triggered. |
UNIVENTION_CUPS |
monitors the CUPS daemon.
If there is no cupsd process running or the web interface
on port 631 is not accessible, the CRITICAL status is returned.
|
UNIVENTION_DANSGUARDIAN | monitors the DansGuardian web filter. If no DansGuardian process is running or the DansGuardian proxy is not accessible, the CRITICAL status is returned. |
UNIVENTION_SQUID | monitors the Squid proxy. If no squid process is running or the Squid proxy is not accessible, the CRITICAL status is returned. |
UNIVENTION_LIBVIRTD_KVM |
tests the status of a KVM virtualization server
via a request to virsh
and returns CRITICAL if the request takes longer than ten seconds.
|
UNIVENTION_LIBVIRTD_XEN |
tests the status of a Xen virtualization server
via a request to virsh
and returns CRITICAL if the request takes longer than ten seconds.
|
UNIVENTION_UVMMD | tests the status of the UCS Virtual Machine Manager by requesting the available nodes. If they cannot be resolved, CRITICAL is returned. |
Default parameters have been set for the services listed above, which are customised to the requirements of most UCS installations. If the default parameters are not suitable, they can also be altered subsequently. This is documented in Section 14.3.1.
The following Nagios services are only available on the respective Nagios client once additional packages have been installed (see Section 14.2):
| Nagios service | Description |
|---|---|
UNIVENTION_OPSI |
monitors the opsi daemon. If no opsi process is running or the opsi proxy is not accessible, the CRITICAL status is returned. |
UNIVENTION_SMART_SDA |
tests the S.M.A.R.T. status of the hard drive |
UNIVENTION_RAID |
tests the status of the software RAID via |
UNIVENTION_ADCONNECTOR |
Checks the status of the AD connector. If no connector process is running, CRITICAL is reported; if more than one process is running per connector instance, a WARNING is given. If rejects occur, a WARNING is given. If the AD server cannot be reached, a CRITICAL status occurs. The plugin can also be used in multi-connector instances; the name of the instance must be passed on as a parameter. |
The following settings can be performed in Univention Management Console:
In the basic setting, there is already a large number of tests defined for each computer, e.g., a Nagios basic configuration is set up without the need for any further adjustments.
A Nagios service defines the monitoring of a service. Any number of computers can be assigned to such an object so that the Nagios plugins to be used and the testing and notification parameters of a service test can be set up on the specified computers with only one entry.
Nagios services are administrated in the UMC module Nagios with the object type (see Section 4.2). Nagios has no LDAP interface for the monitoring configuration, instead the configuration files are generated by a listener module when adding/removing/editing a Nagios service.
Table 14.1. 'General' tab
| Attribute | Description |
|---|---|
| Name |
An unambiguous name for the Nagios service. |
| Description |
Any description of the service. |
| Plugin command |
The plugin command to be requested. Each plugin command specifies a
predefined plugin execution. These are defined in the configuration
files in the |
| Plugin command arguments |
As not all parameters of the Nagios plugins are predefined in the
plugin commands, it often proves necessary to enter additional
parameters. The parameters specified here are separated by exclamation
marks, e.g., |
| Use NRPE |
If the test of a service cannot be performed remotely (e.g., of the available drive space on the root partition), the plugin can be executed on a distant UCS system via the Nagios Remote Plugin Executor Daemon (NRPED). To do so, the univention-nagios-client package must be installed. |
Table 14.2. 'Interval' tab (advanced settings)
| Attribute | Description |
|---|---|
| Check interval |
The check interval defines the interval of time in minutes between two service tests. |
| Retry check interval |
If the last service test does not return the status OK, Nagios uses a different time interval for the further tests. The test frequency can be increased in this way in the case of error. If the status OK has not yet been attained, Nagios continues to use the regular check interval. The value is specified in minutes. |
| Maximum number of check attempts |
If the check returns a not OK status, the number of tests specified here is waited before the contact persons are notified. If the service reattains the OK status again before reaching the limit specified here, the internal counter is reset and there is no notification. NoteThe time delay for a notification is arranged both according to the maximum number of check attempts and to the retry check interval. At a retry check interval of two minutes and a maximum number of check attempts of 10, the first notification is performed after 20 minutes. |
| Check period |
It is possible to specify a test period in order to impose time restrictions on a service test. There are no tests outside this period of time and consequently also no notifications. This can be useful for devices or services, which are deactivated at night. |
Table 14.3. 'Notification' tab (advanced settings)
| Attribute | Description |
|---|---|
| Notification interval |
If an error occurs for a service, the contact persons are repeatedly notified in the interval specified here. A value of 0 deactivates the repeated notification. The value is specified in minutes. For example, if an interval of 240 were set, a notification would be sent every four hours. |
| Notification period |
Notifications are only sent to the contact persons during the period specified here. If a service changes to the not-OK status outside of the period specified, the first notification is only sent once the specified period is reached, assuming the not-OK status continues that long. NoteNotifications of errors which begin and end outside of the specified period are not repeated. |
| Notify if service state changes to WARNING |
Configures whether a notification is sent when the service status changes to WARNING (see Section 14.1). |
| Notify if service state changes to CRITICAL |
Configures whether a notification is sent when the service status changes to CRITICAL (see Section 14.1). |
| Notify if service state changes to UNREACHABLE |
If a computer object is subordinate to another object (see Section 14.3.3), the status can no longer be requested in the case of error. This option can be used to configure whether a notification is triggered. |
| Notify if service state changes to RECOVERED |
Configures whether a notification is sent when an error/warning/unaccessibility status is corrected to normal status. Notifications are only sent when the "RECOVERED" status is attained if a notification was sent for the original problem ("WARNING"/"CRITICAL"/"UNREACHABLE") in advance. |
Table 14.4. 'Hosts' tab
| Attribute | Description |
|---|---|
| Assigned hosts |
The service test is performed for/on the computers assigned here. |
Nagios period objects are used by Nagios services to specify periods in which the service test should be performed or contact persons should be notified. Specification of the period is performed separately for each weekday.
Nagios services are administrated in the UMC module Nagios with the object type (see Section 4.2).
Nagios has no LDAP interface for the monitoring configuration, instead the configuration files are generated by a listener module when adding/removing/editing a Nagios time period.
Three standard periods are set up during the installation. The automatically created periods can be altered or deleted manually. However, they are used by the automatically created Nagios services to some extent. It is thus important to note that it is only possible to delete a Nagios period once it is no longer employed by any Nagios services:
| Nagios time period | Description |
|---|---|
| 24x7 |
This object defines a period starting on Monday at 0:00 and ending on Sunday at 24:00 without any interruptions. |
| WorkHours |
Defines the period from 8 a.m. to 4 p.m. from Monday to Friday respectively. |
| NonWorkHours |
The opposite to the Nagios period WorkHours, this period covers the time from midnight to 8 a.m. and from 4 p.m. to midnight from Monday to Friday respectively and from 0:00 to 24:00 on Saturday and Sunday. |
Table 14.5. 'General' tab
| Attribute | Description |
|---|---|
| Name |
An unambiguous name for the Nagios time period. |
| Description |
Any description. |
| Monday - Sunday |
This field contains a list of time periods. If there should be no period defined for a weekday, this weekday field should be left empty. The entry of the period always requires two-figure hour and minute entries separated by a colon. Start and end points are separated by a hyphen. If several periods are to be defined for one weekday, these can be entered in the text field separated by a comma. A whole day is represented by the period 00:00-24:00, e.g., 08:00-12:00,12:45-17:00. |
All the computer objects that can be administrated with Univention Management Console can be monitored with Nagios. Nagios services can only be assigned to a computer object if an IP address and a corresponding entry for the DNS forward zone are specified for it. The option must be switched on on the computer object in question to be able to activate the Nagios support. After activation there are two additional groups of input fields available beneath the tab . These can be used to assign the Nagios services conveniently among other things.
Table 14.6. 'Nagios services' tab (advanced settings)
| Attribute | Description |
|---|---|
| Assigned Nagios services |
All the Nagios services that are checked for the current computer are listed here. Parallel to this, the assignment of computers on the Nagios service object is also possible. |
Table 14.7. 'Nagios notification' tab (advanced settings)
| Attribute | Description |
|---|---|
| Email addresses of Nagios contacts |
This list contains the e-mail address of contact persons who should be
notified in the case of a problem. If no e-mail addresses are
specified here, the local |
| Parent hosts |
The entry of superordinate computers can be used to define dependencies between computers. Nagios continually tests whether the individual computers can be accessed. Should a superordinate computer not be accessible, no notifications of service faults are sent to the subordinate computer. Nagios also uses the specified dependencies in the user interface for graphic display. NoteNo loops must occur when the superordinate computers are entered. In that case, the Nagios server would not adopt the new configuration and not be able to be started. |
If you wish to add expansions to the Nagios server configuration files
created by the listener module, the manually created configuration
files can be stored in the /etc/nagios3/conf.local.d/
directory. The added configuration files are only taken into account
after the next restart of the server.
Expansions to the NRPE configurations can be stored in
the /etc/nagios/nrpe.local.d/ directory. Changes are only
applied after the next restart of the Nagios NRPE Daemon.
The Nagios interface is linked on the system overview page (see Section 4.2.1) under and can
be opened directly at http://SERVERNAME-OR-IP/nagios/.
Access is only granted for users in the Domain Admins
group (e.g., the Administrator) in the default setting. There is also
the possibility of expanding the circle of those authorised to log in.
The preconfigured Nagios plugins supplied with UCS can be complemented with additional plugins. A variety of available modules can be found at https://exchange.nagios.org/.
This section describes the integration of an external plugin taking the plugin
check_e2fs_next_fsck as an example. The plugin checks whether a file system
check is scheduled and emits a warning if one is scheduled within seven days and an error status
if a file system check is scheduled for the next reboot.
The installation differs depending on whether the plugin is run via NRPE or not:
/usr/lib/nagios/plugins/ directory on all Nagios servers and on all
the systems to be checked.
/usr/lib/nagios/plugins/ directory on the Nagios server(s).
The plugin must be marked as an executable file (chmod a+x PLUGIN).
Some plugins are exclusively written in Perl, Python or Shell and do not require any external libraries or programs. These interpreters are always installed on all UCS systems. In contrast, if the plugin uses external programs or libraries, it must be ensured that these are installed on all the systems to be checked (for NRPE plugins) or on the Nagios servers (for remote plugins).
The Nagios plugin must now be registered. This is done using a macro in the
/etc/nagios-plugins/config/ directory. For this, a file such as
local.cfg can be used, in which all the locally registered plugins are
entered. The following example registers the plugin check_e2fs_next_fsck:
define command{
  command_name   check_fsck
  command_line   /usr/lib/nagios/plugins/check_e2fs_next_fsck
}
Many plugins also use parameters to configure the thresholds for warnings and errors. These are determined in the command_line line. Similarly to the plugin itself, the macro file must also be copied onto all the systems to be monitored when using NRPE. The plugins, macros and any dependencies can also be bundled in a Debian package. Further information is available in [developer-reference].
The Nagios service must now be restarted:
/etc/init.d/nagios3 restart
The new plugin then only needs to be registered in Univention Management Console as a
, see Section 14.3.1. The name registered under
command_name in the macro file must be entered as the
, in this example check_fsck, and the
option enabled.
The newly registered service can now be assigned to individual systems, see Section 14.3.3.
UCS Virtual Machine Manager (UVMM) is a tool for the administration of hybrid cloud environments. It allows central monitoring and administration of KVM virtualization servers registered in the UCS domain and virtual machines operated on it. In addition, virtual machines can be administered in OpenStack or EC2 environments. The administration is performed via the Univention Management Console module Virtual machines.
In principle, any operating system can be used on the virtualized systems.
UCS Virtual Machine Manager can be installed from the Univention App Center with the application UCS Virtual Machine Manager. Alternatively, the software package univention-virtual-machine-manager-daemon can be installed. Additional information can be found in Section 5.6.
Administration of OpenStack cloud instances is possible directly after installation of the application with the Univention Management Console module Virtual machines (UVMM). The Amazon EC2 Cloud Connection application needs to be installed for the administration of virtual machines in the Amazon EC2 cloud.
To add a KVM virtualization server for the administration via UCS Virtual Machine Manager locally, the KVM virtualization server application must be installed on a server of the domain from the Univention App Center. The application can also be selected directly during the installation of a new UCS server. Alternatively, the software package univention-virtual-machine-manager-node-kvm can be installed.
CPU virtualization support is mandatory for the operation of KVM. This is provided by almost all current x86 CPUs. For more information, consult the KVM project website: http://www.linux-kvm.org/.
Additionally, the architecture must also be taken into account during installation of a virtualization server. 64-bit systems can only be virtualized on UCS systems which are installed using the amd64 architecture. A 64-bit system (amd64) is recommended for use as the virtualization server.
UCS Virtual Machine Manager supports connections to OpenStack. Installation of the application Amazon EC2 cloud connection makes administration of virtual machines on the Amazon EC2 cloud possible.
To create a new connection, the Univention Management Console module Virtual machines (UVMM) must be opened. Clicking on opens a wizard in which the entry needs to be selected. In the drop-down field that appears you can now select the type of connection. Clicking on starts the set-up wizard. Once you have made the settings, clicking on creates the connection. If an error occurs, it is displayed and the connection settings can be corrected. If the connection is established successfully, a wait animation is shown while the connection-specific information for the cloud connection is loaded. This covers for example the existing instances and available images for creating new instances.
The following settings need to be made in the set-up wizard for creating a connection to an OpenStack instance:
Table 15.1. Fields when setting up an OpenStack connection
| Attribute | Description |
|---|---|
| Name | Sets the name of the connection. This will later be shown in the tree view of the Univention Management Console module. |
| Username | The user name to be used for authentication for OpenStack. |
| Use the following authentication type |
There are two options to choose from. The corresponding value is entered in the
field below.
|
| Authentication URL endpoint |
The URL under which the authentication end point of the OpenStack instance can
be reached should be entered here. If you want to establish an encrypted
connection, the URL should be entered in the form
https://[...]. As the public certificate for the OpenStack
instance is used for the encrypted connection, this certificate needs to be made
available on the UCS system on which the UCS Virtual Machine Manager application
is installed. To this end, the public certificate must be copied into the
/usr/local/share/ca-certificates/ directory on the UCS
server in PEM encryption and furnished with the suffix .crt. The following
commands convert a certificate into the correct encryption and make the
certificate known.
openssl x509 -in [path/to/openstack-certificate] \
	-outform pem -out /usr/local/share/ca-certificates/openstack.crt

update-ca-certificates
The public certificate of the OpenStack authentication end point should be taken from the configuration of the OpenStack instance. The corresponding value to the certificate's path can be found under ca_certs in keystone.conf.
|
| Search pattern for images | To create a new virtual machine, only the images that correspond to the configured search template are used as source images. The default value "*" (asterisk) is used to show all available images. |
| Project / tenant | The project or tenant name assigned to the user within the OpenStack environment. |
| Service region |
The name of the region in which the user should work. The OpenStack default
value is regionOne.
|
| Service type |
The type of the service under which the cloud compute function is available. The
default value is compute.
|
| Service |
The name of the service under which the cloud compute function is available. The
default value is nova.
|
| Service URL endpoint | Optional value: The URL of the service end point is normally determined automatically when the user logs on to OpenStack. Should automatically determination not be possible, the corresponding URL can be entered here. |
The following settings need to be made in the set-up wizard for creating a connection to Amazon EC2:
Table 15.2. Fields when setting up an Amazon EC2 connection
| Attribute | Description |
|---|---|
| Name | Sets the name of the connection This will later be shown in the tree view of the Univention Management Console module. |
| EC2 region | Here you select the EC2 region to which you want to create the connection. Virtual machines are always assigned to precisely one region and not visible in other regions. The selection of available images can also vary depending on the region. Univention UCS images are available in all supported regions. |
| Access Key ID | The access key ID assigned to the Amazon EC2 account is comparable with a user name. |
| Secret Access Key | The secret access key for access via the Amazon EC2 account is comparable with a password. |
| Search pattern for AMIs | Image files used as a source for new instances are referred to as AMIs. The search filter specified here restricts the display of selectable AMIs when creating a new virtual instance. The default value "*" (asterisk) is used to show all available images. |
The UMC module Virtual machines (UVMM) offers the possibility to create, edit and delete virtual instances/machines and to change their status. In principle, these functions are independent of the virtualization technology employed (KVM or cloud-based), however they may vary slightly depending on the hypervisor in use. The items that must be observed are illustrated in the following section on the description of the functions.
In the main dialogue of the UMC module, a tree structure is displayed on the left-hand side, which gives an overview of the existing virtualization servers. All the virtual machines are listed in the right half of the screen. If one clicks on the name of a virtualization server, only the instances of that server are listed. The search mask can also be used to search for individual virtual machines.
In the overview of the virtual machines, the computer icon shows the state a virtual machine is in, e.g., whether it is running (computer symbol with green arrow), paused (computer symbol with yellow line) or stopped (computer without additional symbol). Virtual machines in cloud computing environments can also be depicted as deleted (computer with red cross) or as pending (computer with hourglass).
The icon showing an arrow pointing right can be used to start a virtual instance.
Running instances can be accessed via the VNC protocol - insofar as this is configured. The icon with the stylised screen opens a connection with noVNC, a HTML5-based client. Any other VNC client can also be used for the access; the VNC port is displayed in a tooltip above the computer name.
The choice box can be used to perform other operations: The following operations are available on running instances:
The following operations are available on saved or stopped instances:
The following operations are available for virtual machines operated in cloud-based environments.
Virtual machines in cloud-based virtualization environments can be created in just a few steps in UVMM using the wizard by clicking on .
In the input mask you can select the cloud connection via which you wish to create the virtual machine. Once a connection has been selected and you have clicked on , the wizard for creating a new virtual machine opens. Once the parameters have been set, the new virtual machine is created by clicking on .
Table 15.3. Creating a virtual machine via a cloud connection
| Attribute | Description |
|---|---|
| Name | Defines the name of the virtual machine |
| Choose a source image / source AMI | The initial status of a virtual machine when created is specified via a source image (OpenStack) or source AMI (EC2). This type of image usually includes a prepared operating systems that the user can customise after the start-up. Any number of virtual machines can be created from one source image. |
| Choose an instance size | An instance size is assigned to a virtual machine when it is created. This is composed of available memory and the size of the available hard drive memory. When a virtual machine is created in an OpenStack environment, the number of the CPU cores is also determined when selecting the size. |
| Select a key pair |
To allow safe access to the virtual machine via ssh, an ssh key for
configuration of the root account is added to the machine the first time it is
started. With this key, it is possible to access the machine via ssh without a
password. For this to happen, there must be access to the private key part of
the key pair. The access to the instance can be performed with the following
command, for example, if the instance is running:
ssh -i [path/to/private/key] root@[instance-ip-address] |
| Configure security group | This setting configures which security group is set for the new virtual machine. A security group determines which TCP ports are approved for external access to a virtual machine. |
By selecting a virtual machine and clicking on you can view the configured settings of the virtual machine on a separate page. The IP address via which the virtual machine can be reached is shown here in particular.
Virtual machines on local KVM servers can be created with the assistant in a few steps in UVMM by clicking on .
In the input mask you can select the virtualization server on which you wish to create the virtual machine. If a KVM virtualization server is selected here and clicked, the machine profile selection page opens. The selection of the specifies some of the basic settings for the virtual instance (see Section 15.6).
The virtual machine is now given a and an optional and assigned and . The option specifies whether the machine can be accessed via the VNC protocol. This is generally required for the initial operating system installation.
Now the disk drives of the virtual machines are configured. The setup is documented in Section 15.5.1.
Clicking concludes the creation of the virtual machine.
In the overview list, a virtual machine can be edited by clicking on the icon with the stylized pen.
Table 15.4. 'General' tab
| Attribute | Description |
|---|---|
| Name | Defines the name of the virtual machine. This does not have to be the same as the name of the host in the LDAP directory. |
| Operating system | The operating system installed in the virtual instance. Any text can be entered here. |
| Contact | Defines the contact person for the virtual machine. If an e-mail address is specified here, an external e-mail program can then be run via the mouseover that appears. |
| Description | Can be used to describe the function of the virtual machine, e.g. mail server or it's state. The description is shown in the overview of the virtual machines as a mouseover. |
The tab allows the configuration of drives and network interfaces. An introduction to the supported devices, image formats and storage pools can be found in the Section 15.5.1. An introduction to the supported network card settings can be found in the Section 15.5.4.
lists all existing drives, the image files used, their size and the assigned storage pools. One can click on the stylised minus sign to delete a drive and can be used to adjust setting subsequently.
allows specification of whether the access to the drive should be paravirtualized. Where possible, this setting should not be changed for a virtual machine which already has an operating system installed, as this may disrupt the access of partitions.
If drives or network interfaces are subsequently added to a virtual instance, the utilisation of paravirtualization is determined by heuristics or its profile.
can be used to add an additional drive.
This menu contains a list of all network cards; in addition, new cards can be added or existing ones edited. can be used to add another virtual network card.
The tab contains a list of all available snapshots. An introduction to snapshots can be found in the Section 15.5.6.
includes a list of all the existing snapshots. can be used to restore an earlier status.
The current machine state is lost if the old snapshot is restored. However, there is no reason not to save the current state in an additional snapshot in advance.
A snapshot can be removed by clicking in the stylised minus sign. The current state of the virtual machine is not modified by this.
can be used to create a snapshot with the name of your choice, e.g., DC Master before update to UCS 4.0-1. In addition to the description the time is saved when the snapshot is created.
The settings of a virtual machine can only be changed if it is turned off.
Table 15.5. 'Advanced' tab
| Attribute | Description |
|---|---|
| Architecture | Specifies the architecture of the emulated hardware. It must be noted that virtual 64-bit machines can only be created on virtualization servers using the amd64 architecture. This setting is not shown on i386 systems. |
| Number of CPUs | Defines how many CPU sockets are assigned to the virtual instance. The number of NUMA nodes, cores and CPU threads is not currently configurable. |
| Memory | Specifies the size of the assigned system memory. |
| Virtualization technology | The technology used for virtualization. This setting can only be specified when creating a virtual instance. |
| RTC reference | In fully virtualized systems, a computer clock is emulated for each virtual machine (paravirtualized systems access the clock on the host system directly). This option controls the format of the emulated clock; it an either be saved in the or the . The use of UTC is recommended for Linux system and the use of the local time zone recommended for Microsoft Windows systems. |
| Boot order | Specifies the order in which the emulated BIOS of the virtual machine searches the drives for bootable media. This setting is only available for fully-virtualized instances. On paravirtualized machines it is only possible to select one hard drive from which the kernel should be used. |
| Direct access (VNC) | Defines whether VNC access to the virtual machine is available. If the option is enabled, the virtual machine can be accessed directly via the UMC module using an HTML5-based VNC client or any other VNC client. The VNC URL is displayed in a tool tip. |
| Globally available | This allows VNC access from other systems than the virtualization server. |
| VNC Password | Sets a password for the VNC connection. |
| Keyboard layout | Defines the layout for the keyboard in the VNC session. |
If virtual hard drives are added to an instance, image files are usually used for the data keeping. An image file can either be generated for this purpose or an existing image file can be assigned to a virtual machine. Alternatively, a native block device (hard drive partition, logical volume, iSCSI volume) can be assigned to a virtual machine. The direct use of block devices offers performance advantages and is less susceptible to computer crashes.
Hard drive images can be administrated in two ways on KVM systems; by default images are saved in the . This format supports Copy-on-write which means that changes do not overwrite the original version, but store new versions in different locations. The internal references of the file administration are then updated to allow both access to the original and the new version. Snapshots can only be created when using hard drive images in . Alternatively, you can also access a hard drive image in .
Operating systems use a so-called page cache to accelerate accesses to storage media. If data are accessed which have already been read off a hard drive and these data are still present in the cache, the comparatively slow access to the storage medium is not necessary and the request is answered directly from the page cache.
Write accesses are generally also not directly written on the hard drive, but are usually bundled and, consequently, written more efficiently. However, this involves the risk of data loss, if, for example, a system crashes or the power supply is interrupted. The data which have been only saved in the write cache up to that point and have yet to be synchronised on the storage medium are lost. For this reasons, modern operating systems generally only keep pending write changes for a maximum of several seconds before writing them to the hard drive.
In order to avoid data being stored doubly in the page cache of the host system and also of the guest system, cache strategies can be configured with the option when using KVM, which influence the use of the host system's page cache:
If a live migration of virtual machines between different virtualization servers is planned, the storage pool must be stored on a system which can be accessed by all virtualization servers (e.g., an NFS share or an iSCSI target). This is described in Section 15.5.2.
Image files are created as sparse files with the specified size, i.e., these files only grow when they are used and then up to the maximally specified size and thus initially require only minimal disk space. As there is a risk here of the disk space being used up during operation, a Nagios monitoring should be integrated, see Chapter 14.
Where possible, hard drive images should be configured paravirtualized. In the case of UCS systems installed virtualized in KVM, a paravirtualized access is activated automatically when the UCS profile is selected. The configuration of Microsoft Windows systems is documented in Section 15.5.5.
These image files are stored in so-called storage pools. They can either be stored locally on the virtualization server or on a file share. The connection of a storage pool over iSCSI is documented in [ext-doc-uvmm].
Each virtualization server provides a storage pool with the name
default in the standard configuration. It can be found on the
virtualization servers in the /var/lib/libvirt/images/ directory.
To allow simple access to the storage pool, you can set up a share for the
/var/lib/libvirt/images/ directory. To do so, you need to create a
share with the following options in the UMC module . The share
can then be accessed easily from Windows clients via a CIFS network share (or via an NFS
mount).
General/General settings
UVMM-Pool/var/lib/libvirt/imagesAdvanced settings/Samba permissions
AdministratorThe image files of a virtual hard drive include all the user data of the virtualized system! The option ensures that, irrespective of the file system permissions, only the Administrator user can access the share.
It is not possible to create an additional storage pool via Univention Management Console. Instead, this
must be done by logging in to the virtualization server as the root
user. The following steps are required for this:
/mnt/storage/.
The following command is used to create the new Testpool storage pool:
virsh pool-define-as Testpool dir - - - - "/mnt/storage"
The libvirt library used by UVMM differentiates between active and inactive storage pools. To be able to use the storage pool directly, it must be activated:
virsh pool-start Testpool
The following command ensures that the pool is activated automatically the next time the system is started:
virsh pool-autostart Testpool
To change the underlying file path of the default storage pool at a later point in time,
one must log in to the virtualization server as the root user. The
following steps are required for this:
uvmm/pool/default/path must be changed to the new directory.
The following commands remove the old storage pool; the pool is changed over to the new path the next time the UVMM is restarted:
virsh pool-destroy default
virsh pool-undefine default
invoke-rc.d univention-virtual-machine-manager-daemon restart
invoke-rc.d univention-virtual-machine-manager-node-common restart
CD-/DVD-ROM/floppy drives can be mounted in two ways:
/var/lib/libvirt/images/.
It is also possible to provide a virtual machine with a disk drive via an image (in VFD format) or the pass-through of a physical drive.
If drives are defined for a new virtual machine, it must be ensured that it is possible to boot from the CD-ROM drive. The UVMM profile (see Section 15.6) specifies the boot order for the fully-virtualized instances in advance. For the paravirtualized instances, it is defined by the order on the definition of the drives and can be adapted subsequently in the settings section.
When a virtual machine is created, it is automatically assigned a network card with a randomly generated MAC address. It can be subsequently changed.
Two types of network connections are possible:
192.168.122.0/24 network.
This virtual instance is granted the access to the external network via NAT, so that the access is performed via the virtualization server's IP address.
The virtual machine can thus not be reached from other computers, but can create all outgoing connections itself.
The UVMM servers are already preconfigured for bridging and NAT. However, there are restrictions for bridged network cards which are described in Section 8.2.4.1.4.1. For each virtual machine the desired network can be selected through the setting.
NAT network cards are only restricted by the IP addresses available in the 192.168.122.0/24 network.
The can be used to select what type of card will be provided. The is supported by almost all operating systems, the offers advanced abilities and a offers the best performance.
KVM supports paravirtualization via the virtIO interface. The use of paravirtualization allows the virtualized systems direct access to the resources of the virtualization server. This considerably improves performance. We recommend the use of paravirtualization.
Current Linux systems support paravirtualization as standard. The installation
of the KVM packages provides suitable images which can then be mounted in a
virtual machine in the disk management. The images are integrated in the storage
area specified by the Univention Configuration Registry variable uvmm/pool/default/patht. On KVM
virtualization servers, there is an ISO image with the name KVM
Windows drivers, which contains the virtIO virtualization drivers for
Microsoft Windows.
In Windows systems installed under KVM, paravirtualization must be activated before beginning the Windows installation.
The virtIO interface allows the efficient usage of network and storage resources for a virtual machine on the KVM hypervisor. The following steps describe the installation of the virtIO drivers on Windows 7.
Red Hat virtIO SCSI Disk Device and Red Hat virtIO Ethernet Adapter can be found in the Windows device manager.
UVMM offers the possibility to save the contents of the main and hard drive memory of a virtual machine in snapshots. This allows the administrator to revert to these snapshots at a later point in time, which makes them a useful "safety net" when installing software updates.
Snapshots can only be used with KVM instances which access all their hard drive images in Qcow2 format. All snapshots are stored using copy-on-write (see Section 15.4.4) directly in the hard drive image file.
UVMM offers the the possibility of migrating a virtual machine to another virtualization server. This works with both paused and running instances (live migration). The option is only offered if at least two compatible virtualization servers are available in the domain.
During the migration it must be noted that the images of the mounted hard drives and CD-ROM drive must be accessible by both virtualization servers. This can be achieved, for example, by storing the images in a central storage system. Notes on the setting up of this type of environment can be found under Section 15.5.2.
Information about the virtual machines running on the virtualization servers is stored centrally in the UCS Virtual Machine Manager. If a server fails (failure detection is performed periodically every 15 seconds), the server and the virtual instances operated on it are identified as inaccessible with a red symbol, a warning appears and is offered as the only operation in the menu.
Following the migration, the virtual instance is no longer displayed in the overview tree of the failed virtualization server in the UVMM.
It must be ensured under all circumstances that the virtual machine on the original and the secondary server are not started in parallel; this would involve their both writing in the image files simultaneously, which would result in data loss. If virtual machines are started automatically after startup, simultaneous access must be prohibited by disconnecting the network connection or restricting access to the storage pool.
If the failed computer is reactivated - e.g., in the case of a temporary power failure - the virtual machines remain available on the system locally and are reported to UVMM; consequently, there are then two versions of the instance.
As such, one of the two instances should subsequently be deleted. However, the employed image files for the drives should not be deleted at the same time.
Profiles are used to store initial settings when creating new virtual machines. Amongst others this includes the following settings:
The existing UVMM profiles are stored in the LDAP directory and can also be edited there.
The profiles can be found in the UMC module in the container cn=Profiles,cn=Virtual Machine Manager.
Additional profiles can also be added there.
The name of the bridge used as the default network interface is stored in UVMM profiles.
If the default interface br0 is changed, the name should be updated as well.
The following command updates all profiles currently using interface $OLD$NEW
udm uvmm/profile list --filter interface="$OLD" |
	sed -ne 's/^DN: //p' |
	xargs -r -d '\n' -n 1 udm uvmm/profile modify --set interface="$NEW" --dn
[5] Instead, it is recommended to make the free memory directly available to the VMs so that they can use the additional memory more efficiently themselves, for instance for caching.
Bacula is a network-enabled data backup solution with a client/server architecture. It allows data backup and restore in heterogeneous environments. This chapter refers to the univention-bacula package which is delivered as a component of UCS. Other backup solutions can be selected and installed in the Univention App Center, including Bacula Enterprise.
Bacula is composed of a range of individual services and programs, which control the various aspects of the data backup:
The backup settings (data to be backed up, backup mode and times) are thus configured in the director daemon and the backup started automatically or via the Bacula console. The file daemon then supplies the data to be backed up to the storage daemon, which is responsible for saving the data on physical media. In addition, meta information concerning the backups are also saved in a database via the catalog.
If there is sufficient storage capacity available, it is recommended to back up the complete system. However, not all the data on a UCS system need to be backed up. For example, the program packages delivered with UCS are available after reinstallation anyway.
The following information gives an overview of a typical system. Deviations are possible depending on the software installed. This must be checked in each case and carefully tested with a test restore run!
The /dev/, /proc/ and /sys/
directories only contain files automatically generated by the kernel, so they do not need to
be backed up.
These files should generally always be backed up: The /home/ and
/root directories contain user data, the configuration of the UCS
system is backed up in /etc/ and the /var/
directory includes runtime data such as the mails of a mail server.
The /bin/, /boot/, /lib/,
/usr/ and /sbin/ directories usually only include
programs and data delivered with the UCS installation.
In this documentation it is assumed that the director daemon, storage daemon and catalog are present on one a system, the Bacula server. These components are set up by installing the univention-bacula package.
The file daemon must be installed on all the systems on which data are to be backed up using the bacula-client package.
The storage of the catalog data is performed in a PostgreSQL database,
which is created during installation. The access information for this
database (database name, name/password of database user) are then
available in the
/etc/dbconfig-common/bacula-director-pgsql.conf
file in the dbc_dbpass and
dbc_dbuser fields.
The configuration of the Bacula services is performed via various configuration files. The following text explains important options; further configuration options are described in the Bacula documentation.
The directory daemon is managed via the Director
section of the /etc/bacula/bacula-dir.conf file.
The default values can be kept, only the DirAddress
option should be changed from 127.0.0.1, in other
words localhost, to the IP address of the Bacula server. In
addition, the Password field should be configured
Director {
  Name = sec-dir
  DIRport = 9101
  QueryFile = "/etc/bacula/scripts/query.sql"
  WorkingDirectory = "/var/lib/bacula"
  PidDirectory = "/var/run/bacula"
  Maximum Concurrent Jobs = 1
  Password = "master-dir-password"
  Messages = Daemon
  DirAddress = 192.168.100.125
}
The storage daemon is managed via the Storage
section of the /etc/bacula/bacula-sd.conf file.
Here the default values can largely be retained; only the
SDAddress option needs to be adapted to the IP
address of the storage daemon.
Storage {
  Name = sec-sd
  SDPort = 9103
  WorkingDirectory = "/var/lib/bacula"
  Pid Directory = "/var/run/bacula"
  Maximum Concurrent Jobs = 20
  SDAddress = 192.168.100.125
}
The Director section refers to the Bacula server and a password is set that the server must use for access:
Director {
  Name = sec-dir
  Password = "master-storage-password"
}
The file daemon is managed via the configuration file
/etc/bacula/bacula-fd.conf and must be set up on
all systems that are to be backed up.
In the Director section, the
Name option should be set to the name of the
director (see Section 16.4.1). A client password must be set for every
system. In addition, the FDAddress option in the
FileDaemon section should be set to the computer's
IP address.
Director {
  Name = sec-dir
  Password = "client-password"
}
FileDaemon {
Name = sec-fd
FDport = 9102
WorkingDirectory = /var/lib/bacula
Pid Directory = /var/run/bacula
Maximum Concurrent Jobs = 20
FDAddress = 192.168.100.125
}
Every computer to be backed up must also be registered in the
/etc/bacula/bacula-dir.conf file in the director
with the password specified above:
Client {
  Name = client-host
  Address = 192.168.100.125
  FDPort = 9102
  Catalog = MyCatalog
  Password = "client-password"
  File Retention = 30 days
  Job Retention = 6 months
  AutoPrune = yes
}
The Bacula console is managed in the
/etc/bacula/bconsole.conf configuration file.
Here, the address of the computer on which the director daemon is running and its password must be entered in the Director section (see Section 16.4.1):
Name = localhost-dir
  DIRport = 9101
  address = 192.168.100.125
  Password = "master-dir-password"
In the basic Univention Firewall setting, the incoming packages are blocked/refused for all ports.
The ports used for Bacula must be approved accordingly. Access to the
file daemon must be permitted on all systems. This is done by setting
the Univention Configuration Registry variable
security/packetfilter/package/bacula/tcp/9102/all to
ACCEPT and then restarting Univention Firewall.
Port 9103 must also be approved in the same way on the Bacula server.
In a distributed setup, it may be necessary to permit the ports 9101/TCP (connections from the console to the directory) and 9103/TCP (connections from the directory and file daemon to the storage daemon) as well.
In Bacula one can define resources which when combined in a job represent a certain action, such as the backup of X data from Y computer on the Z medium. Among others, the following resources are available:
A job combines all of the information above. There are two types of job: restore and backup. In addition, the backup process of the backups (incremental, complete or differential backing up) is also defined here.
Messages are used to define how to handle Bacula status messages. Messages can be saved in log files, displayed on the console or sent by e-mail, for example.
[bacula-config-example] includes an example configuration which can be used as a template for backups and described the resources outline above in more detail.
The Bacula console can be used to export
information about the status of Bacula, start backup jobs or restore
data. It is started with the bconsole command.
The status command displays status information. A
list of the director's upcoming, running and ended jobs is exported.
Backup jobs can be started automatically, e.g., every weekday. Backups and restores can also be started interactively via the Bacula console:
run command can be used to start a job. In
addition, a list of available jobs is displayed from which one has to
select the required job. The mod command can be used
to set and change options such as the backup type for the job.
Confirming with yes starts the job.
restore command can be used to restore data.
3 (Enter list of comma separated JobIds to select)
can now be used to select a backup job from which the data should be
restored. A file browser then opens in which one can browse using the
standard commands cd and ls.
mark FILE and mark -r DIR select
files and directories respectively for the restore. Once all the
required data are selected, the file browser is exited with
done. Once the client is specified and some options
for the restore job confirmed (e.g., where the data should be copied
to), the job can be started with yes. The selected
data will be saved in the configured restore directory. If a tape is
required for a backup or restore and it is not in the drive, Bacula
requests the tape explicitly
Further information on the Bacula console can be found in the Bacula
documentation or via the help command.
The meta data of the backup are stored in the catalog. As standard, the catalog is stored in a PostgreSQL database, which should also be backed up. This is performed via a backup job, which saves an SQL dump of the database.
# Backup the catalog database (after the nightly save)
Job {
  Name = "BackupCatalog"
  JobDefs = "DefaultJob"
  Level = Full
  FileSet="Catalog"
  Schedule = "WeeklyCycleAfterBackup"
  # This creates an ASCII copy of the catalog
  # Arguments to make_catalog_backup.pl are:
  #  make_catalog_backup.pl catalog-name
  RunBeforeJob = "/etc/bacula/scripts/make_catalog_backup.pl MyCatalog"
  # This deletes the copy of the catalog
  RunAfterJob = "/etc/bacula/scripts/delete_catalog_backup"
  Write Bootstrap = "/var/lib/bacula/%n.bsr"
  Priority = 11
}

...

# This schedule does the catalog. It starts after the WeeklyCycle
Schedule {
  Name = "WeeklyCycleAfterBackup"
  Run = Full sun-sat at 23:10
}

...

# This is the backup of the catalog
FileSet {
  Name = "Catalog"
  Include {
    Options {
      signature = MD5
    }
    File = "/var/lib/bacula/bacula.sql"
  }
}
The instructions RunBeforeJob and
RunAfterJob are run before and after the actual
backing up of the scripts respectively. In the case of the catalog,
make_catalog_backup is used prior to the backup
to create an SQL dump of the catalog database and saved under
/var/lib/bacula/bacula.sql. This file is then
deleted again following successful backup.
In addition, Write Bootstrap is used to generate a
bootstrap file for the backup of the catalog. This file documents how
the data can be restored, i.e., on which volume they are saved and where
on the volume they are. This is normally performed by the catalog
itself, but for the backup of the catalog itself, a bootstrap file is
required. It should also be backed up independently of Bacula.
The backup job for the catalog with the corresponding FileSet and Schedule is available as a template in the configuration of the director daemon and merely needs to be adjusted.
Further information on the setup of Bacula is available on the following websites:
[ucs-dokumentationen] Univention GmbH. 2013. UCS documentation overview. https://docs.software-univention.de/en.html.
[admx-reference] Microsoft. 2014. Group Policy ADMX Syntax Reference Guide. https://technet.microsoft.com/en-gb/library/cc753471(v=ws.10).aspx.
[admx-central] Mark Morowczynski. 2011. How to Implement the Central Store for Group Policy Admin Templates, Completely (Hint: Remove Those .ADM files!). https://blogs.technet.microsoft.com/askpfeplat/2011/12/12/how-to-implement-the-central-store-for-group-policy-admin-templates-completely-hint-remove-those-adm-files/.
[microsoft-wmi-filter] Microsoft. 2005. WMI filtering using GPMC. https://technet.microsoft.com/en-us/library/cc779036(v=ws.10).aspx.
[add-wmi-filters] Mark Heitbrink. 2013. Filtern von Gruppenrichtlinien anhand von Benutzergruppen, WMI und Zielgruppenadressierung. http://www.gruppenrichtlinien.de/artikel/filtern-von-gruppenrichtlinien-anhand-von-benutzergruppen-wmi-und-zielgruppenadressierung/.
[adm-templates-howto] Florian Frommherz. 2007. How to create custom ADM templates. http://www.frickelsoft.net/blog/downloads/howto_admTemplates.pdf.
[microsoft-adm-templates] Microsoft. 2014. Writing Custom ADM Files for System Policy Editor. https://support.microsoft.com/en-us/kb/225087.
[bonding] Thomas Davis et al.. 2011. Linux Ethernet Bonding Driver HOWTO. https://www.kernel.org/doc/Documentation/networking/bonding.txt.
[wiki-saml] Univenton GmbH. 2014. SAML Identity Provider. http://wiki.univention.de/index.php?title=SAML_Identity_Provider.
[dhcp-failover] ISC. 2013. A Basic Guide to Configuring DHCP Failover. https://kb.isc.org/article/AA-00502/31.
[developer-reference] Univention GmbH. 2013. Univention Developer Reference. https://docs.software-univention.de/developer-reference-4.0.html.
[release-notes] Univention GmbH. 2013. UCS 4.0-0 Release Notes. https://docs.software-univention.de/release-notes-4.0-0-en.html.
[bind-loglevel] O'Reilly. 1998. Reading Bind Debugging Output. http://www.diablotin.com/librairie/networking/dnsbind/ch12_01.htm.
[samba3-howto-chapter-20] Jelmer R. Vernooij and John H. Terpstra and Gerald (Jerry) Carter. 2010. The Official Samba 3.2.x HOWTO and Reference Guide. http://www.samba.org/samba/docs/Samba3-HOWTO.pdf#chapter.20.
[wiki-samba-update] Univention GmbH. 2013. Univention Wiki - Migration from Samba 3 to Samba 4. http://wiki.univention.de/index.php?title=Migration_from_Samba_3_to_Samba_4.
[packaging-acl-extensions] Univention GmbH. 2013. Packaging LDAP ACL Extensions. https://docs.software-univention.de/developer-reference-4.0.html#settings:ldapacl.
[packaging-schema-extensions] Univention GmbH. 2013. Packaging LDAP Schema Extensions. https://docs.software-univention.de/developer-reference-4.0.html#settings:ldapschema.
[ucs-performance-guide] Univention GmbH. 2014. UCS performance guide. https://docs.software-univention.de/performance-guide-4.0.html.
[ext-doc-inst] Univention GmbH. 2014. Extended installation documentation. https://docs.software-univention.de/installation-4.0.html.
[ext-doc-uvmm] Univention GmbH. 2014. Extended virtualization documentation. https://docs.software-univention.de/uvmm-4.0.html.
[ext-doc-win] Univention GmbH. 2014. Extended Windows integration documentation. https://docs.software-univention.de/windows-4.0.html.
[ext-print-doc] Univention GmbH. 2014. Extended print services documentation. https://docs.software-univention.de/printers-4.0.html.
[ext-doc-domain] Univention GmbH. 2014. Extended domain services documentation. https://docs.software-univention.de/domain-4.0.html.
[ext-doc-net] Univention GmbH. 2014. Extended IP and network management documentation. https://docs.software-univention.de/networks-4.0.html.
[hardwarelist] Univention GmbH. 2015. Univention Corporate Server - Compatible hardware. https://updates.software-univention.de/doc/Hardware_compatibility_list.pdf.
[ec2-quickstart] Univention GmbH. 2013. Univention Wiki - Amazon EC2 Quickstart. http://wiki.univention.de/index.php?title=Amazon_EC2_Quickstart.
[xenserver-installation] Univention GmbH. 2013. Univention Wiki - Citrix XenServer. http://wiki.univention.de/index.php?title=Citrix_Xen_Server.
[bacula-config-example] Univention GmbH. 2013. Bacula configuration example. http://wiki.univention.de/index.php?title=Bacula_configuration_example.
[ext-doc-windows-nt] Univention GmbH. 2014. Operation of a Samba domain based on Windows NT domain services. https://docs.software-univention.de/windows-nt-4.0.html.
[ext-doc-cyrus] Univention GmbH. 2015. Cyrus mail server. https://docs.software-univention.de/cyrus-4.0.html.
[dovecot-wiki-clusterfs] Timo Sirainen. 2015. Dovecot Wiki: Mail storage on shared disks. http://wiki2.dovecot.org/MailLocation/SharedDisk.
[dovecot-wiki-nfs] Timo Sirainen. 2015. Dovecot Wiki: NFS. http://wiki2.dovecot.org/NFS.
[dovecot-wiki-services] Timo Sirainen. 2015. Dovecot Wiki: Service configuration. http://wiki2.dovecot.org/Services.