4. Configuration#
The Keycloak app offers various configuration options.
To change settings after installation, sign in to the UCS management system with a username with administration rights and go to . On the appearing Configure Keycloak page, you can change the settings and apply them to the app with a click on Apply Changes.
The App Center then reinitializes the Docker container for the Keycloak app. Reinitialize means the App Center throws away the running Keycloak Docker container and creates a fresh Keycloak Docker container with the just changed settings.
4.1. Use Keycloak for login to Univention Portal#
The Keycloak app can take over the role of the SAML IDP for the Univention Portal. And the portal can use Keycloak for user authentication.
Warning
The LDAP server will not recognize SAML tickets that the simpleSAMLphp based identity provider issued after you restart it. Users will experience invalidation of their existing sessions.
For more information about production use, see Installation on UCS.
To configure the UCS portal to use Keycloak for authentication, run the following steps on the system where you installed Keycloak:
Set the UCR variable
umc/saml/idp-serverto the URLhttps://ucs-sso-ng.$domainname/realms/ucs/protocol/saml/descriptor, for examplehttps://ucs-sso-ng.example.org/realms/ucs/protocol/saml/descriptor. This step tells the portal to use Keycloak as IDP.Sign in to the UCS management system and then go to and search for the variable
umc/saml/idp-serverand set the value as described before.Open a shell on the UCS system as superuser
rootwhere you installed Keycloak and run the following command:$ ucr set \ umc/saml/idp-server=\ "https://ucs-sso-ng.$(hostname -d)/realms/ucs/protocol/saml/descriptor"
Modify the portal to use SAML for login:
In the UCS management system go to . On the tab General in the section Advanced activate the Activated checkbox.
Open a shell on the UCS system as superuser
rootwhere you installed Keycloak and run the following command:$ udm portals/entry modify \ --dn "cn=login-saml,cn=entry,cn=portals,cn=univention,$(ucr get ldap/base)" \ --set activated=TRUE
To activate the changes, restart the LDAP server
slapdwithin a maintenance window.In the UCS management system go to . Search for
slapdand click to select the service. Then click Restart.Open a shell on the UCS system as superuser
rootwhere you installed Keycloak and run the following command:$ service slapd restart
Note
If you don’t restart the LDAP server, you will see the following message in
/var/log/syslog:
slapd[…]: SASL [conn=…] Failure: SAML assertion issuer
https://ucs-sso-ng.$domainname/realms/ucs is unknown
By default the Keycloak app creates a SAML SP (client) for every Univention Portal server. You can see the list of existing SAML SP clients with the following command:
$ univention-keycloak saml/sp get --json
[
    "https://ucs1.example.com/univention/saml/metadata",
    "https://ucs2.example.com/univention/saml/metadata",
    ...
]
If the SAML SP for a particular Univention Portal server doesn’t exist, you can create it in Keycloak with the command:
$ FQDN="the fqdn of the Univention Portal server"
$ univention-keycloak saml/sp create \
  --metadata-url="https://$FQDN/univention/saml/metadata" \
  --umc-uid-mapper
4.2. Import of user attributes from UCS to Keycloak#
Keycloak uses the LDAP directory of the UCS domain as
backend for the user accounts. During the authentication process
certain user attributes are imported into Keycloak. These
attributes can be used later on in so called Attribute Mappers to pass
additional information trough the SAML assertion or OIDC token to
services, for example displayName.
By default the Keycloak app is configured to import the following user attributes:
LDAP attribute |
Keycloak attribute |
|---|---|
|
|
|
|
|
|
|
|
|
|
|
|
|
|
|
|
It is possible to configure the import of additional LDAP user attributes to Keycloak, for example
$ univention-keycloak user-attribute-ldap-mapper create description
to import the LDAP user attribute description to the Keycloak
attribute description.
With the following command you get a list of all the currently configured Keycloak user attributes.
$ univention-keycloak user-attribute-ldap-mapper get --user-attributes
4.3. Keycloak as OpenID Connect provider#
The Keycloak app can serve as an OpenID Connect provider (OIDC Provider). The following steps explain how to configure an OIDC relying party (OIDC RP) to use Keycloak for authentication:
Navigate to .
Specify the
client-idfor the client application (OIDC RP). Use the sameclient-idin the configuration of the client application.Select
openid-connectin the Client Protocol drop-down list.Enter the root URL, the endpoint URL of the client application (OIDC RP).
Click Save.
Finally, the administrator can review the URL settings and customize them, if necessary.
For more information, see Keycloak Server Administration Guide: OIDC clients [4].
Added in version 19.0.1-ucs1: univention-keycloak added.
For more information about the usage, see the --help option.
As an alternative the app Keycloak offers a command line tool. For usage, see the following example:
$ univention-keycloak oidc/op/cert get \
--as-pem \
--output "$SOMEFILENAME"
$ univention-keycloak oidc/rp create \
--app-url="https://$(hostname -f)/${MYAPP_URL}/" "${MYAPP_CLIENT_ID}"
The option group oidc/rp offers additional options like --client-secret.
Note
If the administrator chooses Confidential as Access Type on the client
configuration page, Keycloak offers an additional Credentials tab with the
credentials.
4.4. Keycloak as SAML Identity Provider#
Added in version 19.0.1-ucs1: univention-keycloak added.
For more information about the usage, see the --help option.
The Keycloak app can serve as an SAML IDP.
For apps that want to act as a SAML SP, you need to add a client
configuration in Keycloak through the Keycloak Admin Console. For more information about how to create a SAML
client configuration, see Keycloak Server Administration Guide: Creating a SAML client [5].
As an alternative the app Keycloak offers a command line tool. For usage, see the following example:
$ univention-keycloak saml/idp/cert get \
--as-pem --output "$SOMEFILENAME"
$ univention-keycloak saml/sp create \
--metadata-url "https://$(hostname -f)/$METADATA-URL-OF-THE-APP"
The option group saml/sp offers additional options like
--client-signature-required.
Note
If the administrator chooses Confidential as Access Type on the client
configuration page, Keycloak offers an additional Credentials tab with the
credentials.
4.5. Backup and restore#
Administrators can create a backup of the Keycloak app data. The data comprises information for example about the realm, clients, groups, and roles. To create a backup, run the export action as in the following steps:
$ univention-app shell keycloak /opt/keycloak/bin/kc.sh export \
--db=$(ucr get kc/db/kind) \
--db-driver=$(ucr get kc/db/driver) \
--transaction-xa-enabled=$(ucr get kc/db/xa) \
--dir /var/lib/univention-appcenter/apps/keycloak/data/myexport
In this example myexport is a freely chosen directory name.
To restore the backup into the app Keycloak, run the import action as in the following step:
$ univention-app shell keycloak /opt/keycloak/bin/kc.sh import \
--db=$(ucr get kc/db/kind) \
--db-driver=$(ucr get kc/db/driver) \
--transaction-xa-enabled=$(ucr get kc/db/xa) \
--dir /var/lib/univention-appcenter/apps/keycloak/data/myexport
Warning
Keycloak defines the scope of exported data and may not contain every configuration option the program offers.
4.6. Multiple installations in the domain#
Administrators can install the app Keycloak on several nodes in a UCS
domain to increase availability and provide failover using the default DNS name
ucs-sso-ng.$(hostname -d). The default installations in the domain don’t
require any interaction from the administrator. This will also provide session
synchronization between all Keycloak installations on the domain.
Note
If the Keycloak app is installed on multiple systems in the domain and updates are available, make sure to update the app on all systems so that all instances of the app in the domain are on the same version.
4.7. Two-factor authentication for Keycloak#
Warning
The two-factor capability is a built-in Keycloak feature that is not integrated into the UCS identity management or user lifecycle. More sophisticated integration needs to be added individually.
Added in version 19.0.1-ucs1:
Added functionality to enable 2FA to univention-keycloak. For more information about the usage, see the
--helpoption.
The app Keycloak offers a 2FA option. 2FA is an authentication method that grants users access to a service after they sign in with a password and a OTP randomly generated by a third-party OTP password generator like FreeOTP or Google Authenticator.
2FA increases the protection for user data, because users need to provide two pieces: knowledge (password) and something in the users’ possession (the OTP). It also increase the security of the system by avoiding account locking on known accounts because of malicious attacks. For more information, see Wikipedia: Multi-factor authentication.
After you activate 2FA for a group of users, Keycloak asks those users for their OTP on each login. To simplify the configuration process, you can use a command-line tool to enable 2FA.
To activate or deactivate 2FA for a user group, follow the instructions in the next sections.
4.7.1. Activate two-factor authentication for domain administrators#
Open a shell on the UCS system as superuser
rootwhere you installed Keycloak and run the following command:$ univention-keycloak 2fa enable --group-2fa "Domain Admins"
The next time a user belonging to the
Domain Adminsgroup tries to sign in, Keycloak forces them to configure the 2FA following the instructions given during the login.
4.7.2. Deactivate two-factor authentication for domain administrators#
Navigate to .
Select
Domain Adminsin the list and click Edit.Navigate to Role Mappings on the tabs.
Remove
2FA rolefrom Assigned roles.
4.8. Settings#
The following references show the available settings within the Keycloak app. Univention recommends to keep the default values.
Keycloak has a lot more possibilities for configuration and customization. For more information, consult Keycloak 26.3 Documentation [1].
- keycloak/log/level#
Configures the verbosity of log messages in Keycloak.
- Possible values
ALL,DEBUG,ERROR,FATAL,INFO,OFF,TRACE,WARN.
For a detailed description of the log level values, see Keycloak documentation: Configuring logging [6].
Required
Default value
Set
Yes
INFOInstallation and app configuration
- keycloak/audit/events/success/level#
Configures the log level for successful audit events such as user logins, logouts, and other successful authentication operations. By default, Keycloak logs these events at
DEBUGlevel. You can adjust the log level to match your monitoring needs. For information audit logging, see Audit logging for Keycloak.Note
Promoting successful events to
infolevel increases log volume because every sign-in, sign-out, and token refresh produces a log entry. In high-traffic deployments, plan your log storage capacity and retention policies accordingly.Warning
Audit log entries include usernames and IP addresses, which are personal data under regulations such as GDPR. Apply appropriate access controls and retention policies to your log storage.
- Possible values
DEBUG,ERROR,FATAL,INFO,TRACE,WARN.
Required
Default value
Set
No
DEBUGInstallation and app configuration
- keycloak/audit/events/error/level#
Configures the log level for failed audit events such as failed login attempts and other authentication errors. By default, Keycloak logs these events at
WARNlevel. You can adjust the log level to match your monitoring needs. For information audit logging, see Audit logging for Keycloak.Warning
Audit log entries include usernames and IP addresses, which are personal data under regulations such as GDPR. Apply appropriate access controls and retention policies to your log storage.
- Possible values
DEBUG,ERROR,FATAL,INFO,TRACE,WARN.
Required
Default value
Set
No
WARNInstallation and app configuration
- keycloak/java/opts#
Defines the options that the Keycloak app appends to the java command.
Required
Default value
Set
Yes
-server -Xms1024m -Xmx1024mInstallation and app configuration
- keycloak/server/sso/fqdn#
Defines the FQDN of the identity provider for this Keycloak instance. Defaults to
ucs-sso-ng.$domainname.Please note that uppercase letters in this setting can lead to problems regarding the Keycloak admin console.
Note
This note only applies to domains with UCS servers with version 5.0 or lower.
If this setting deviates from the default, you need to set this setting via UCR on all UCS servers in the domain, so that these servers can connect to Keycloak.
Required
Default value
Set
No
ucs-sso-ng.$domainnameInstallation and app configuration
- keycloak/server/sso/autoregistration#
If set to
true(default), the joinscript of the Keycloak app registers a name server entry for the hostname of the identity provider defined inkeycloak/server/sso/fqdn.- Possible values:
trueorfalse
Required
Default value
Set
Yes
trueInstallation and app configuration
- keycloak/server/sso/virtualhost#
If set to
true(default) the UCS system will create a dedicated apache virtual host configuration for the Keycloak server FQDN.- Possible values:
trueorfalse
Required
Default value
Set
Yes
trueInstallation and app configuration
- keycloak/apache/config#
If set to
true(default) the UCS system will create an apache configuration for Keycloak.- Possible values:
trueorfalse
Required
Default value
Set
Yes
trueInstallation and app configuration
- keycloak/federation/remote/identifier#
This property stores the name of the UDM property that stores the unique identifier of the remote IAM objects. It is only used for ad hoc federation.
Required
Default value
Set
No
univentionObjectIdentifierInstallation and app configuration
- keycloak/federation/source/identifier#
This property stores the name of the UDM property that stores the remote source of an IAM objects. It is only used for ad hoc federation.
Required
Default value
Set
No
univentionSourceIAMInstallation and app configuration
- keycloak/database/connection#
This is a setting for the PostgreSQL database, the default database for Keycloak on the UCS system. The setting specifies the IP addresses from which the database can receive connections. The default value is
0.0.0.0, meaning that every IP address can connect to the database.Required
Default value
Set
No
None
Installation and app configuration
- kc/db/url#
Specifies the database JDBC URL (for example
jdbc:postgresql://dbhost/keycloak) to connect Keycloak. Defaults tojdbc:postgresql://fqdn:5432/keycloak.Required
Default value
Set
No
jdbc:postgresql://fqdn:5432/keycloakInstallation and app configuration
- kc/db/username#
Specifies the database username. Defaults to
keycloak.Required
Default value
Set
No
keycloakInstallation and app configuration
- kc/db/kind#
Specifies the kind of database. Defaults to
postgres. You find the available values at Configuring the database [7].Required
Default value
Set
No
postgresInstallation and app configuration
- kc/db/password#
Specifies the password to connect to the database.
Required
Default value
Set
No
None
Installation and app configuration
- ucs/self/registration/check_email_verification#
Controls if the login is denied for unverified, self registered user accounts. For more information, see Account verification in the UCS 5.0 Manual [2].
Required
Default value
Set
No
False
Installation and app configuration
- keycloak/login/messages/en/accountNotVerifiedMsg#
English error message for a self-registered user account that isn’t verified yet. The error message supports HTML format.
Required
Default value
Set
No
See default value in Listing 4.1 after the table.
Installation and app configuration
'Your account is not verified.<br>You must <a id="loginSelfServiceLink" href="https://${hostname}.${domainname}/univention/selfservice/#/selfservice/verifyaccount" target="_blank">verify your account</a> before you can login.<br/>'
- keycloak/login/messages/de/accountNotVerifiedMsg#
German error message for a self-registered user account that isn’t verified yet. The error message supports HTML format.
Required
Default value
Set
No
See default value in Listing 4.2 after the table.
Installation and app configuration
'Konto nicht verifiziert.<br>Sie m\\u00FCssen Ihr <a id="loginSelfServiceLink" href="https://${hostname}.${domainname}/univention/selfservice/#/selfservice/verifyaccount" target="_blank">Konto verifizieren</a>, bevor Sie sich einloggen k\\u00F6nnen.<br/>'
- keycloak/csp/frame-ancestors#
Additional entries to the
frame-ancestorsdirective of the Keycloak virtual host. The space separated list of sources can have multiple values can be used. For example,https://portal.external.com https://*.remote.de. For more information, see CSP: frame-ancestors in Mozilla Foundation [8].Required
Default value
Set
No
None
Installation and app configuration
- keycloak/apache2/ssl/certificate#
Sets the absolute path to the SSL certificate file for the Apache web server module
mod_sslof the Keycloak virtual host. The web server needs the certificate in the PEM format.The web server uses the UCS certificate from
/etc/univention/ssl/ucs-sso-ng.$domainname/cert.pem, if the UCR variable has no value.Required
Default value
Set
No
/etc/univention/ssl/ucs-sso-ng.$domainname/cert.pemInstallation and app configuration
- keycloak/apache2/ssl/key#
Sets the absolute path to the private RSA/DSA key of the SSL certificate file for the Apache web server module
mod_sslof the Keycloak virtual host. The web server needs the certificate in the PEM format.The web server uses the UCS private key from
/etc/univention/ssl/ucs-sso-ng.$domainname/private.key, if the UCR variable has no value.Required
Default value
Set
No
/etc/univention/ssl/ucs-sso-ng.$domainname/private.keyInstallation and app configuration
- keycloak/apache2/ssl/ca#
Sets the absolute path to the certificate of the certificate authority (CA) for the Apache web server module
mod_sslof the Keycloak virtual host. The web server needs the certificate in the PEM format.The web server uses the UCS CA from
/etc/univention/ssl/ucsCA/CAcert.pem, if the UCR variable has no value.Required
Default value
Set
No
/etc/univention/ssl/ucsCA/CAcert.pemInstallation and app configuration
- keycloak/cookies/samesite#
This setting sets the
SameSiteattribute in all the cookies of Keycloak. Possible values areLax,Strictand the default valueNone.Required
Default value
Set
No
NoneInstallation and app configuration
- keycloak/server/sso/path#
This setting sets the path used to access Keycloak at the end of the Keycloak URL. If this setting deviates from the default, you need to set this setting via UCR on all UCS servers in the domain, so that these servers can connect to Keycloak.
Required
Default value
Set
No
/Installation and app configuration
- keycloak/password/change/endpoint#
This setting sets the endpoint for the password change. Per default, the local Univention Management Console Server is used.
Required
Default value
Set
No
NoneInstallation and app configuration
- keycloak/login/messages/en/pwdChangeSuccessMsg#
This setting sets the success message after password change in English. Please note that this message is only shown if a new login is required after the password change.
Required
Default value
Set
No
See default value in Listing 4.3 after the table.
Installation and app configuration
'The password has been changed successfully. Please log in again.'
- keycloak/login/messages/de/pwdChangeSuccessMsg#
This setting sets the success message after password change in German. Please note that this message is only shown if a new login is required after the password change.
Required
Default value
Set
No
See default value in Listing 4.4 after the table.
Installation and app configuration
'Das Passwort wurde erfolgreich geändert. Bitte melden Sie sich erneut an.'
- keycloak/login/messages/en/accessDeniedMsg#
This setting sets the access denied message during login in English. This setting only has effect, if you have configured Keycloak for application specific access restriction as described in Restrict access to applications.
Required
Default value
Set
No
See default value in Listing 4.5 after the table.
Installation and app configuration
'Access forbidden.<br>You do not have the needed privileges to access this application. Please contact the administrator that you do not have access to the service {0} if you find this to be incorrect.'
- keycloak/login/messages/de/accessDeniedMsg#
This setting sets the access denied message during login in German. This setting only has effect, if you have configured Keycloak for application specific access restriction as described in Restrict access to applications.
Required
Default value
Set
No
See default value in Listing 4.6 after the table.
Installation and app configuration
'Zugriff verboten.<br>Bitte wenden Sie sich an den Administrator, dass Sie keinen Zugriff auf den Service {0} haben, wenn Sie feststellen, dass dies nicht korrekt ist.'
- keycloak/auto-migration#
Deactivate the automatic configuration migration during update process. When this is off you have to manually migrate the configuration. See Configuration migration during Keycloak app updates for more information.
Required
Default value
Set
No
NoneInstallation and app configuration
Starting with UCS 5.2 there is the additional setting ucs/server/sso/uri,
not a Keycloak app setting but a normal UCR variable, meant to be
used by SAML or OIDC clients for the configuration of the IdP endpoint.
- ucs/server/sso/uri#
Defines the URI for the IDP.
Required
Default value
Set
Yes
For all hosts in the UCS domain by the UCR policy
sso_uri_domainwide_setting, which is created by the Keycloak app during the installation or updated after changing the app settingkeycloak/server/sso/fqdnorkeycloak/server/sso/path.
4.9. Customize the appearance#
The Keycloak app uses the same web theme as UCS, so that the UCR
variable ucs/web/theme applies to Keycloak, as well. To adjust the web
theme, follow the steps outlined in Creating a custom theme/Adjusting the design of UCS web interfaces in
the UCS 5.0 Manual [2].
Administrators can change the values of the following CSS variables to customize the appearance of the web theme for the sign-in form provided by Keycloak. These CSS variables are specifically relevant to Keycloak. They take their default values from UMC and expect CSS background values.
--login-background--login-box-background--login-logo
Keycloak also uses
/usr/share/univention-management-console-login/css/custom.css and loads
from the URL /univention/login/css/custom.css. The CSS file gives more
control than just the theme.
Caution
You may need to adjust your customizations in the CSS file custom.css
after updates for UCS or the Keycloak app, because CSS selectors may change
on updates.
See also
- background - CSS: Cascading Style Sheets | MDN
for more information about the syntax for background values.
4.9.1. Adjusting texts on the Keycloak login page#
The Keycloak app lets Administrators overwrite any messages on the Keycloak login page. Each text variable value in this login template can be overwritten by using a UCR variable of the form
keycloak/login/messages/[de/en]/key=value
This make use of the Keycloak message bundles that are documented here: https://www.keycloak.org/docs/latest/server_development/#messages
For example, the login title in the Keycloak login dialogue can be adjusted like this:
$ ucr set \
keycloak/login/messages/en/loginTitleHtml=\
'Login at Domainname'
After setting one of these variables, this command has to be run to make the change visible in Keycloak login page:
$ univention-app configure keycloak
Warning
These settings are local settings. The UCR variables have to be set on each host running Keycloak.
4.9.2. Additional links on the login page#
Added in version 22.0.1-ucs2: Additional links below login dialog
Administrators can add links below the login dialog, for example to the user self service for a forgotten password or legal information such as a privacy statement.
To manage up to 12 links, use the command line tool univention-keycloak. To add links to the login page for both English and German run the following commands:
$ univention-keycloak login-links set en 1 "Link 1" "Link 1 description"
$ univention-keycloak login-links set en 2 "Link 2" "Link 2 description"
$ univention-keycloak login-links set de 1 "Link 1" "Beschreibung von 1"
$ univention-keycloak login-links set de 2 "Link 2" "Beschreibung von 2"
The login page then shows the links below the login dialog as in Fig. 4.1.
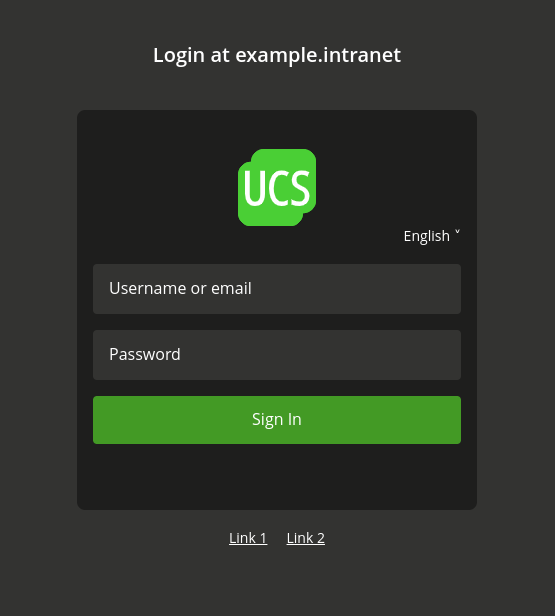
Fig. 4.1 Custom links below the login dialog#
Use univention-keycloak to modify and remove login links.
$ univention-keycloak login-links set en 1 "Link 1 new" "Link 1 new description"
$ univention-keycloak login-links delete en 2
To show the links that the login page has configured for a given language, use univention-keycloak like in the following example:
$ univention-keycloak login-links get en
4.10. Customize web server configuration for Keycloak#
The Keycloak app ships a configuration for the Apache HTTP web server
in /etc/apache2/sites-available/univention-keycloak.conf.
The Keycloak app creates the file and overwrites any changes during app updates.
Therefore, administrators shouldn’t edit this file.
You as administrator can customize the web server configuration for Keycloak
by creating the file /var/lib/univention-appcenter/apps/keycloak/data/local-univention-keycloak.conf.
For example, an administrator may want to restrict the access to the
Keycloak Admin Console to a specific IP subnet
and writes the appropriate configuration into local-univention-keycloak.conf.
<LocationMatch "^(/admin/|/realms/master/)">
              deny from all
              allow from 10.207.0.0/16
</LocationMatch>
To activate the configuration, you need to validate the configuration and then tell the web server to reload it. Use the following commands on the command line as super user.
The validation of the configuration is necessary, because the Apache HTTP web server terminates upon errors without error message. The Apache HTTP web server offers a dedicated command to validate the configuration.
$ apachectl configtest
Syntax OK
After the validation didn’t show any errors, you can restart the Apache HTTP web server to activate your custom changes.
$ service apache2 restart
4.11. Activate Kerberos authentication#
In the default configuration, the Keycloak app evaluates Kerberos tickets during the authentication process. If you have a UCS domain with client workstations that obtain Kerberos tickets during the user login process, users can configure their web browsers to send this ticket to Keycloak for authentication to enable a passwordless login, for example in the UCS portal.
To enable the web browser to send the Kerberos tickets, you must change the following settings:
Open a tab and enter about:config in the address bar to open the
Firefox configuration. Search for network.negotiate-auth.trusted-uris and
add the FQDN of your Keycloak server, which is
ucs-sso-ng.[Domain
name]
by default.
For Microsoft Edge on Windows, you need to configure Kerberos authentication
in the general settings of the operating system. Open the Control Panel and
move to .
Add the FQDN of your Keycloak server, ucs-sso-ng.[Domain
name] by default, to the list of Websites.
If you install the Active Directory-compatible Domain Controller app after installing Keycloak, you need to run the following command on the Primary Directory Node. It ensures that the Kerberos authentication also works with the Active Directory-compatible Domain Controller:
$ eval "$(ucr shell keycloak/server/sso/fqdn)"
$ samba-tool spn add "HTTP/$keycloak_server_sso_fqdn" "krbkeycloak"
$ fqdn="$(ucr get ucs/server/sso/uri | sed -e 's,https://,,' -e 's,/.*,,')"
$ samba-tool spn add "HTTP/$fqdn" "krbkeycloak"
Per default, Keycloak tries to use Kerberos. If no Kerberos ticket is available, Keycloak falls back to username and password authentication. You can deactivate this behavior in the Keycloak Admin Console with the following steps:
Select the realm
UCS.On the sidebar, click User federation and choose
ldap-provider.Go to the section Kerberos integration and deactivate Allow Kerberos authentication.
4.12. Restrict Kerberos authentication to IP subnets#
Added in version 25.0.6-ucs2: Restrict Kerberos authentication to IP subjects
On Microsoft Windows clients that aren’t joined to the Kerberos realm, Windows presents the user a dialog box before authenticating. To prevent this behavior in Windows, administrators can restrict Kerberos authentication to specific IPv4 and IPv6 subnets in Keycloak.
The Keycloak app version 25.0.6-ucs2 provides
a conditional authenticator extension
called Univention Condition IP subnet.
You can use this conditional authenticator
to restrict the activation of an authenticator
depending on the IP address of the requesting client IP address.
See also
For more information on authentication flows, see Keycloak Server Administration Guide: Authentication flows [9].
This section specifically describes how to create a conditional Kerberos authentication flow, although you can use any type of authenticator with this condition. To use this conditional authenticator, you need to create a Keycloak authentication flow that includes this condition. You can use the program univention-keycloak as outlined in Listing 4.10.
The command copies an existing flow and replaces the Kerberos authenticator with a Keycloak sub flow. The sub flow activates the conditional authenticator that evaluates the client’s IP address before it attempts the Kerberos authentication. The command copies the browser flow on default.
$ univention-keycloak conditional-krb-authentication-flow create \
  --flow=REPLACE_WITH_THE_ORIGINAL_FLOW --name=REPLACE_WITH_THE_NEW_KERBEROS_FLOW_NAME" \
  --allowed-ip=REPLACE_WITH_IPCIDRv4 --allowed-ip=REPLACE_WITH_IPCIDRv6
univention-keycloak conditional-krb-authentication-flow create has the following parameters:
- --flow#
The parameter
flowspecifies the source for the copy operation and the adjustment. Use the parameter in case you want to base the flow on an existing custom flow. The default value isbrowserthat references the default Keycloak browser flow.
- --name#
The parameter
namespecifies the name of the flow where Keycloak saves the flow.
- --allowed-ip#
Use the parameter
allowed-ipto specify the IP subnets that you want to allow for Kerberos authentication. You need to specify the values in CIDR format. You can use the parameter multiple times to specify several subnets.If you don’t specify a value, the program uses the default value
--allowed-ip=0.0.0.0/0 --allowed-ip=::/0. The default value allows all clients of all IPv4 and of all IPv6 addresses to use Kerberos authentication.
4.12.1. Assign authentication flow#
You can assign the authentication flow directly in the Keycloak Admin Console or optionally through the univention-keycloak command, as shown in Listing 4.11.
$ univention-keycloak client-auth-flow \
  --clientid "REPLACE_WITH_YOUR_CLIENT_ID" \
  --auth-flow "REPLACE_WITH_THE_NEW_FLOW_NAME"
Tip
You can also pass the option --auth-browser-flow
when you create a SAML SP or OIDC RP as a Keycloak Client.
For information about how to create a Keycloak Client,
see Keycloak as SAML Identity Provider.
4.13. Restrict access to applications#
Added in version 21.1.2-ucs2.
With the UCS simpleSAMLphp integration, you can restrict access of groups and users to specific SAML service providers through the UDM SAML settings.
The configuration steps in the following sections restrict access to certain SAML service providers and OIDC Relying parties through group membership in a similar way with Keycloak.
Attention
Application access restriction isn’t yet integrated into the UDM UMC module yet.
If you already need the application access restriction for groups at this time, read on and follow the steps outlined below. Note that you may need to perform manual migration steps after the integration is complete.
If you don’t have an immediate need, it’s recommended that you wait until the integration is complete in a future version of the Keycloak app.
This configuration differs from the one provided by simpleSAMLphp in the following ways:
Only the group membership restricts the access to applications. It isn’t possible to restrict the access for an individual user directly.
You must configure group access restrictions for SAML SP and OIDC RP directly in the Keycloak Admin Console, although you manage users and their group memberships in UDM.
By default, Keycloak allows access to all users. Only when you specifically configure the SAML SP or OIDC RP to use app authorization will Keycloak evaluate the access restriction to applications.
Important
Univention doesn’t support nested groups in the group mapper between UCS and Keycloak. The reason is that Keycloak doesn’t support groups as members of groups.
4.13.1. Create authentication flow#
Keycloak version 21.1.2-ucs2 provides an authenticator extension called Univention App authenticator, which performs the authorization validation on the user during the sign-in.
To use this authenticator, you need to create a Keycloak authentication flow that includes this authenticator. Use the command univention-keycloak as follows. The command doesn’t give any output:
$ univention-keycloak legacy-authentication-flow create
See also
For more information on authentication flows, see Keycloak Server Administration Guide: Authentication flows [9].
4.13.3. Map UDM groups to Keycloak#
To restrict access to certain Keycloak Clients by group membership, you must map the necessary groups to Keycloak. Use the Keycloak Admin Console to create an appropriate LDAP mapper.
In Keycloak Admin Console go to .
Choose the Name of the mapper freely.
Select the Mapper type
group-ldap-mapperto extend the form. Fill in the fields as following:- LDAP Groups DN:
Set to the value of the base LDAP DN of your domain, for example
dc=example,dc=local.- Group Object Classes:
univentionGroup- Ignore Missing Groups:
On- Membership LDAP Attribute:
memberUid- Membership Attribute Type:
UID- Drop non-existing groups during sync:
On
Important
It’s strongly recommended to set an LDAP Filter in the group mapper so that Keycloak only maps strictly necessary groups. If you don’t specify an LDAP filter, Keycloak synchronizes all groups from the LDAP directory service. Depending on the size of the groups, it may impact the performance of Keycloak.
- Example
To filter groups by their name and only allow Keycloak to synchronize the mentioned groups, use
(|(cn=umcAccess)(cn=nextcloudAccess))
Scroll down and click Save.
To trigger the synchronization of the groups immediately, click the name of the mapper you just created to open it and select Sync LDAP groups to Keycloak from the Action drop-down.
4.13.4. Create Keycloak client roles#
The authenticator extension Univention App authenticator restricts access by
evaluating the roles of a user in Keycloak. It specifically checks
for a client specific role named univentionClientAccess. If this client
specific role exists, the authenticator extension restricts access of all users
that don’t have this role.
For each Keycloak Client that you want to check access restrictions, you
need to create the role univentionClientAccess. In Keycloak Admin
Console go to .
For each client of interest, run the following steps:
Select .
Enter name for the role
univentionClientAccess.Click Save.
Important
Follow the next section Attach the client specific role to groups immediately, because saving the client role enforces the sign-in restriction for the Keycloak Client.
See also
For more information on roles in Keycloak, see Keycloak Server Administration Guide: Assigning permissions using roles and groups [10].
4.13.5. Attach the client specific role to groups#
To grant access permission to group members of a group so that they can sign in to an app, you need to attach the Keycloak Client role to the groups. All group members then inherit the client role.
In Keycloak Admin Console go to . For each group of interest, run the following steps:
Select .
Find and select the app you intend to control with
univentionClientAccess.Warning
Keycloak doesn’t evaluate nested group memberships. Only direct group membership of a user give the user the necessary client role.
Click Assign.
From now on, only the users that inherited the Keycloak Client specific
role univentionClientAccess have access to the respective applications.
4.14. Import additional CA certificates#
Added in version 25.0.1-ucs3.
Keycloak in UCS runs as Docker container with its own CA certificates store. By default the UCS root CA certificate is imported into Keycloak’s CA store to allow for a secure connection to the UCS LDAP directory.
In some cases it is necessary to add additional CA certificates to Keycloak.
You can do that by creating the directory
/var/lib/univention-appcenter/apps/keycloak/conf/ca-certificates and
copying CA certificate files in the pem format with the ending .pem
into this directory.
$ file /var/lib/univention-appcenter/apps/keycloak/conf/ca-certificates/*.pem
.../keycloak/conf/ca-certificates/cert1.pem: PEM certificate
.../keycloak/conf/ca-certificates/cert2.pem: PEM certificate
During the manual configuration of the App with
$ univention-app configure keycloak
or automatically during the installation and updates, these certificates will be imported.
Important
Follow the steps above on all your servers where the Keycloak app is installed.