3.2. Domain join#
A Nubus for UCS system must and Ubuntu, or Windows system can join the domain after installation. You can also add any other Unix systems to the domain. See Extended domain services documentation [5] for details.
3.2.1. Domain join process#
The Primary Directory Node should run the latest version. A UCS system joining the domain must use the same version or an older version. Because this causes compatibility errors, don’t join a domain with a newer version. When a computer joins a domain, the primary system:
Creates a computer account.
Synchronizes the TLS certificates.
Copies LDAP data if needed.
After that, the join scripts run. Installed software packages use them to add objects to the directory service. For more information, see Join scripts and unjoin scripts.
The UCS system records the domain join on the client in
/var/log/univention/join.log.
To analyze errors, review this file.
The Primary Directory Node stores related join actions in
/home/<Join-Account>/.univention-server-join.log.
You can repeat the domain join process at any time. You may need to rejoin a system after major changes on the Primary Directory Node, such as changes to key system settings.
3.2.2. How UCS systems join domains#
A UCS system can join an existing domain in three ways:
During installation in the Univention Installer, see Mode: Join an existing UCS domain.
After installation with the command univention-join, see Subsequent domain joins with univention-join.
Through the Domain Join management module in the Management UI, see Join a domain through the management module.
3.2.2.1. Subsequent domain joins with univention-join#
The univention-join command joins a Nubus for UCS system to a Nubus for UCS domain. It accepts command-line arguments or interactive prompts. After installation and before the domain join is complete, run this command. The command asks for required settings interactively, or pass them as command-line options instead. This works well for automated or remote setups.
The following options are available. Most are optional. The command asks for any missing values.
- -dcname <HOSTNAME>#
The system automatically detects the Primary Directory Node through DNS. If automatic detection fails, for example, when a Replica Directory Node has a different DNS domain, you can specify the Primary Directory Node hostname directly using this parameter. Enter the hostname as a fully qualified name, for example
primary.example.com.
- -dcaccount <ACCOUNTNAME>#
The join account is the user account used to add systems to the UCS domain. By default, you use the
Administratoruser or a member of theDomain AdminsorDC Backup Hostsgroups. You can specify a different join account using this parameter.
- -dcpwd <FILE>#
Specify the password using this parameter. The command reads the password from the specified file.
- -verbose#
This parameter adds additional debug output to the log files. You can review this output to analyze errors.
3.2.2.2. Join a domain through the management module#
You can also join a Nubus for UCS domain through the Domain join management module.
The Administrator user doesn’t exist yet on a system that hasn’t joined.
Sign in to the Management UI as user root instead.
For information about the password, see Define the root password.
As with the command-line join,
enter the username and password of an account that’s member of the Domain Admins group.
The system finds the Primary Directory Node through DNS.
You can also enter it by hand.
Use the Rejoin option to repeat the domain join at any time.
3.2.2.3. Join scripts and unjoin scripts#
The system runs scripts during the domain join and during software removal:
- Join scripts
The UCS system runs join scripts during the domain join. They can register a print server in the domain, adapt DNS entries, or perform other configuration changes. The system stores them in
/usr/lib/univention-install/.- Unjoin scripts
Unjoin scripts reverse changes that join scripts applied. The UCS system runs them when you uninstall software components and stores them in
/usr/lib/univention-uninstall/.
Each script belongs to a software package and has a version number. When a new package version needs an updated setup, the script version goes up too.
Note
Join scripts and unjoin scripts are specific to UCS systems. Windows, Ubuntu, and macOS systems don’t use this mechanism during domain join.
Checking and running scripts
Use univention-check-join-status to check whether any scripts need to run. This command identifies scripts that haven’t run yet or have an older version.
If pending scripts are present, the Domain join management module displays a warning message when you open it. To run all pending join scripts, click Execute all pending join scripts.
To run all scripts from the command line,
use univention-run-join-scripts.
The system automatically checks whether it has already run each script.
When you run univention-run-join-scripts on a system other than
the Primary Directory Node, the command asks for a username and password.
When you run this command on the Primary Directory Node,
to sign in, use the --ask-pass option.
The system records each script name and its output
in /var/log/univention/join.log.
3.2.3. Windows domain joins#
Microsoft Windows systems can join a Nubus for UCS domain. The join uses Samba with Active Directory support.
3.2.3.1. Windows domain join overview and requirements#
Samba enables Nubus for UCS to support Microsoft Windows systems. This section describes the join procedure for Windows 11 as an example. The process is similar for other Windows versions and for Windows Server systems, which you can also join as member servers. UCS doesn’t support Windows systems as domain controllers. For more information about Windows in a Nubus for UCS domain, see Services for Windows in Univention Corporate Server - Manual for users and administrators [3].
Important
Only domain-compatible Windows versions can join the Nubus for UCS domain. Windows Home editions can’t join a domain.
When a Windows client joins, Nubus for UCS creates a host account for it. For more information, see Computers module in Nubus Manual 1.x [4]. You can configure the MAC address, IP address, network, DHCP, and DNS through management modules before or after the join.
To join the domain, use the local Administrator account.
Domain joins take some time. Don’t cancel the process prematurely. After successful joining, a confirmation window appears with the message Welcome to the domain <your domain name>. To confirm the join, click OK. To apply the changes, restart the Windows computer.
For Windows client domain name rules, see Naming constraint for the domain name.
Important
For a domain join against a domain controller based on Samba/AD, configure the DNS settings on the client to resolve entries from the Nubus for UCS domain. Verify that the system time on the client matches the time on the domain controller.
3.2.3.2. Supported Windows versions#
Nubus for UCS supports the following Microsoft Windows versions to join a UCS domain:
Windows 10
Windows 11
Windows Server in the versions 2012, 2016, 2019, 2022, and 2025
3.2.3.3. Windows 11#
To join Windows 11 to a Nubus for UCS domain, you need the Pro, Education, or Enterprise edition. Follow these steps:
Open the Start menu or press the Windows key. Search for
Control Panelin the Search field.Navigate to . Scroll down and click Domain or workgroup. Select .
Enable the Domain option.
Enter the domain name in the input field. Use the full domain name, for example
mydomain.intranet. Click OK.Enter the username and password of an account that’s member in the
Domain Adminsgroup. The default domain username for administrator accounts isAdministrator.To start the domain join, click OK.
3.2.3.4. Windows 10#
Only the Pro and Enterprise editions of Windows 10 can join a domain. To join Windows 10 to a Nubus for UCS domain, follow the steps in Windows 11.
3.2.3.5. Windows Server 2012 / 2016 / 2019 / 2022 / 2025#
To join Windows Server to a Nubus for UCS domain, follow these steps:
Open the Start menu.
Navigate to . Click .
Enable the Domain option. Enter the domain name in the input field for the domain join. Click OK.
In the Name field, enter
Administrator. In the Password field, enter the password fromuid=Administrator,cn=users,LDAP base DN.To start the domain join, click OK.
Warning
Univention doesn’t support joining Microsoft Active Directory Domain Controllers into the Nubus for UCS domain. Use the Active Directory Connection app from the Univention App Center as an alternative.
For more information, see Active Directory Connection in Univention Corporate Server - Manual for users and administrators [3].
3.2.4. Ubuntu domain joins#
Univention provides the Univention Domain Join Assistant, a GUI and command-line tool for adding Ubuntu and Linux Mint clients to a Nubus for UCS domain. The assistant sets up LDAP, DNS, Kerberos, and login (PAM/SSSD) for you. You don’t need to set up anything manually.
For installation steps, supported versions, and usage details, see the Univention Domain Join Assistant documentation.
3.2.5. macOS domain joins#
To join the macOS client to a Nubus for UCS domain, follow these steps:
In System Preferences, open Users & Groups.
Click the lock icon and enter the credentials for a local Administrator account.
From the menu, open the Directory Utility, as you can see in Fig. 3.1.
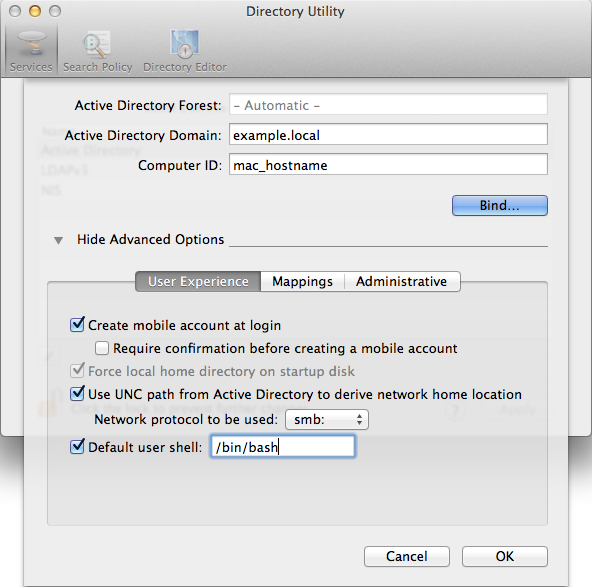
Fig. 3.1 Domain join of a macOS system#
In the Advanced options section, enable Create mobile account at login. A mobile account lets you sign in to the macOS system with your domain account even when the domain isn’t available.
Enter the domain name in the Active Directory Domain field.
Enter the macOS client hostname in the Computer ID field.
To start the domain join, click Bind…. Enter the username and password for an account in the
Domain Adminsgroup, for exampleAdministrator.
3.2.5.1. Domain join on the command line#
You can also use dsconfigad on the command line. See Listing 3.1 for the full command. For more options, run dsconfigad -help.
$ dsconfigad -a <MAC HOSTNAME> \
  -domain <FQDN> \
  -ou "CN=Computers,<LDAP base DN>" \
  -u <Domain Administrator> \
  -mobile enable