2.2. Initial system configuration#
This section guides you through the interactive installation process of Nubus for UCS. During the graphical installation, you configure all necessary system settings through a series of prompts. The installer walks you through each configuration step sequentially and lets you navigate between steps.
The configuration process covers the following essential steps:
- Installation mode selection
Choose how to proceed with the installation: graphical mode with default settings, manual network configuration, or text mode.
- Language and location settings
Select the system language and geographic location, which determine the time zone and language variants.
- Keyboard layout configuration
Configure the keyboard layout independently of the system language.
- Network configuration
Set up network interfaces through automatic DHCP discovery or manual IP address configuration.
rootpassword definitionDefine the root password, which you also use for the
Administratordomain user from installation of a Primary Directory Node.- Hard drive partitioning
Select a partitioning strategy such as standard partitioning, logical volume management (LVM), or encrypted LVM.
- Base system installation
The installer automatically installs the Nubus for UCS base system and additional software after partitioning is complete.
After completing all configuration steps, the system restarts to begin domain setup and system initialization.
2.2.1. Select the installation mode#
After booting the system from the installation medium, the screen shows the boot prompt in Fig. 2.1.
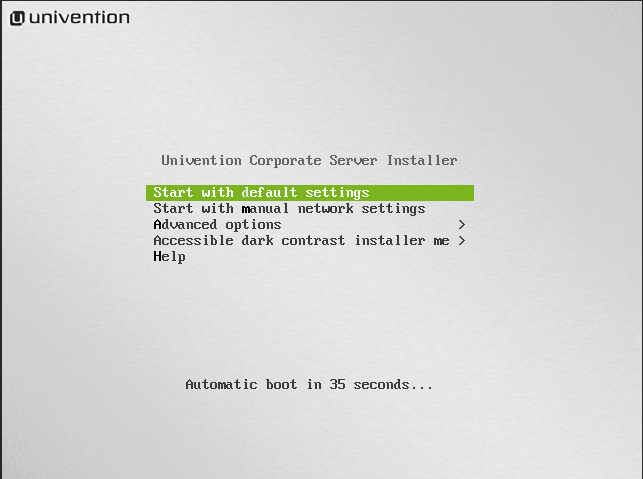
Fig. 2.1 Installation boot prompt#
You can choose between the following installation procedures:
- Start with default settings
starts the interactive, graphic installation. During the installation, the system requests a number of parameters such as the network settings, hard drive partitions and domain settings and then runs installation and configuration.
- Start with manual network settings
runs a standard installation that doesn’t automatically configure the network through DHCP. Use this option for system installation, where you need to set up the network manually.
- Advanced options
The submenu offers advanced options for the installation process for selection:
- Start in text mode
runs an interactive standard installation in text mode. Use this option on systems which have problems with the graphic version of the installer. For information, see Text mode installation.
- Rescue mode
serves to recover systems that are unable to boot.
- Boot from first hard drive
boots the operating system installed on the first hard drive instead of the Nubus for UCS installation.
- Accessible dark contrast installer menu
allows running the setup in a dark and contrast rich mode for visually impaired persons.
After you select one option, the boot loader runs the kernel from the installation medium. The installation consists of separate modules that the installer loads subsequently from the installation medium, if necessary. For example, the installer has modules for network configuration or for the selection of software.
2.2.2. Select the language#
In the first step, you select the system language that you want to use, see Fig. 2.2. The selection has an influence on the use of language-specific characters and permits the representation of program output in the selected languages on the installed Nubus for UCS system.
If Univention Installer has a translation for the selected language, it also uses the language during installation. Otherwise, the installer continues in English. The installer supports the languages English and German.
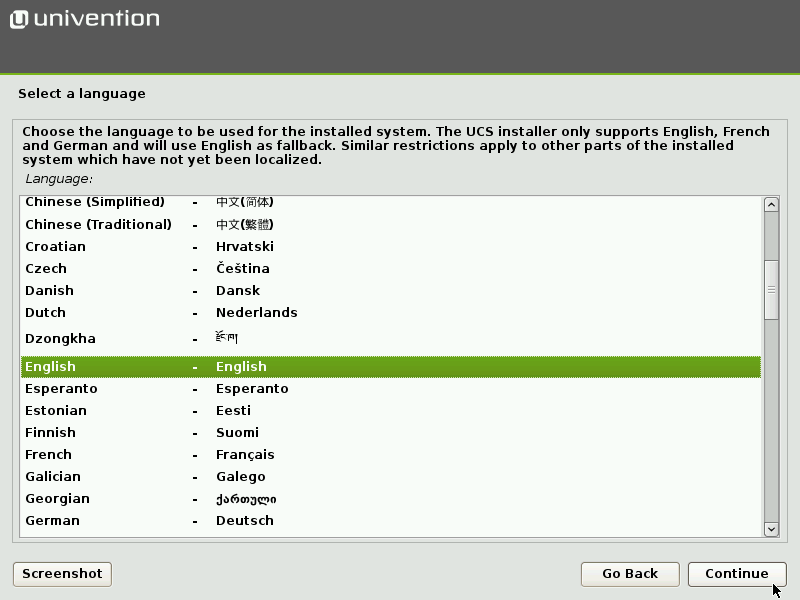
Fig. 2.2 Select the language#
2.2.3. Select the location#
After the language selection, the installer shows a list of locations related to the selected language, see Fig. 2.3. Select a suitable location from the list. Nubus for UCS uses the selected location to configure the time zone and the correct language variant. If the needed location isn’t in the list, select other at the bottom to see an extensive list.
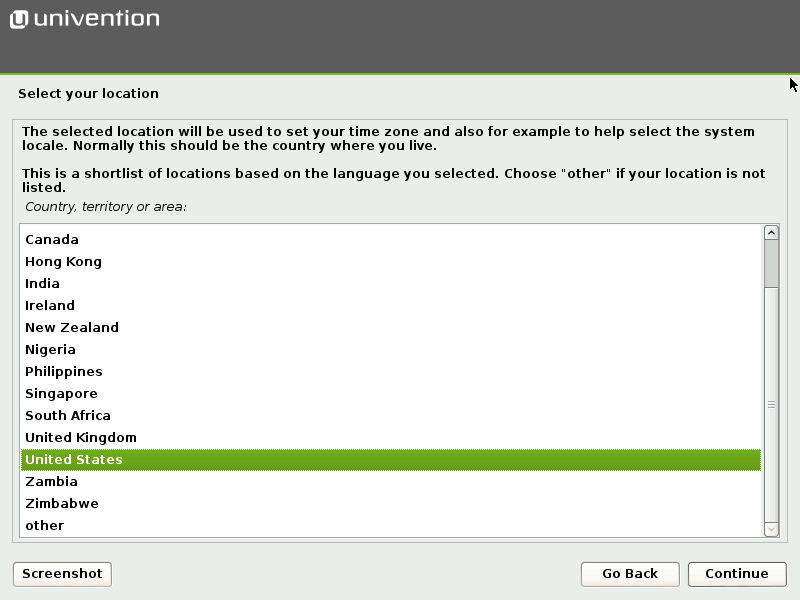
Fig. 2.3 Select the location#
2.2.4. Select the keyboard layout#
You can select the keyboard layout independently of the system language, see Fig. 2.4. Select a language compatible with the keyboard. Otherwise, it may cause operating problems.
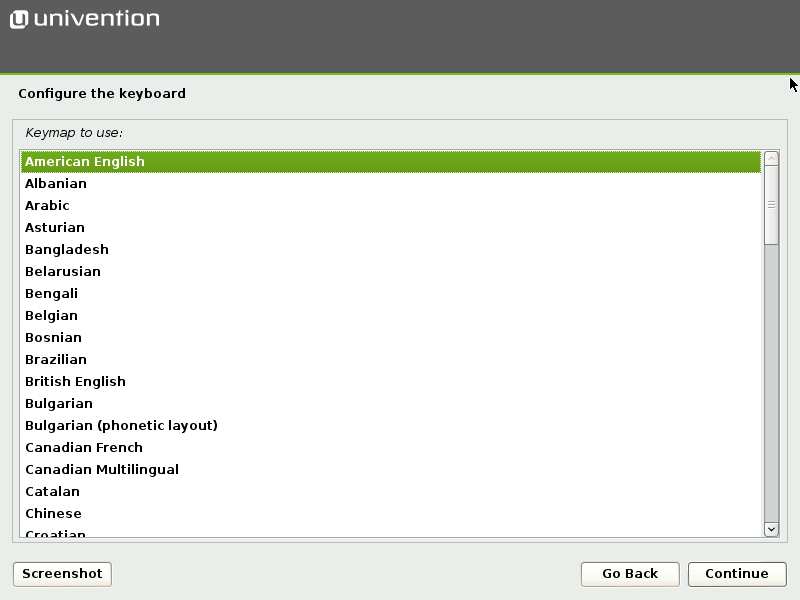
Fig. 2.4 Select the keyboard layout#
2.2.5. Set up network configuration#
Initially, the Univention Installer attempts to configure the network interfaces automatically, see Fig. 2.5. You can deactivate the automatic network interface configuration by selecting Start with manual network settings from the boot loader menu in Select the installation mode.
First, the installer attempts to determine an IPv6 address through the stateless address autoconfiguration (SLAAC). If unsuccessful, the installer attempts to request an IPv4 address through the Dynamic Host Configuration Protocol (DHCP). If again successful, the installer skips the manual network configuration.
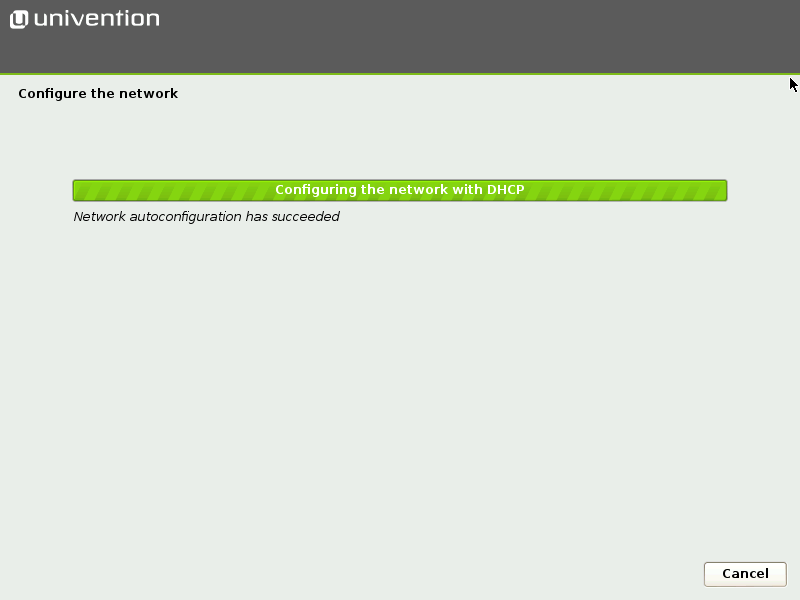
Fig. 2.5 Automatic network configuration#
If no DHCP server is present in the local network or your network requires a static configuration of the network interface, click Cancel. The installer then offers to repeat the automatic configuration or to configure the interface manually, see Fig. 2.6.
Important
The installation of Nubus for UCS requires at least one network interface. If the installer can’t detect a supported network card, it opens a list of supported drivers to choose from.
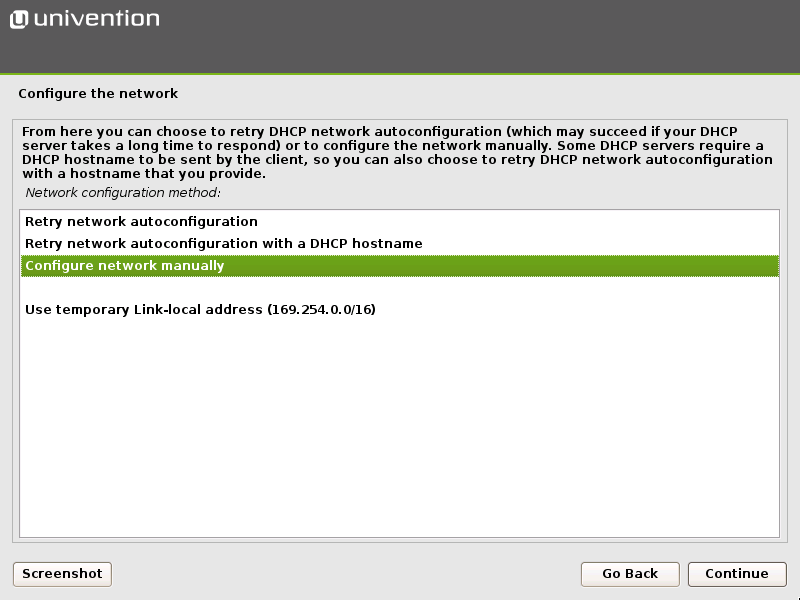
Fig. 2.6 Select the manual network configuration#
- Manual network address configuration
In the manual network configuration you can specify either a static IPv4 or an IPv6 address for the system, see Fig. 2.7.
- IPv4 addresses
IPv4 addresses have a 32-bit length and you write them in four blocks in decimal form, for example
192.0.2.10.- IPv6 addresses
IPv6 addresses are four times as long and you typically write them in hexadecimal form, for example
2001:db8:fe29:de27:0000:0000:0000:0000.- Other network address parameters
In addition to a static IP address, the installer requests values for network mask, gateway, and DNS servers.
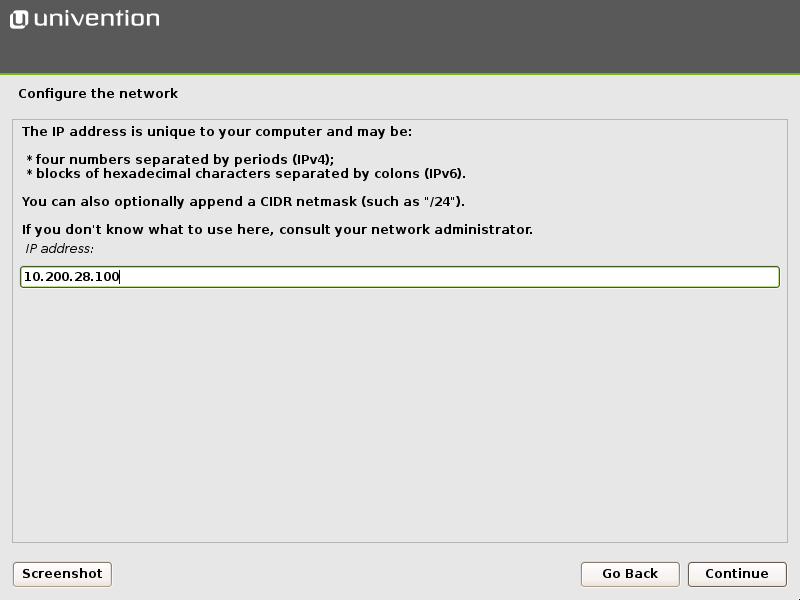
Fig. 2.7 Specify an IP address#
- Manual DNS server setting configuration
Consider the following points when you specify a DNS server manually. They depend on the intended subsequent use of the Nubus for UCS system.
- First Nubus for UCS system
When you install the first Nubus for UCS system and create a Nubus for UCS domain, use the IP address of the local router, if it provides the DNS service, or the DNS server of the internet provider as DNS server address.
- Additional Nubus for UCS system
For the installation of every additional Nubus for UCS system, use the IP address of a UCS Primary Directory Node as the DNS server. This is essential for the automatic detection of the UCS Primary Directory Node to work properly. In case of doubt, use the IP address of the UCS Primary Directory Node system.
- Nubus for UCS in Windows Active Directory domain
If the Nubus for UCS system is to join a Windows Active Directory domain during the installation, use the IP address of an Active Directory domain controller system as the DNS server. This is essential for the automatic detection of the Windows Active Directory domain controller to work properly.
2.2.6. Define the root password#
Defining a password for the root user is necessary to sign in to the installed system,
see Fig. 2.8.
If you install a UCS Primary Directory Node
the installer employs this password also the Administrator domain user.
In later operation, you can manage the passwords for the root and Administrator users independent of each other.
You must enter the password twice to ensure it’s defined correctly.
For security reasons the password must contain at least eight characters.
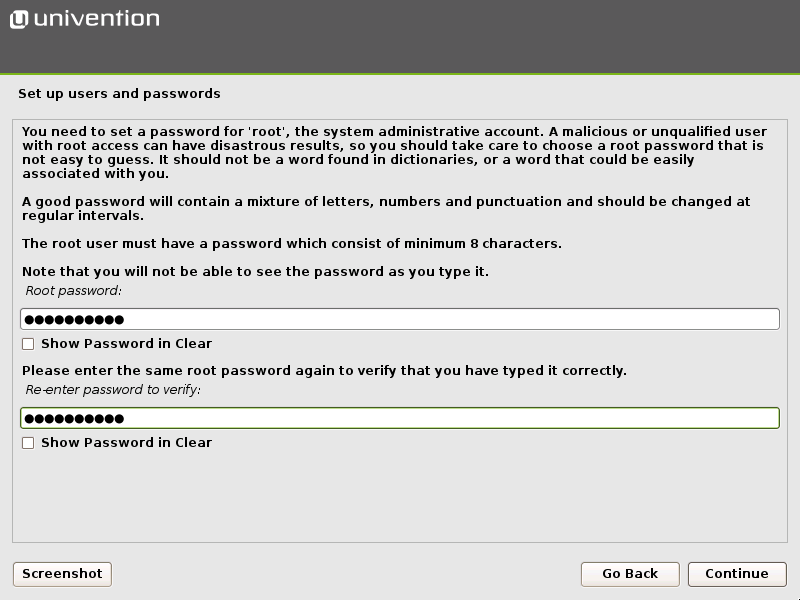
Fig. 2.8 Define the root password#
2.2.7. Partition the hard drive#
The Univention Installer supports to partition hard drives
and create different file systems, such as ext4 and XFS.
In addition, you can also configure different partition strategies,
such as the logical volume manager (LVM), RAID, or partitions encrypted with LUKS.
The Univention Installer automatically selects a suitable partition layout, Master Boot Record (MBR) or GUID Partition Table (GPT), depending on the size of the selected hard drive. On systems with the Unified Extensible Firmware Interface (UEFI), the installer automatically uses GPT.
The Univention Installer offers guided partitioning to simplify the installation. In the guided installation, the installer applies certain standard schemes with respect to the partitioning and formatting to the selected hard drive. In addition, you can manually partition the hard drive yourself.
The installer offers the following schemes for guided partitioning, see Fig. 2.9:
- Guided - Use entire disk
The installer creates an individual partition for each file system. It doesn’t use abstraction layers, such as LVM. It assigns the number of file systems or partitions. The size of the respective hard drive restricts the sizes of the partitions.
- Guided - Use entire disk and set up LVM
The installer creates a Logical Volume Group on the selected hard drive first. For each file system, it then creates a separate logical volume within the volume group. In this scheme, the size of the volume group restricts the size of the logical volume, You can subsequently enlarge the size of the volume group with additional hard drives. In case of doubt, select this partitioning scheme.
- Guided - Use entire disk with encrypted LVM
This partitioning scheme is the same as Guided - Use entire disk and set up LVM, with the addition that it uses an encrypted partition for the LVM volume group. Consequently, you must enter the password for the encrypted volume group every time you start the system.
Warning
In all mentioned partitioning schemas, the installer deletes all existing data on the selected hard drive during the partitioning.
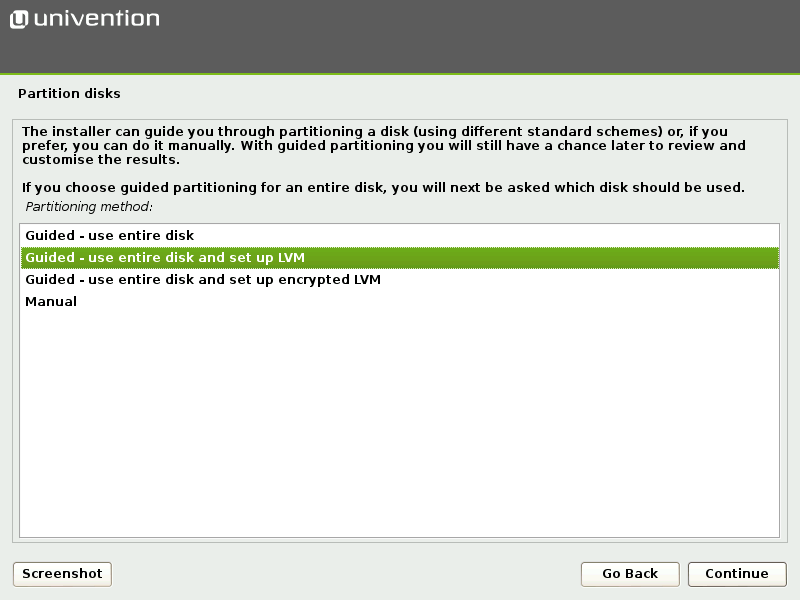
Fig. 2.9 Select the partitioning scheme#
Select a hard drive from the list of the detected hard drives, where you want to apply the partitioning scheme to.
Each partitioning version has the following sub schemas, which differ in the number of file systems it creates:
- All files in one partition
The installer creates just one partition or logical volume for the
/file system.- Separate
/homepartition In addition to a file system for
/, the installer creates an additional file system for/home/.- Separate
/home,/usr,/varand/tmppartition In addition to a file system for
/, the installer also creates an additional file system for each of/home/,/usr/,/var/, and/tmp/.
Before the installer applies a change to the hard drive, it summarizes the change again that you must explicitly confirm, see Fig. 2.10.
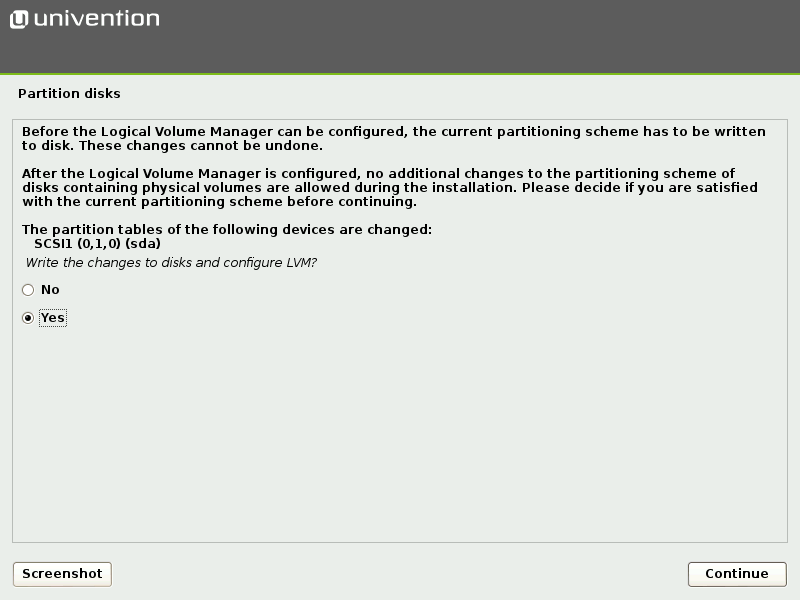
Fig. 2.10 Confirm to apply changes to the hard drive#
2.2.8. Finish installation#
After the installer completes the partitioning, it automatically installs the Nubus for UCS base system and additional software. The software installation takes some time depending on the speed of your hardware. After software installation, the installer makes the system ready for boot through installation of the GRUB boot loader, see Fig. 2.11.
A restart into the freshly installed system follows subsequently to complete the system configuration. To continue with the domain setup, see Domain setup.
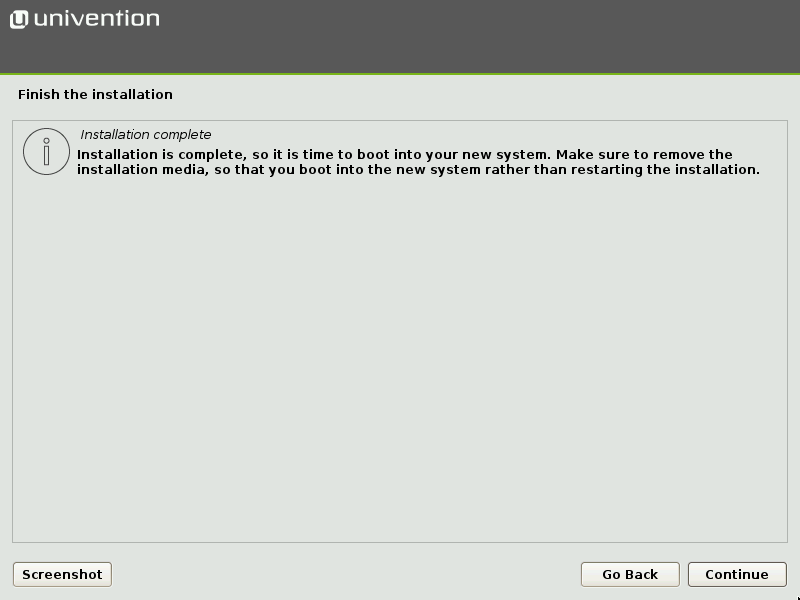
Fig. 2.11 Finish the installation#