2. Installation#
The following documentation describes how to install Univention Corporate Server (UCS). The UCS system is installed from the DVD. The installation is interactive and prompts all the necessary system settings in a graphic interface.
The installation DVD is available for the computer architecture amd64 (64-bit). In addition to support for the widely distributed BIOS systems, the DVD also includes support for the Unified Extensible Firmware Interface (UEFI) standard. The UEFI support on the DVD is also capable of starting systems with activated Secure Boot and installing UCS there.
Note
Please note that simultaneous operation of UCS and Debian on a UEFI system starting with UCS 5.0-0 is not supported. The reason for this is the GRUB boot loader of Univention Corporate Server, which partly uses the same configuration files as Debian. An already installed Debian leads to the fact that UCS cannot be booted (any more) after the installation of or an update to UCS 5.0. A subsequent installation of Debian will also result in UCS 5.0 not being able to boot.
Following installation on hardware or in a virtualization solution, UCS can also be installed on the Amazon EC2 cloud using an AMI image. Further information can be found in Installation in the Amazon EC2 cloud.
The installer’s input masks can be operated with the mouse or via the keyboard.
The Tab key can be used to proceed to the next field.
The key combination of Shift+Tab can be used to return to the previous field.
The Enter key is used to assign values to the input field and confirm buttons.
Within a list or table, the arrow keys can be used for navigating between entries.
Note
The Cancel button can be used to cancel the current configuration step. An earlier configuration step can then be selected again in the menu that is subsequently shown. Under certain circumstances, subsequent configuration steps cannot be directly selected if the earlier steps have not been completed.
2.1. Selecting the installation mode#
After booting the system from the installation medium, the following boot prompt is displayed:
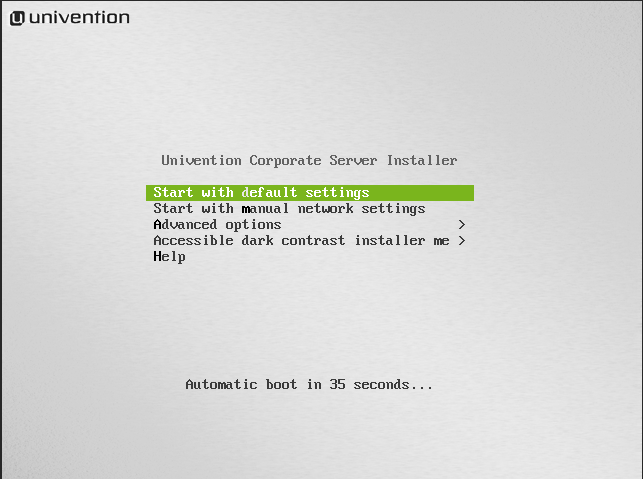
Fig. 2.1 Installation boot prompt#
Now you can choose between several installation procedures.
Start with default settings starts the interactive, graphic installation. During the installation, the system requests a number of parameters such as the network settings, hard drive partitions and domain settings for the UCS system to be installed and then performs the installation and the configuration.
Start with manual network settings performs a standard installation, where the network is not configured automatically through DHCP. This is practical on systems, where the network must be setup manually.
The Advanced options submenu offers advanced options for the installation process for selection:
Start in text mode performs an interactive standard installation in text mode. This is practical on systems which display problems with the graphic version of the installer.
Rescue mode is there to recover systems unable to boot.
Boot from first hard drive boots the operating system installed on the first hard drive instead of the UCS installation.
Accessible dark contrast installer menu allows to start the setup in a dark and contrast rich mode.
Once one of the installation option is selected, the kernel is loaded from the installation medium. The actual installation is divided into separate modules, which can be loaded from the installation medium subsequently if necessary. There are modules for network configuration or for selecting the software to be installed, among others.
2.2. Selecting the installation language#
In the first step, you can select the system language you wish to use. The selection has an influence on the use of language-specific characters and permits the representation of program output in the selected languages in the installed UCS system.
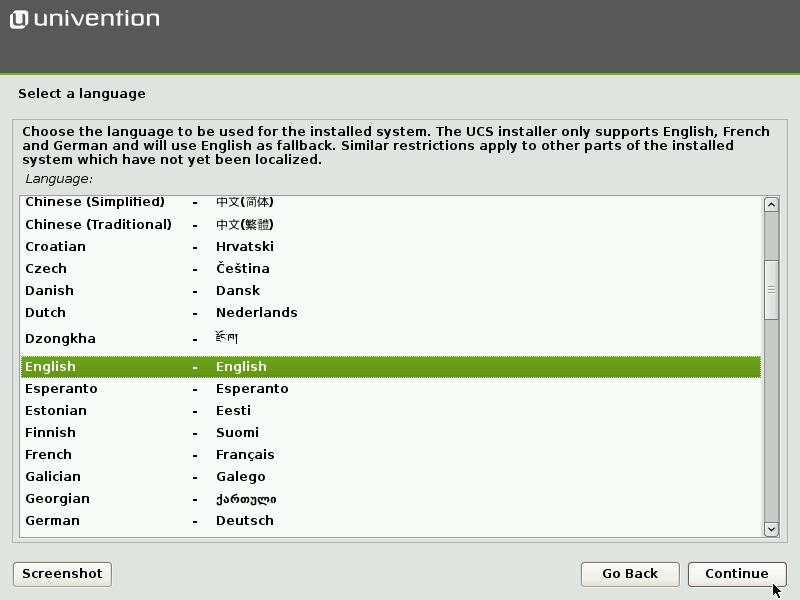
Fig. 2.2 Selecting the installation language#
If Univention Installer has been translated into the selected language (currently German and English), the selected language is also used during the installation, otherwise the installation is performed in English.
2.3. Selecting the location#
Once the system language has been selected, a small list of locations is displayed based on the selected language. Select a suitable location from the list. The selected location is used to set the time zone or the correct language variant, for example. Should none of the displayed locations be appropriate, a more extensive list can be displayed using the menu entry other.
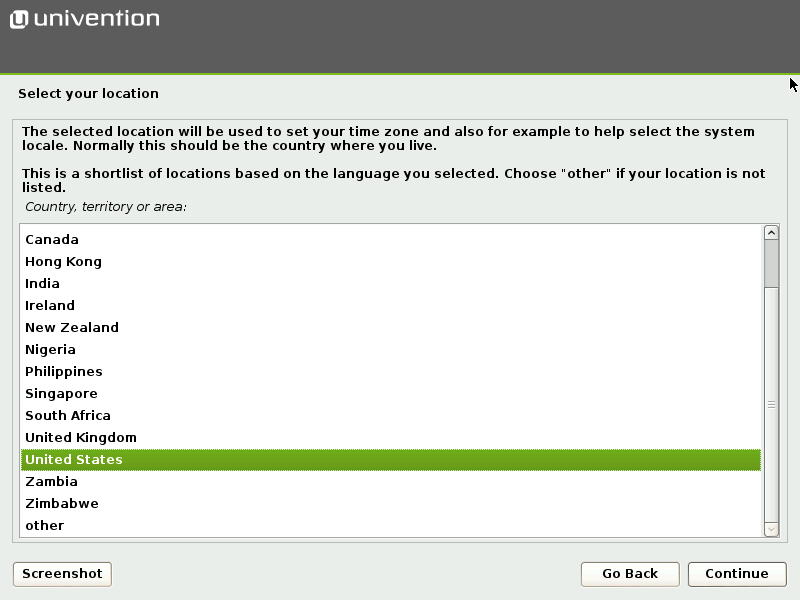
Fig. 2.3 Selecting the location#
2.4. Selecting the keyboard layout#
The keyboard layout can be selected independently of the system language. The language selected here should be compatible with the keyboard used as it may otherwise cause operating problems.

Fig. 2.4 Selecting the keyboard layout#
2.5. Network configuration#
Initially, the Univention Installer attempts to configure the network interfaces automatically. This can be disabled by selecting the menu item Start with manual network settings from the menu of the boot loader. Firstly, an attempt is made to determine an IPv6 address via the stateless address autoconfiguration (SLAAC). If this is not successful, the Univention Installer attempts to request an IPv4 address via the Dynamic Host Configuration Protocol (DHCP). If this is successful, the manual network configuration of Univention Installer is skipped.
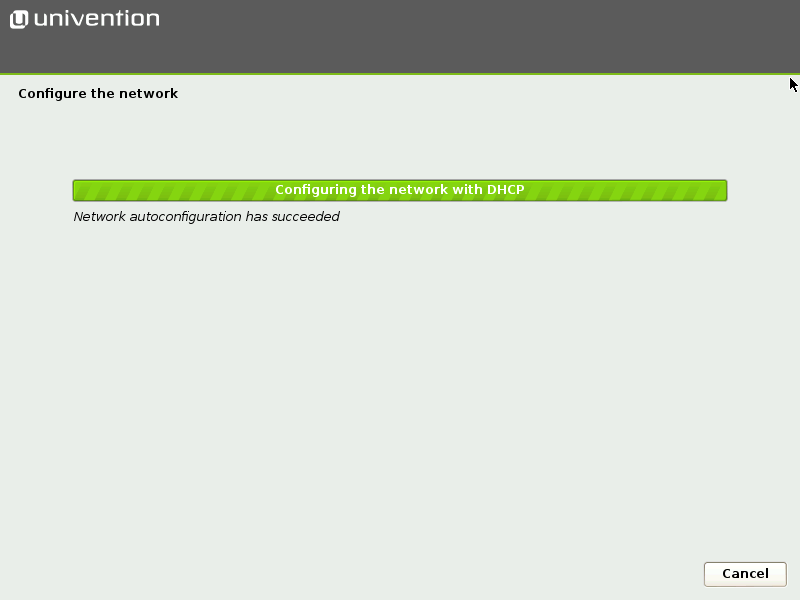
Fig. 2.5 Automatic network configuration#
If there is no DHCP server present in the local network or static configuration of the network interface is required, the Cancel button can be selected. The Univention Installer then offers to repeat the automatic configuration or to configure the interface manually.
Note
At least one network interface is required for the installation of Univention Corporate Server. If no supported network card is detected, Univention Installer opens a list of supported drivers for selection.
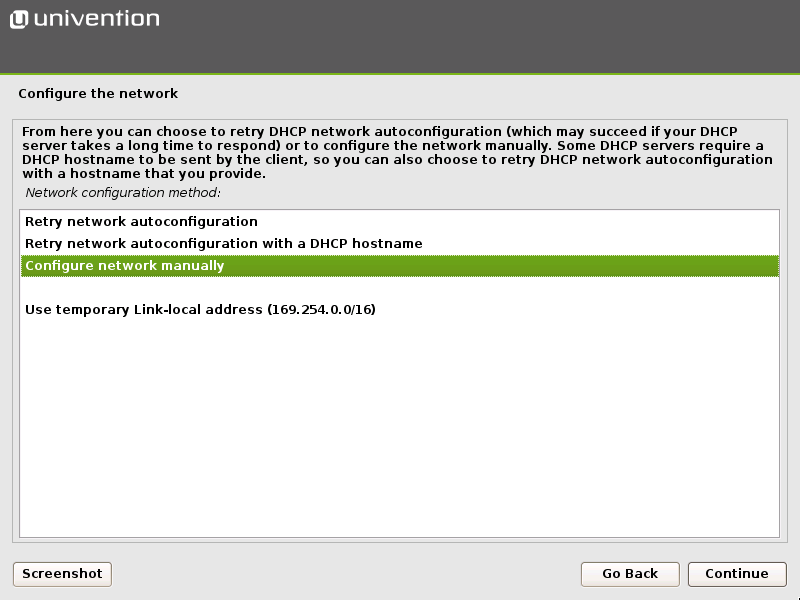
Fig. 2.6 Selecting the manual network configuration#
In manual configuration it is possible to specify either a static IPv4 or an
IPv6 address for the system. IPv4 addresses have a 32-bit length and are
generally written in four blocks in decimal form (e.g., 192.0.2.10), whereas
IPv6 addresses are four times as long and typically written in hexadecimal form
(e.g., 2001:0DB8:FE29:DE27:0000:0000:0000:0000). In addition to entering a
static IP address, values for network masks, gateways and DNS servers are also
requested.
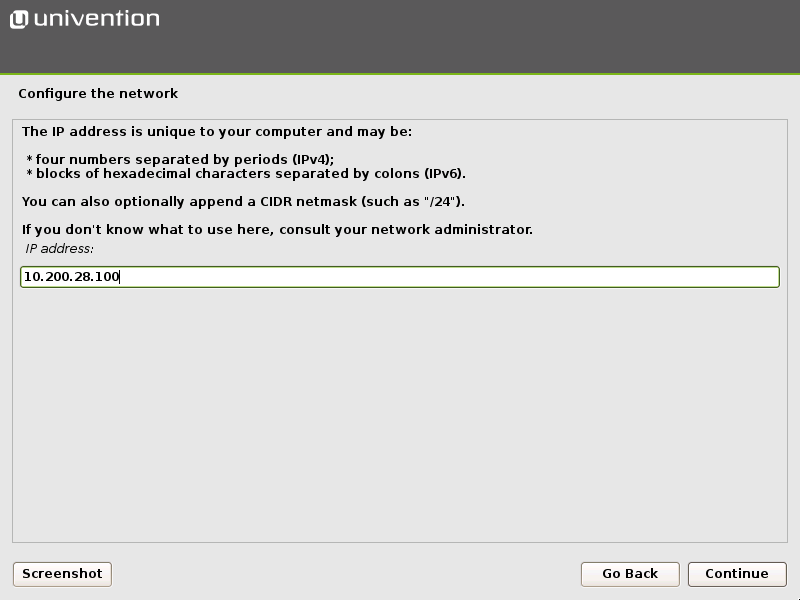
Fig. 2.7 Specifying an IP address#
The following points must be taken into consideration when specifying a DNS server manually. They depend on the intended subsequent use of the UCS system.
When installing the first UCS system in a new UCS domain, the IP address of the local router (if it provides the DNS service) or the DNS server of the internet provider should be entered.
When installing every additional UCS system, the IP address of a UCS Directory Node system must be specified as the DNS server. This is essential for the automatic detection of the Primary Directory Node to function. In case of doubt, the IP address of the UCS Primary Directory Node system should be entered.
If the UCS system is to join a Windows Active Directory domain during the installation, the IP address of an Active Directory domain controller system should be specified as the DNS server. This is essential for the automatic detection of the Windows Active Directory domain controller to function.
2.6. Setting up the root password#
Setting of a password for the root user is required for logging on to the
installed system. If a Primary Directory Node is installed, this password is also
employed for the Administrator user. In later operation, the passwords for
the root and Administrator users can be managed independently of each
other. The password must be re-entered in the second entry field.
The password must contain at least eight characters for security reasons.
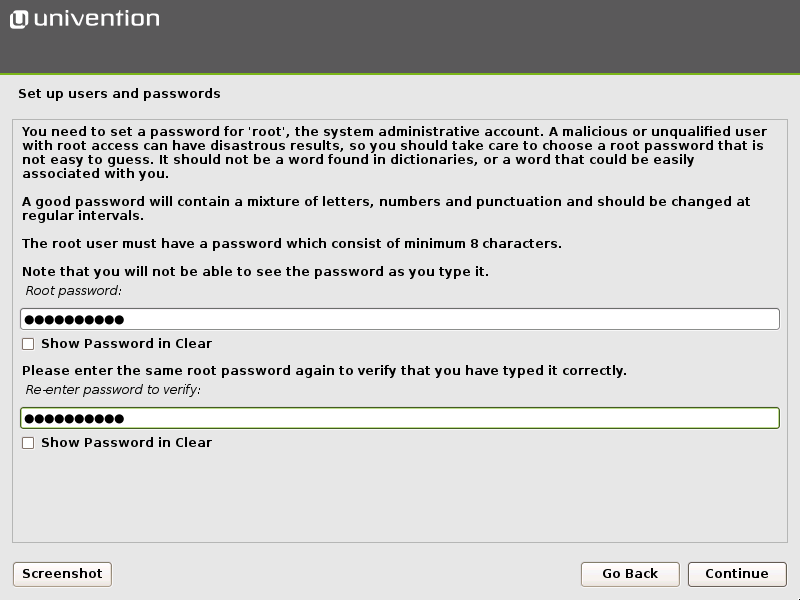
Fig. 2.8 Setting the root password#
2.7. Partitioning the hard drive#
The Univention Installer supports the partitioning of hard drives and the creation of different file systems (e.g., ext4 and XFS). In addition, it is also possible to set up mechanisms such as the logical volume manager (LVM), RAID or partitions encrypted with LUKS.
As of UCS 4.0, the Univention Installer selects a suitable partition model (MBR or GPT) automatically depending on the size of the selected hard drive. On systems with the Unified Extensible Firmware Interface (UEFI), the GUID Partition Table (GPT) is used automatically.
The Univention Installer offers guided installations to make installation simpler. In the guided installation, certain standard schemes with respect to the partitioning and formatting are applied to the selected hard drive. In addition, it is also possible to perform partitioning manually.
There are three schemes available for selection for guided partitioning:
- Guided - Use entire disk
In this scheme, an individual partition is created for each file system. Abstraction layers like LVM are not used. During the following step the number of file systems or partitions is assigned. The size of the partitions is restricted to the size of the respective hard drive.
- Guided - Use entire disk and set up LVM
If the second scheme is selected, a Logical Volume Group (LVM) is set up on the selected hard drive first. A separate logical volume is then created within the volume group for each file system. In this scheme, the size of the logical volume is restricted by the size of the volume group, which can also be subsequently enlarged with additional hard drives. In case of doubt, select this partitioning scheme.
- Guided - Use entire disk with encrypted LVM
This version is the same as the previous version, with the addition that the LVM volume group is also encrypted. Consequently, the password for the encrypted volume group has to be entered every time the system is started up.
Caution
In all three versions, the existing data on the selected hard drive are deleted during the partitioning!
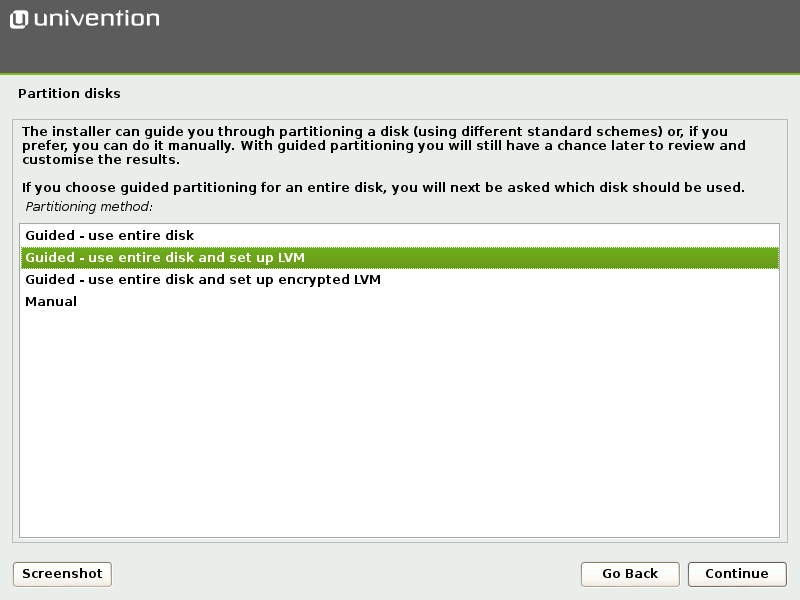
Fig. 2.9 Selecting the partitioning scheme#
The next step is to select a hard drive from the list of those detected to which the partitioning version should be applied.
There are three sub versions for each partitioning version, which differ in the number of file systems created:
- All files in one partition
In this version, just one partition or logical volume is created and the
/file system saved there.- Separate
/homepartition In addition to a file system for
/, an additional file system is also created for/home/.- Separate
/home,/usr,/varand/tmppartition In addition to a file system for
/, an additional file system is also created each for/home/,/usr/,/var/and/tmp/.
Before every active change to the hard drive, the change is displayed again in an additional dialogue and must be confirmed explicitly.
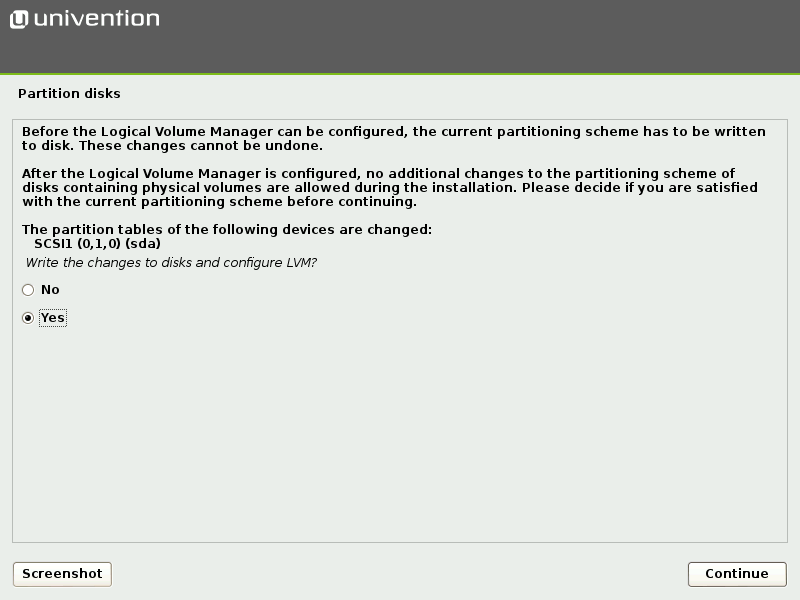
Fig. 2.10 Confirmation of changes to the hard drive#
Once the partitioning is complete, the UCS basic system and additional software is installed automatically. This can take some time depending on the speed of the hardware used. The system is then made ready to boot via the installation of the GRUB boot loader.
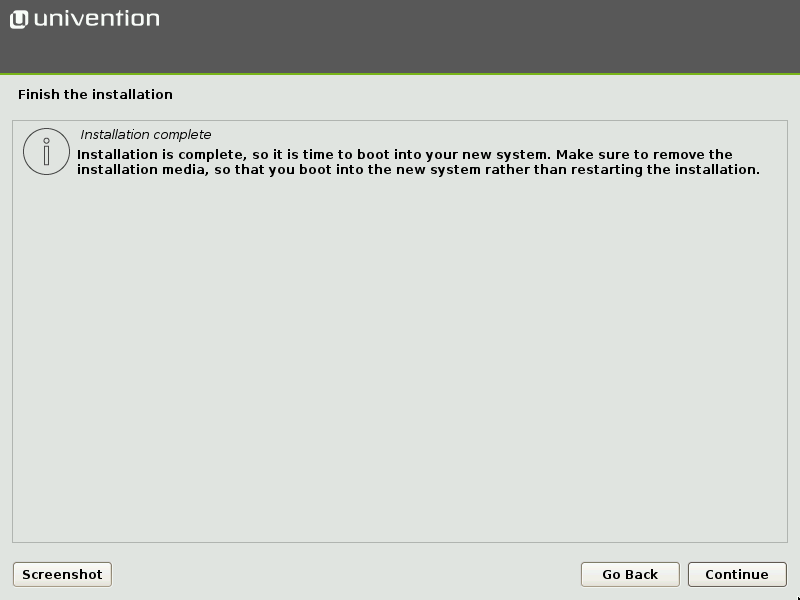
Fig. 2.11 Finish the installation#
A restart into the freshly installed system follows subsequently in order to complete the configuration within it.
2.8. Domain settings#
The final configuration of the UCS system is started by selecting a domain mode. There are three modes available, which influence the following configuration steps:
- Create a new UCS domain
In the first mode, Create a new UCS domain, the first system in a new UCS domain is configured: a UCS system with the Primary Directory Node system role. In the following configuration steps, the information required for setting up a new directory service, authentication service and DNS server are requested. A UCS domain can consist of one single or several UCS systems. Additional UCS systems can be added at a later point in time using the Join an existing UCS domain mode.
- Join into an existing Active Directory domain
This mode, in which UCS is operated as a member of an Active Directory domain, is suitable for expanding an Active Directory domain with applications available on the UCS platform. Apps installed on the UCS platform are then available for the users of the Active Directory domain to use. On selection of this mode, all the relevant information for the joining of the Active Directory domain is requested and the UCS system configured correspondingly.
- Join into an existing UCS domain
Selecting the Join into an existing UCS domain mode allows the UCS system to be configured to join an existing UCS domain. What UCS system role it is to take on in the domain is queried at a later stage.
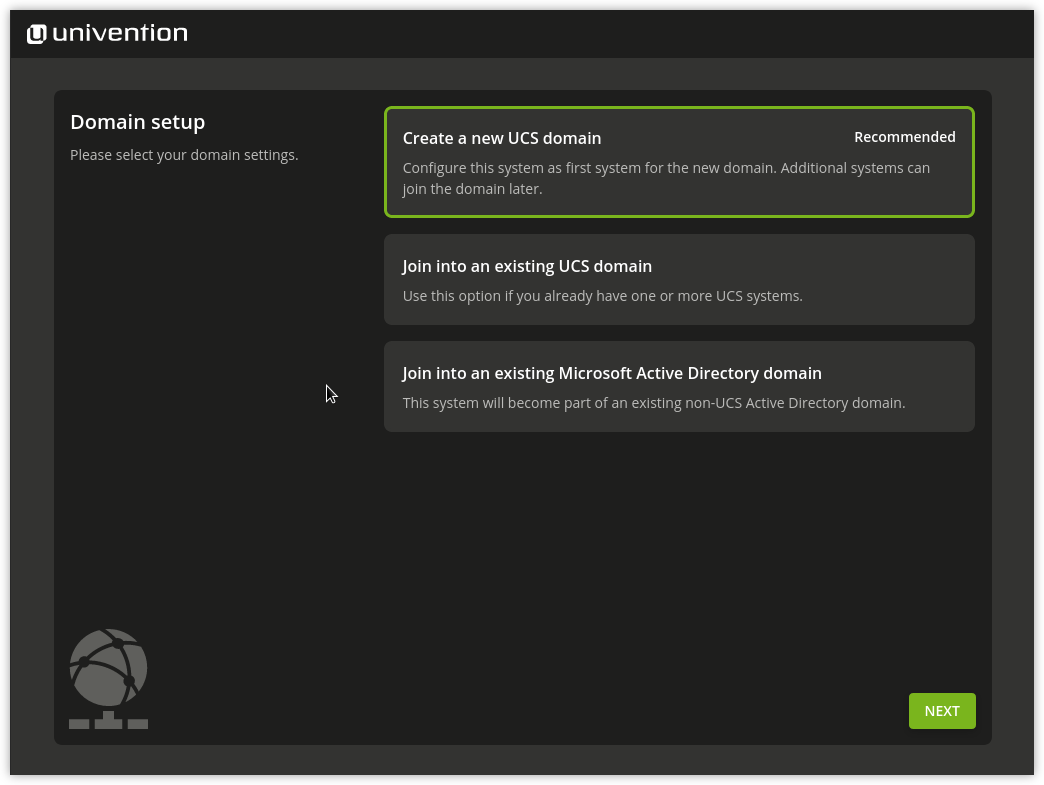
Fig. 2.12 Domain settings#
2.8.1. Naming convention for hostnames#
During UCS installation, the domain setup asks for a hostname and a domain name as fully qualified domain name. For compatibility reasons with Samba 4 and Windows domains, the hostname must adhere to the following naming convention:
Length from 1 to 13 alpha numeric characters
Only lower case letters (
a-z) and numerals (0-9)Start and end with an alpha numeric character and can contain a hyphen (
-) in between.
The naming convention has the following regular expression:
^[a-z0-9][a-z0-9-]{0,11}[a-z0-9]?$
2.8.2. Create a new UCS domain mode#
Once the Create a new UCS domain mode has been selected, an organization name, an email address, a fully qualified domain name and an LDAP base are requested in the following two steps.
Specification of an organization name is optional and it is used in the second step to generate a domain name and the LDAP base automatically.
If a valid email address is specified, this is used to activate a personalized license, which is required for the use of the Univention App Center. The license is generated automatically and sent to the specified email address immediately. The license can then be imported via the UMC module Welcome! (Activation of UCS license / license overview).
The name of the UCS system to be configured and the name of the DNS domain are determined from the fully qualified domain name (hostname including domain name) entered here. A suggestion is generated automatically from the organization name entered in the previous step. It is recommended not to use a publicly available DNS domain, as this can result in problems during the name resolution.
For the naming convention of the hostname, refer to Naming convention for hostnames.
A LDAP base needs to be specified for the initialization of the directory service. A suggestion is also derived here automatically from the fully qualified domain name. This value can usually be adopted without any changes.

Fig. 2.13 Specification of hostname and LDAP base#
2.8.3. Join an existing Active Directory domain mode#
If the DNS server of an Active Directory domain was specified during the network configuration, the name of the Active Directory domain controller is suggested automatically in the Active Directory account information step. If the suggestion is incorrect, the name of another Active Directory domain controller or another Active Directory domain can be entered here.
The specification of an Active Directory account and the corresponding password is required for joining the Active Directory domain. The user account must possess the right to join new systems in the Active Directory domain.
In addition, a hostname must be entered for the UCS system to be configured. The suggested hostname can be adopted or a new hostname entered. The domain name of the computer is derived automatically from the domain DNS server. In some scenarios (e.g., a public mail server) it can prove necessary to use a specific fully qualified domain name. The UCS system will join the Active Directory domain with the hostname specified here. Once set up, the domain name cannot be changed again once the configuration is completed.
For the naming convention of the hostname, refer to Naming convention for hostnames.
In a UCS domain, systems can be installed in different system roles. The first UCS system, that joins an Active Directory domain, is automatically installed with the Primary Directory Node system role. If this mode is selected during installation of additional UCS systems, the system role selection dialogue is shown. The system roles are described within the following section.
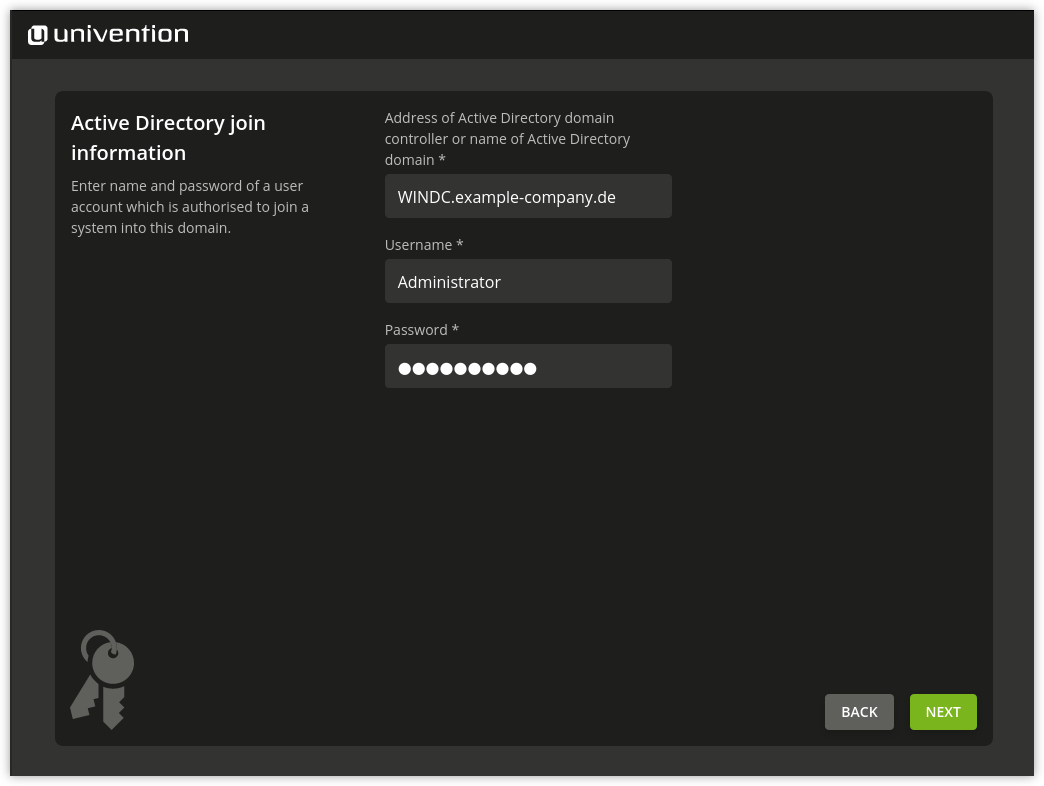
Fig. 2.14 Information on the Active directory domain#
2.8.4. Join an existing UCS domain domain mode#
In a UCS domain, systems can be installed in different system roles. The first system in a UCS domain is always installed with the Primary Directory Node system role. Additional UCS systems can join the domain at a later point in time and can be configured with one of the following system roles.
- Backup Directory Node
The Backup Directory Node is the fallback system for the Primary Directory Node. If the latter should fail, a Backup Directory Node can adopt the role of the Primary Directory Node permanently. All the domain data and SSL security certificates are saved as read-only copies on servers with the Backup Directory Node role.
- Replica Directory Node
All the domain data are saved as read-only copies on servers with the Replica Directory Node role. In contrast to the Backup Directory Node, however, not all security certificates are saved. As accesses to the services running on a Replica Directory Node are performed against the local LDAP directory service, Replica Directory Node systems are ideal for site servers and the distribution of high-load services.
- Managed Node
Managed Nodes are UCS systems without a local LDAP directory service. Access to domain data here is performed via other servers in the domain. They are therefore suitable for services which do not require a local database for authentication, for example, such as print and file servers.
Once the UCS system role has been selected, further information on the domain join is requested. If the domain join is not intended to occur automatically during the installation, the Start join at the end of the installation option can be disabled. If the correct DNS server was selected during the network configuration, Univention Installer can determine the name of the Primary Directory Node system automatically. If the decision is taken to join another UCS domain, the Search Primary Directory Node in DNS option can be disabled and the fully qualified domain name of the preferred Primary Directory Node entered in the input field below. The access information required for the domain join must be entered in the Administrator account and Administrator password input fields.
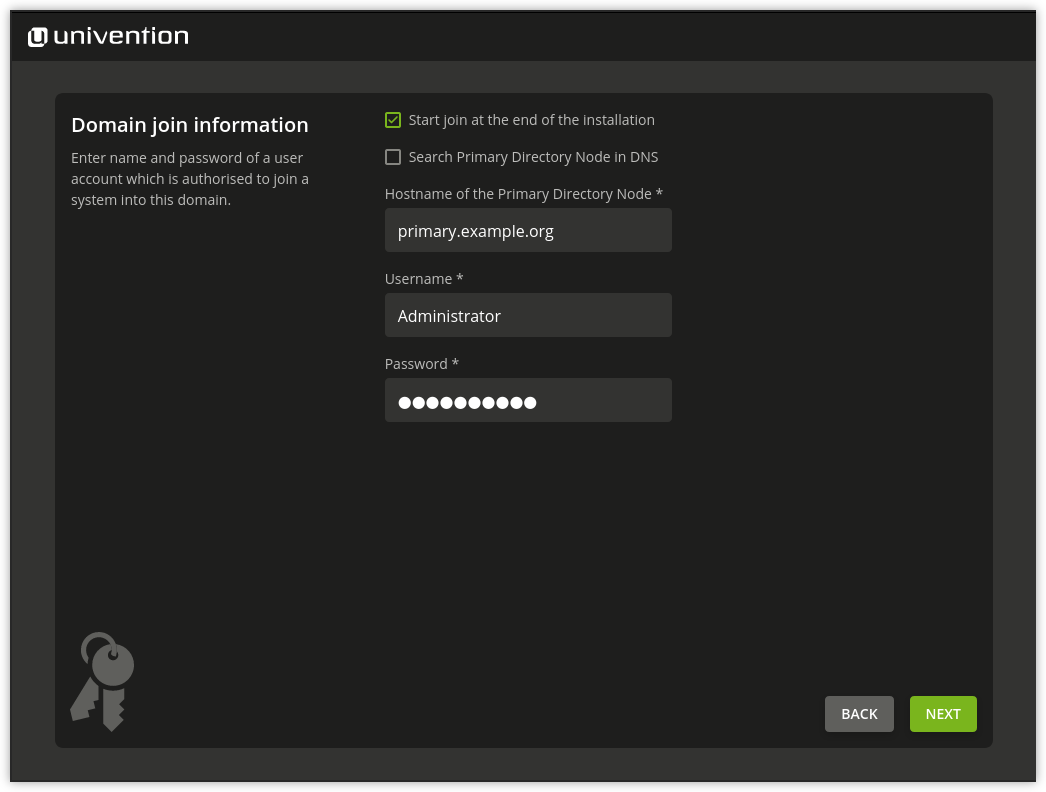
Fig. 2.15 Information on the domain join#
In addition, a hostname must be entered for the UCS system to be configured in the next step. The suggested hostname can be adopted or a new hostname entered. The domain name of the computer is derived automatically from the domain DNS server. In some scenarios (e.g., a public mail server) it can prove necessary to use a certain fully qualified domain name. Once set up, the domain name cannot be changed again once the configuration is completed.
For the naming convention of the hostname, refer to Naming convention for hostnames.
2.9. Confirming the settings#
This dialogue shows the major settings that were made. If all the settings are correct, the CONFIGURE SYSTEM button can be used to start the configuration of the UCS system, see Fig. 2.16.
The Update system after installation option allows the automatic installation of available Errata updates. In addition, all patch level updates and Errata updates available are installed on a Primary Directory Node. On all other system roles, all the patch level updates are set up to the installation status of the Primary Directory Node. You need to sign in to the Primary Directory Node to check the installation status. This is done using the login data specified in the join options.
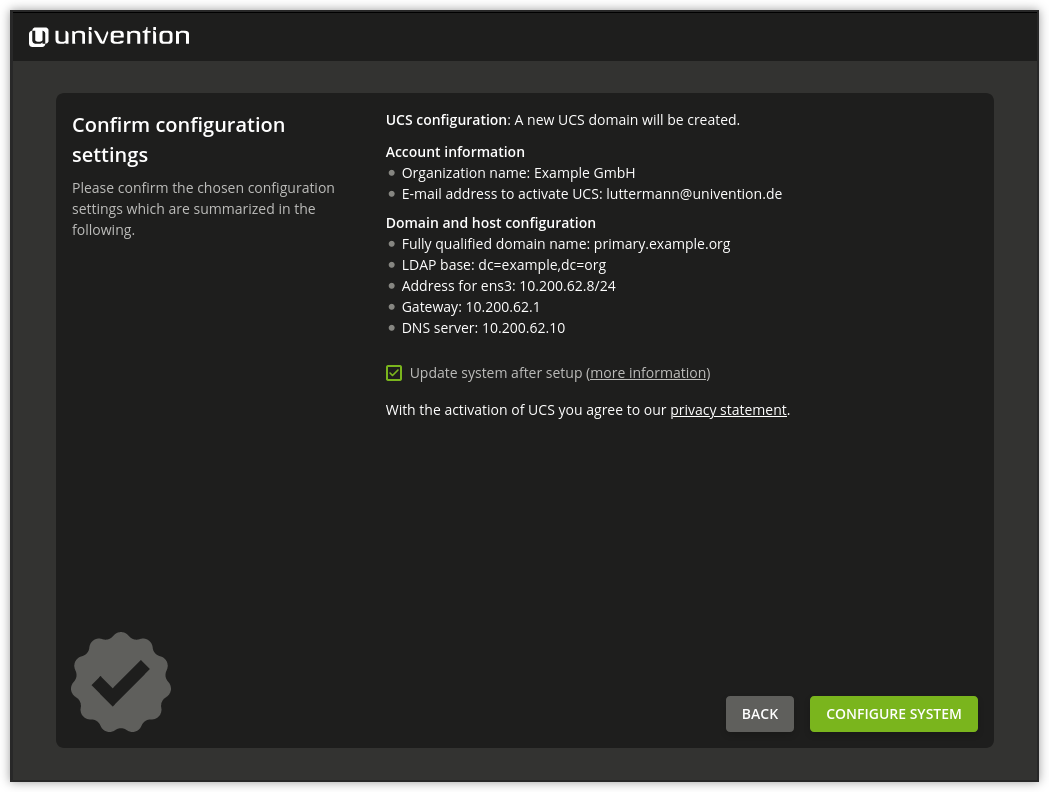
Fig. 2.16 Installation overview#
During the configuration, a progress bar displays the progress of the installation.
The installation protocol of the Univention Installer is saved in the following files:
/var/log/installer/syslog/var/log/univention/management-console-module-setup.log
Completion of the configuration must be confirmed with the CONFIGURE SYSTEM button. The UCS system is then prepared for the first full booting procedure and restarted.
The system will then boot from the hard drive. Following the boot procedure, the
root and Administrator users can sign in to the UCS portal page (see
UCS web interface), which can be reached under the IP address set during
the installation or the hostname.
If the computer was installed as the first system in the UCS domain (Primary Directory Node), the license can now be imported (see Activation of UCS license / license overview).
2.10. Troubleshooting for installation problems#
Information on possible installation problems can be found in the Univention Knowledge base in the section Installation.
2.11. Installation in text mode#
On systems that showed a problem with the graphic variant of Univention Installer, the installation may be also started in text mode. To achieve this, in the DVD boot menu Advanced options the entry Install in text mode has to be selected.
During installation in text mode Univention Installer shows the same information and asks for the same settings. After partitioning the hard drive, the system is prepared for the first boot and finally restarted.
After restart the configuration may be resumed by using a web browser. The URL
https://SERVER-IP-ADDRESS or http://SERVER-IP-ADDRESS has to be opened
within the browser (HTTPS is recommended). After loading the URL a login as user
root is required.
The configuration process asks for location and network setting and then resumes with the same steps as the graphic variant of the installation, see Domain settings.
2.12. Installation in the Amazon EC2 cloud#
Univention provides an Amazon Machine Image (AMI) for the Amazon EC2 cloud for UCS. This generic image for all UCS system roles is used to derive an individual instance which can be configured via Univention Management Console modules (domain name, software selection, etc.).
The process for setting up a UCS instance based on Amazon EC2 is documented in Univention Help 21833 - “Amazon EC2 Quickstart”.
2.13. Installation in VMware#
If UCS is installed as a guest in VMware, select the option as the Guest operating system, because UCS is based on Debian.
The Linux kernel used in UCS includes all the support drivers necessary for
operation in VMware (vmw_balloon, vmw_pvsci, vmw_vmci,
vmwgfx and vmxnet3).
The open source version of the VMware Tools (Open VM Tools) is delivered with
UCS. The tools can be installed using the open-vm-tools package (they are
not required but do, for example, allow synchronization of the time on the
virtualization server with the guest system).