11.6. RADIUS#
The RADIUS app increases the security for UCS managed IT infrastructures by controlling the access to the wireless network for users, groups and endpoint devices via RADIUS protocol. The configuration is done via deny and allow lists and directly at user, group and endpoint device objects in the UCS management system. Registered users are authenticated with their usual domain credentials or, alternatively, with a specifically for RADIUS generated password, which, among others, also allows bring your own device concepts.
11.6.1. Installation#
RADIUS is available through the App Center (see Univention App Center) and can be installed using the UMC module App Center. It can be installed on multiple machines. After the installation it runs a FreeRADIUS server. Authenticators (e.g. access points) can contact via RADIUS to check network access requests.
The RADIUS app can also be installed on UCS@school systems. In this case, the network access can be given to users or groups regardless of the internet rule or computer room settings.
11.6.2. Configuration#
11.6.2.1. Allowed users#
By default no user is allowed to access the network. Enabling the checkbox for network access on the RADIUS tab, gives the user access to the network. The checkbox can also be set on groups, which allows all users in this group access.
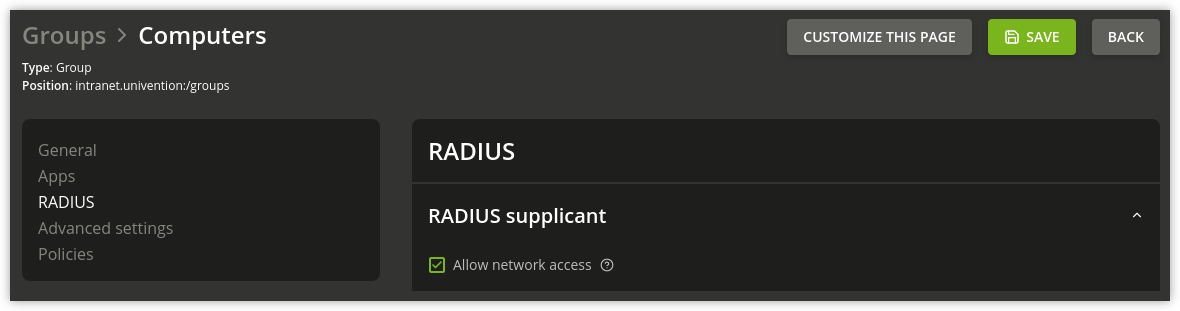
Fig. 11.4 Example for a group allowing network access to its users#
11.6.2.2. Service specific password#
By default, users authenticate with their domain password.
RADIUS uses a specific password,
if an administrator sets the Univention Configuration Registry Variable
radius/use-service-specific-password to true.
Users can request a password specific to wireless LAN use
through the
Self Service app.
UCS generates a random password for each password request
from the Self Service.
If necessary, users can generate a random password at any time,
which also invalidates the existing password.
To enable the service specific password page in the Self Service app,
the administrator must set the Univention Configuration Registry Variable
umc/self-service/service-specific-passwords/backend/enabled
to the value true on the UCS system
that has the Self Service Backend app installed.
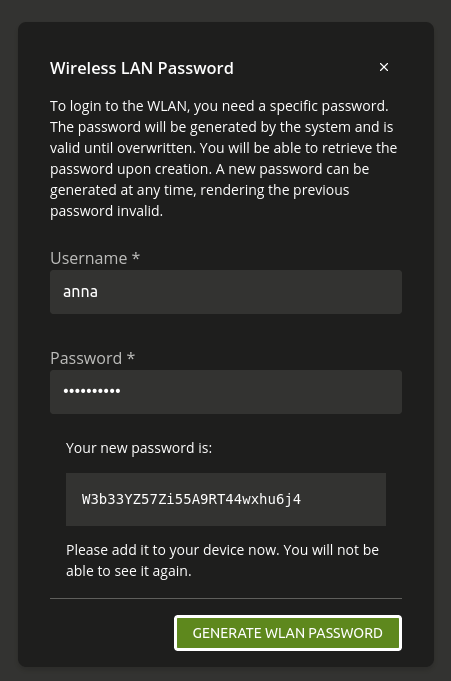
Fig. 11.5 The page in the Self Service to get a RADIUS specific password#
UCS allows configuring the password quality for the auto generated service specific passwords through the following Univention Configuration Registry Variables. For a description, see the references to the respective generic password quality settings.
RADIUS password quality parameter |
Generic password quality parameter |
|---|---|
|
|
|
|
|
|
|
|
|
|
|
Important
The settings in the password/quality/** Univention Configuration Registry Variables don’t have an effect on the service specific password.
To configure the password quality, choose the scenario on the following tabs that matches your environment where you installed the RADIUS app.
To configure the password quality, use the following steps.
- Prerequisite
You have the RADIUS app installed on the Primary Directory Node.
For available password quality parameters, either look at Table 11.25, or at your system.
On the Primary Directory Node, open the command-line and lookup the available password quality parameters:
$ ucr search password/radius/quality
Pick the parameter that you want to change and set the respective Univention Configuration Registry Variable, for example the minimal password length.
$ ucr set password/radius/quality/length/min=32
To configure the password quality, use the following steps.
- Prerequisite
You have the RADIUS app installed on a UCS system other than the Primary Directory Node.
For available password quality parameters, either look at Table 11.25, or at your system.
On the UCS system that has the RADIUS app installed, open the command-line and lookup the available password quality parameters:
$ ucr search password/radius/quality
Pick the parameter that you want to change and set the respective Univention Configuration Registry Variable, for example the minimal password length. On the Primary Directory Node, open the command-line and run the following command:
$ ucr set password/radius/quality/length/min=32
Regardless the scenario, you finally need to restart the UDM HTTP REST API on the Primary Directory Node. Open the command-line and run the following command.
$ systemctl restart univention-directory-manager-rest.service
11.6.2.3. MAC filtering#
By default access to the network is allowed for every device (assuming the used
username has access). It can be restricted to only allow specific devices. This
can be enabled by setting the Univention Configuration Registry Variable radius/mac/whitelisting to
true. When enabled, the device used to access the network is looked up via
the LDAP attribute macAddress and the resulting computer object must have
network access granted (either directly or via one of its groups), too.
11.6.2.4. MAC Authentication Bypass with computer objects#
MAC Authentication Bypass (MAB) is a proprietary fallback mode to 802.1X for devices that don’t support 802.1X authentication, such as network printers or wireless phones. MAB is an option that allows such devices to authenticate with the network using their MAC address as their username.
This section describes how to use a device’s MAC address for authentication
and assign them a VLAN to the corresponding network infrastructure through MAB.
To activate MAC Authentication Bypass, set the Univention Configuration Registry Variable
freeradius/conf/allow-mac-address-authentication to true.
Important
Devices that authenticate using MAB ignore network access settings:
Univention Configuration Registry Variable
radius/mac/whitelistingThe checkbox Allow network access at the computer object and in the group setting
Warning
Attackers can spoof MAC addresses. Consider any port as compromised where your switch allows to use MAB. Make sure you have put appropriate measures in place to still keep your network secure.
To assign the VLAN ID to a computer, you need to add it to the group of the computer object with the respective VLAN ID. In the UCS management system, follow these steps:
Open .
Click the computer object to edit.
Go to .
To add a group with VLAN IDs, click + ADD, select
Virtual LAN IDfrom the Object property drop-down, and activate the appropriate group to add it.To save, click ADD in the Add objects dialog and SAVE in the Advanced settings.
To assign the VLAN ID to a user group, you need to add it to the user group settings. In the UCS management system, follow these steps:
Open .
Click the user group object to edit or create a new user group.
Go to .
Enter the VLAN ID as number into the field Virtual LAN ID.
To save, click SAVE.
If a computer object has assigned several groups with VLAN IDs,
UCS selects the VLAN ID with the lowest number and assigns it.
To configure a default VLAN ID, set it as value to the Univention Configuration Registry Variable
freeradius/vlan-id.
After you completed the configuration, the Radius server returns the assigned VLAN ID to requests with the given MAC address.
UCS stores the MAC address in the LDAP directory as lowercase string with the
colon (:) as separator, for example 00:00:5e:00:53:00.
Added in version 5.0-6-erratum-1011: With UCS 5.0 erratum 1011 the Radius server can handle different formats of the MAC addresses for the username when using MAB.
Devices that use MAB, use their MAC address as username and they may use different formats for it. The Radius server supports different case-sensitive formats. The following list shows the tested formats:
XX:XX:XX:XX:XX:XXXX-XX-XX-XX-XX-XXXX.XX.XX.XX.XX.XXXXXX.XXXX.XXXXXXXXXXXXXXXX
Note
For non-standard formats, you can configure a regular expression in the Univention Configuration Registry Variable
freeradius/conf/mac-addr-regexp to match your custom MAC address format.
Depending on your regular expression, the previously listed formats may not work anymore.
Important
All devices that use MAB, need to have the same password set,
because service specific passwords don’t work,
and the switch must know the password.
You can only configure one device password in the switch.
You can make up your own password for the devices using MAB,
for example mab request format attribute 2 password1.
If the network infrastructure provides a different format,
you can often reconfigure the format.
For example, for Cisco switches, you can use mab request format attribute 1 groupsize 2 separator : lowercase
as described in
Configurable MAB Username and Password.
11.6.2.5. Access point administration#
All access points must be known to the RADIUS server. An access point can either
be configured in the file /etc/freeradius/3.0/clients.conf or through
the UMC module Computers. For each access point a random shared
secret should be created (e.g. by using the command makepasswd). The
shortname can be chosen at will.
Example entry for an access point:
client AP01 {
    secret = a9RPAeVG
    ipaddr = 192.0.2.101
}
To configure an access point using the UMC module Computers create or select a computer object and activate the RADIUS-Authenticator option (RADIUS option). An IP client is a good choice as a computer object for access points. The RADIUS settings can be edited on the RADIUS tab of the object (RADIUS authenticator options). At least the IP address and the shared secret must be configured. The virtual server and NAS type options usually do not need to be changed.
Access points that are configured via the UMC module Computers are
available to all RADIUS servers in the domain. To achieve this, the Univention Directory Listener
will write them into the file
/etc/freeradius/3.0/clients.univention.conf and restart the RADIUS
server. In order to merge multiple changes in one restart, this happens with a
slight delay (around 15 seconds). New access points can only access the RADIUS
server after this restart.
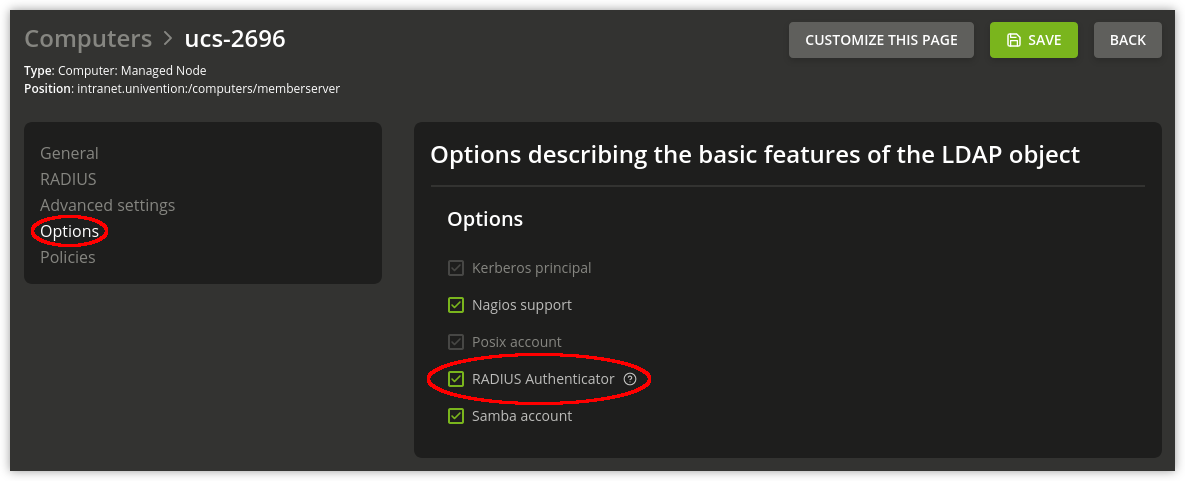
Fig. 11.6 RADIUS option#
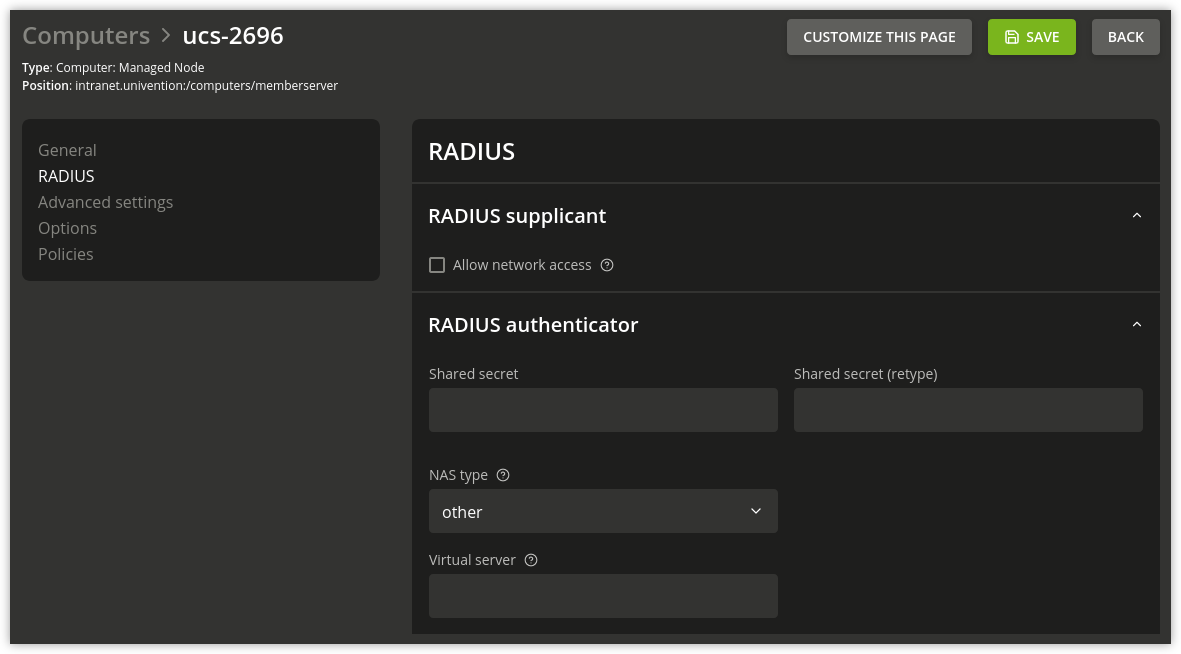
Fig. 11.7 RADIUS authenticator options#
11.6.2.6. Access point and client configuration#
The access points must then be configured to use 802.1x (“WPA Enterprise”)
authentication. And the RADIUS server address should be set to the address of
the server, where the RADIUS app is installed. The password must be set to the
secret from the clients.conf entry for that access point.
Wireless clients have to be configured to use WPA with PEAP and MSCHAPv2 for authentication.
11.6.2.7. VLAN IDs#
Virtual Local Area Networks (VLANs) can be used to separate the traffic of users at the network level. UCS can be configured to return a VLAN ID in the Radius response of the Radius authentication process according to RFC 3580 / IEEE 802.1X. You find further information in Configure VLAN.
The VLAN ID for a user can be configured by assigning the user to a group with a VLAN ID.
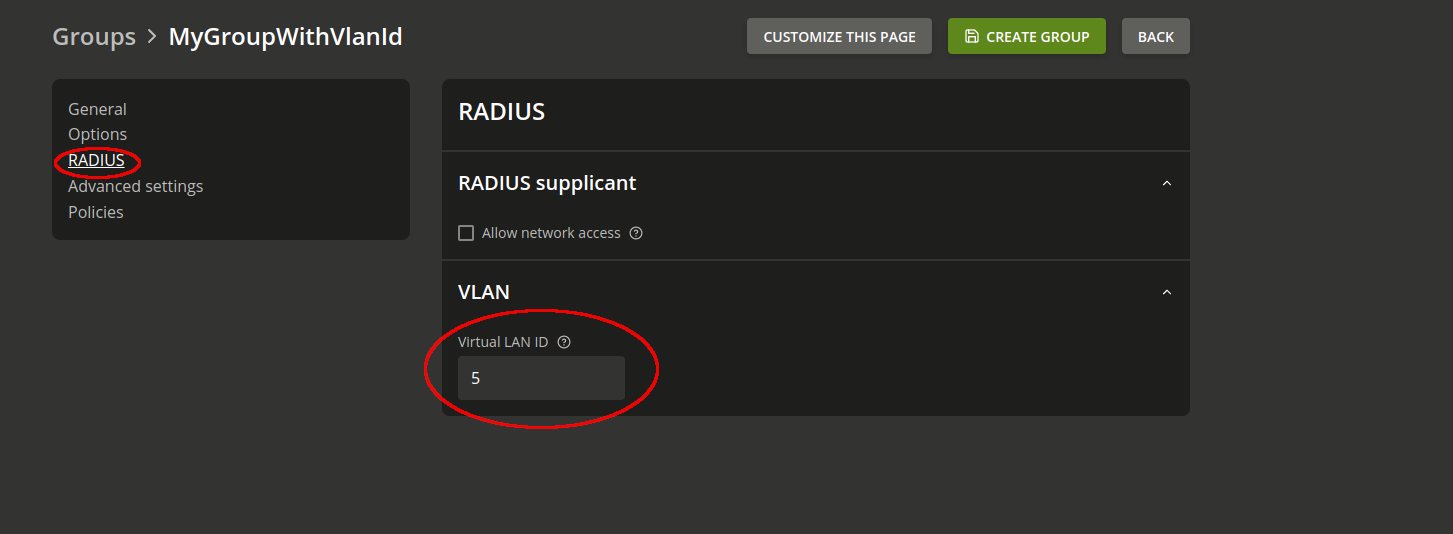
Fig. 11.8 Assigning VLAN ID to a user group#
A default VLAN ID can be configured in the Univention Configuration Registry Variable freeradius/vlan-id. This default
VLAN ID will be returned if the user is not a member of a group with a VLAN ID. The Radius
response will not contain any VLAN ID in case the user is not a member of a group with
VLAN ID and no default VLAN ID is defined.
11.6.3. Debugging#
The RADIUS app has a log file under
/var/log/univention/radius_ntlm_auth.log. The log verbosity can the
controlled via the Univention Configuration Registry Variable freeradius/auth/helper/ntlm/debug. The
FreeRADIUS server uses the log file:
/var/log/freeradius/radius.log.
The tool univention-radius-check-access can be used to evaluate the current access policy for a given user and/or station ID (MAC address). It can be executed as root on the server where univention-radius its installed:
root@primary211:~# univention-radius-check-access --username=stefan --station-id none
DENY 'uid=stefan,cn=users,dc=ucs,dc=example'
'uid=stefan,cn=users,dc=ucs,dc=example'
-> DENY 'cn=Domain Users,cn=groups,dc=ucs,dc=example'
-> 'cn=Domain Users,cn=groups,dc=ucs,dc=example'
-> -> DENY 'cn=Users,cn=Builtin,dc=ucs,dc=example'
-> -> 'cn=Users,cn=Builtin,dc=ucs,dc=example'
Thus access is DENIED.
root@primary211:~# univention-radius-check-access --username=janek --station-id none
DENY 'uid=janek,cn=users,dc=ucs,dc=example'
'uid=janek,cn=users,dc=ucs,dc=example'
-> DENY 'cn=Domain Users,cn=groups,dc=ucs,dc=example'
-> ALLOW 'cn=Network Access,cn=groups,dc=ucs,dc=example'
-> 'cn=Domain Users,cn=groups,dc=ucs,dc=example'
-> -> DENY 'cn=Users,cn=Builtin,dc=ucs,dc=example'
-> -> 'cn=Users,cn=Builtin,dc=ucs,dc=example'
-> 'cn=Network Access,cn=groups,dc=ucs,dc=example'
Thus access is ALLOWED.
root@primary211:~#
It prints a detailed explanation and sets the exit code depending on the result
of the access check (0 for access granted, 1 for access denied).